Maytag MED6000XG Support Question
Maytag MED6000XG Support Question
Find answers below for this question about Maytag MED6000XG.Need a Maytag MED6000XG manual? We have 4 online manuals for this item!
Question posted by Tom24afte on June 14th, 2014
How Remove Lid From Med6000x
The person who posted this question about this Maytag product did not include a detailed explanation. Please use the "Request More Information" button to the right if more details would help you to answer this question.
Current Answers
Related Maytag MED6000XG Manual Pages
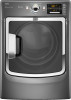
Owners Manual - Page 5
...n Cleaning your energy savings.
n Use no more drying time or when using a Steam Cycle. n Remove lint and debris from clothes that needs a little more than those without. 100% cotton items may vary...2 years. The venting system attached to efficiently dry laundry.
n It is not recommended with heat, dryers require good air flow to the dryer plays a big role in the load. Wash any ...
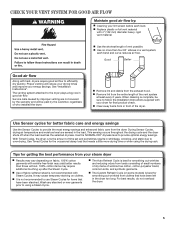
Owners Manual - Page 6
... detailed descriptions of a Timed Dry or Small Load cycle.
6 See Cycle Guide for your dryer. Press again to stop/cancel a cycle at any time.
2 CYCLE CONTROL KNOB Use your dryer's cycle control knob to turn the dryer on your laundry load. CONTROL PANEL AND FEATURES
Not all features and cycles are available on all...
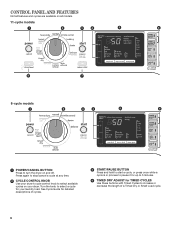
Owners Manual - Page 7
...hold the Cycle Signal button for future loads. Drum Light Press to help smooth wrinkles.
The dryer will also turn Steam back on when the door is for available settings on each cycle. This... Duty, Bedding, Normal, or Denim cycle to help reduce wrinkling. This will be unable to remove a load immediately, press Wrinkle Prevent to add up and the Estimated Time Remaining (for Sensor ...
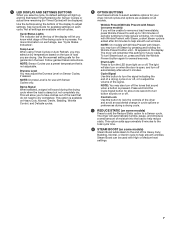
Owners Manual - Page 8
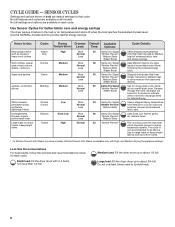
...Steam Boost
Stepped drying uses High heat initially, followed by Medium heat for improved moisture removal and enhanced fabric care. Undergarments,
Delicate
Extra Low
blouses, lingerie,
performance wear
More... cycle with Steam (on some models). Use for that cycle. Medium load: Fill the dryer drum up to about 3/4 full. SENSOR CYCLES
Settings and options shown in bold are default...
Owners Manual - Page 9
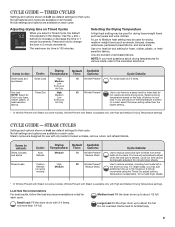
...noted for a load, select the lower setting rather than 1/4 full.
Large load: Fill the dryer drum up to reduce wrinkles, including from small loads of the temperature to tumble freely.
9... minute increments using the Timed Dry adjust buttons. Medium load: Fill the dryer drum up to loosen wrinkles, remove odors, and refresh fabrics.
A Low to about drying temperatures for use with...
Owners Manual - Page 10
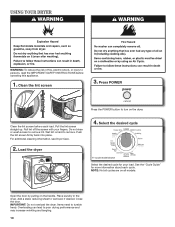
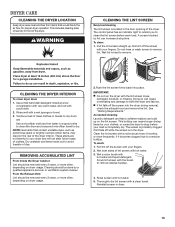
... door. Push the lint screen firmly back into place. IMPORTANT: Do not overload the dryer. USING YOUR DRYER
WARNING: To reduce the risk of fire, electric shock, or injury to remove. Pull the lint screen straight up. Roll lint off the screen with your load. ... to poor drying performance and may increase wrinkling and tangling.
10 Clean the lint screen
3. Place laundry in the dryer.
Owners Manual - Page 11
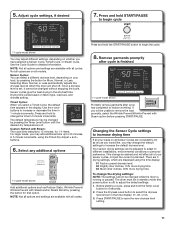
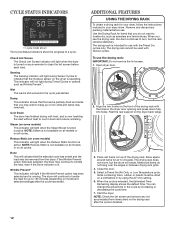
...option before pressing START/PAUSE. temp level dryness level damp signal
11-cycle model shown
Promptly remove garments after cycle is finished
+
-
Before starting a cycle, press and hold START/PAUSE..., or Less automatically adjusts the dryness level at which are 3 drying settings, which the dryer will affect all of your load, by pressing the button for detailed information. Use the ...
Owners Manual - Page 12
... models) This indicator will not light during Sensor Cycles to indicate that you may removed. Steam (on the dryer is active. Done This will continue to tumble the load for up or iron ...the Reduce Static function is running.
If the Wrinkle Prevent option has been selected, the dryer may be removed from items dried on model and selected settings) after the cycle is now tumbling the ...
Owners Manual - Page 13
... bottle to clean the drum and a second microfiber towel to remove.
See "Venting Requirements." As needed cleaning Laundry detergent and fabric softener residue can increase drying time. To wash: 1. Roll lint off the screen with the brush to avoid transfer of the dryer.
Tumble a load of clothes. Push the lint screen firmly back...
Owners Manual - Page 14
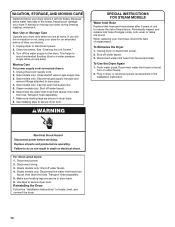
.... Turn on vacation or not using your dryer during freezing weather, winterize it.
Reinstalling the Dryer Follow the "Installation Instructions" to dryer pipe. 4. Unplug dryer or disconnect power. 2. Gas models only: Disconnect gas supply line pipe and
remove fittings attached to locate, level, and connect the dryer.
14 Turn off water faucet. 4. Make sure leveling legs...
Owners Manual - Page 16
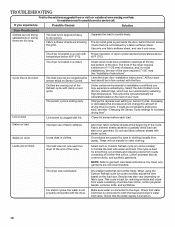
...Clean lint screen before each load. Loose dyes in a closet. The dryer was not removed from dryer at the top and bottom of the cycle. Do not use it is... consisting of fabric softener. Under certain environmental or installation conditions you experience
Possible Causes
Solution
Dryer Results (cont.)
Clothes are not drying satisfactorily or drying times are consistently ending too early...
Owners Manual - Page 17
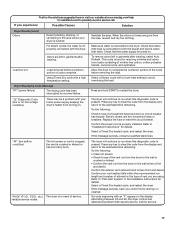
... length and number of elbows for the type of service.
variable service codes. The dryer will continue to the estimated time remaining.
Odors are left in the Installaton Instructions for details. Load removed before removing the load.
The dryer will continue to the estimated time remaining. Replace the fuse or reset the circuit breaker...
Owners Manual - Page 18
... electrical or plumbing codes, or use of products not approved by calling Maytag. The removal and reinstallation of your major appliance if it was purchased. DISCLAIMER OF IMPLIED WARRANTIES
IMPLIED...be found by checking the "Assistance or Service" section or by Maytag.
5. MAYTAG® LAUNDRY WARRANTY
LIMITED WARRANTY
For one year from the date of purchase, when this major appliance is ...
Installation Instructions - Page 2
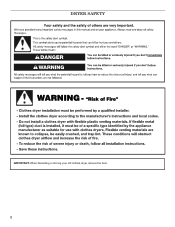
DRYER SAFETY
IMPORTANT: When discarding or storing your old clothes dryer, remove the door. 2
Installation Instructions - Page 5
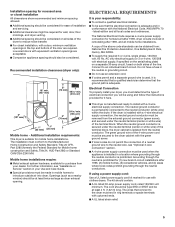
... all local codes and ordinances. The installation must be removed from the neutral conductor. The neutral ground conductor is your Use and Care Guide.
■■Special provisions must end in .2 min. (310 cm2)
ELECTRICAL REQUIREMENTS
It is permanently connected to the dryer cabinet with upturned ends.
■■A UL listed strain...
Installation Instructions - Page 8

..., silver-colored terminal block screw (B). Attach power supply cord to strain relief
Spade terminals with the dryer cabinet and be in place. Tighten screw. A
4-wire receptacle (NEMA
4-prong plug
B
type 14-30R)
C D
Remove the screws from green external ground conductor screw (A).
2. Put the tabs of the two clamp sections (C) into the hole...
Installation Instructions - Page 9
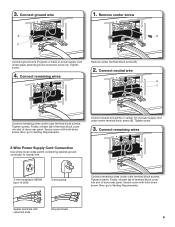
... terminal block screw (B). Finally, reinsert tab of terminal block cover into slot of dryer rear panel. Now, go to Venting Requirements.
Tighten screw.
3. Spade terminals with... tab of terminal block cover into slot of dryer rear panel. Tighten screws. Secure cover with hold -down screw. Connect remaining wires
Remove center terminal block screw (B).
2. Secure cover...
Installation Instructions - Page 10
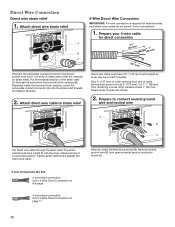
... for direct connection
31 (89
⁄2" mm)
(251"mm)
(127
5" mm)
Direct wire cable must have a tight fit with the dryer cabinet and be moved if needed. Remove center terminal block screw (B). Remove neutral ground wire (E) from end of cable, leaving bare ground wire at 5" (127 mm). Shape ends of outer covering from...
Installation Instructions - Page 11

...wire, cut bare wire even with hold-down screw. Connect neutral wire
B C
Place hooked ends of dryer rear panel. Tighten screw.
11 Squeeze hooked ends together and tighten screw.
4. Tighten screw.
5. Connect...). Now, go to neutral wire.
1. Strip insulation back 1" (25 mm). Remove center screw
A
F
B
Connect ground wire (green or bare) (F) of direct wire cable under green external...
Installation Instructions - Page 12

... ground wire and neutral wire
Connect neutral ground wire (E) and neutral wire (white or center wire) (C) of dryer rear panel. Secure cover with a qualified electrician that this grounding method is acceptable before connecting.
1. Tighten screw.
3.
Remove neutral ground wire (E) from green external ground conductor screw (A).
Secure cover with hold -down screw. Connect...
Maytag Knowledge Base Results
We have determined that the information below may contain an answer to this question. If you find an answer, please remember to return to this page and add it here using the "I KNOW THE ANSWER!" button above. It's that easy to earn points!-
Fabric is too hot - Dryer
... laundry items removed from the dryer before Cool Down may feel very warm. dryer does not dry Cycle time is too hot - Dryer Dryer Loads are too hot when removed from the dryer. All cycles end with a Cool Down, which cools the fabric for easy handling and reduced wrinkling. Items removed before... -
Loads are wrinkled - Neptune® front-load washer
... to allow the clothes to find my model number? An overloaded washer keeps the laundry items from the dryer to the cold-water faucet. Try selecting a lower spin speed or a cycle, such... spinning out water, wet loads - Neptune® Reversed inlet hoses can I find them online. Remove the load as soon as Wrinkle Free or Wrinkle Control, with high-speed spinning such as... -
Loads are wrinkled - Top-load HE washer with Dispenser Drawer
...water setting wrinkles into garments that is tightly packed in the washer is also important to promptly remove loads from 700 to 800 rpm to extract the maximum amount of the cycle, wrinkles...Top-load HE washer with Dispenser Drawer - Remove the load as soon as Heavy Duty or Normal? The washer high spin speeds range from the dryer to the faucets. Top-load washer Not ...
Similar Questions

Remove Lint Filter Holder
I need to remove the lint filter holder to get all the lint from the dryer. I have found 4 screws, 2...
I need to remove the lint filter holder to get all the lint from the dryer. I have found 4 screws, 2...
(Posted by davehard 2 years ago)

Removal Of Top Of Dryer
How does one remove the top to repaint it?
How does one remove the top to repaint it?
(Posted by Anonymous-168376 2 years ago)


How To Remove Front Panel Of Dryer?
How do you remove the front panel of a Maytag gas dryer model # MGDB200QV?
How do you remove the front panel of a Maytag gas dryer model # MGDB200QV?
(Posted by vitojeffords 11 years ago)

How Do I Remove And Replace A Dryer Door Switch On A Maytag Med9700sq
(Posted by Anonymous-56791 12 years ago)