Maytag MED5700TQ Support Question
Maytag MED5700TQ Support Question
Find answers below for this question about Maytag MED5700TQ - 29" Electric Dryer.Need a Maytag MED5700TQ manual? We have 1 online manual for this item!
Question posted by kruitfam71 on October 28th, 2013
What Was Improved From The Maytag Med5700tqo To The Current Model Of The Medc300
What was improved upon in the now discontinued Maytag electric dryer, Model # MED5700TQO? When was this model made? What is the new improved model #?
Current Answers
Related Maytag MED5700TQ Manual Pages
Use and Care Guide - Page 3

...; Read all safety messages. IMPORTANT SAFETY INSTRUCTIONS
WARNING: To reduce the risk of fire, electric shock, or injury to reduce the chance of injury, and tell you what can kill ... containing foam rubber or similarly textured rubber-like materials.
■ Clean lint screen before using the dryer, follow the safety alert symbol and either the word "DANGER" or "WARNING." Always read and ...
Use and Care Guide - Page 4
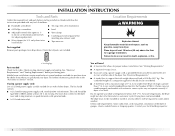
... installing new exhaust vent)
■ Tape measure
Parts supplied Remove parts packages from dryer. Place dryer at the end of 1" (2.5 cm) under entire dryer. (If slope is greater than 1" [2.5 cm], install Extended Dryer Feet Kit, Part Number 279810.) Clothes may not operate correctly if dryer is not level. Failure to water and/or weather. See "Electrical Requirements...
Use and Care Guide - Page 5

...57.8 cm)
*27 ³⁄₄" (70.5 cm)
29" (73.66 cm)
*Most installations require a minimum 5" (12.7 cm) clearance behind the dryer for purchase from your dealer.
■ Special provisions must be... require:
■ Metal exhaust system hardware, which is suitable for this dryer. Recommended spacing should be considered for the following spacing dimensions are required. ...
Use and Care Guide - Page 6

...9632; To contact a qualified electrical installer.
■ To be sure that connect to the dryer must be used when the... All current-carrying wires must have four 10-gauge copper wires and match a 4-wire receptacle of the line. The National Electric Code...: Use a UL listed power supply cord kit marked for (1) new branch-circuit installations, (2) mobile homes, (3) recreational vehicles, and ...
Use and Care Guide - Page 7

... the "Assistance or Service" section. For further information, please reference the service numbers located in doubt as to whether the dryer is properly installed and grounded in a risk of least resistance for electric current. The plug must be plugged into a standard 14-30R wall receptacle. grounding conductor can result in accordance with the...
Use and Care Guide - Page 8

... hold in death, fire, or electrical shock.
1. Terminal block cover B. Put the tabs of the two clamp sections into the hole below terminal block opening
E
F
3. Clamp section D. Failure to green ground connector.
Center, silver-colored terminal
block screw D. Only
Direct Wire
WARNING
WARNING
Fire Hazard
Use a new UL listed 30 amp power...
Use and Care Guide - Page 9

... the dryer cabinet and be in a horizontal position. Tighten strain relief screw against the direct wire cable.
A B
C
A. Now complete installation following instructions for your type of electrical connection:...box*
4-wire connection: Direct Wire
A UL listed, 120/240-volt minimum, 30-amp, dryer power supply cord*
3-wire connection: Power supply cord
3-wire direct
A fused disconnect or ...
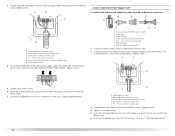
Use and Care Guide - Page 10

... screw. Tighten screw. Ring terminals
1.
B. Ground prong D. Remove center silver-colored terminal block screw.
2. Tighten screw. E
D
A. You have completed your electrical connections. Dotted line shows position of dryer rear panel. Neutral ground wire
4. Neutral ground wire
5. B
F
A
3. Neutral wire (white or center wire) D. ¾" (1.9 cm) UL listed strain...
Use and Care Guide - Page 12
...Center silver-colored terminal block screw D. Insert tab of terminal block cover into slot of dryer rear panel. Center silver-colored terminal block screw C. Loosen or remove center silver-colored...with up turned ends E 1.9 cm) UL listed strain relief F. You have completed your electrical connections. Connect ground wire (green or bare) of the terminal block. Tighten screw. Neutral ...
Use and Care Guide - Page 15

... shown here. Better
Improper venting can be fully extended and supported when the dryer is acceptable.
4" (10.2 cm)
2½" (6.4 cm)
■ ...cap the vent to keep rodents and insects from your dealer or by calling Maytag Services.
Do not use duct tape. If this is recommended to seal all ... vent is a new vent system
Vent material ■ Use a heavy metal vent. Housecleaning ...
Use and Care Guide - Page 16

... Number 4396037 - 0" (0 cm) to 18" (45.72 cm) mismatch
Part Number 4396011 - 18" (45.72 cm) to 29" (73.66 cm) mismatch
Part Number 4396014 - 29" (73.66 cm) to a noncombustible portion of the dryer. Periscope installation
NOTE: The following kits for your exhaust installation type
Recommended exhaust installations Typical installations vent the...
Use and Care Guide - Page 17

....
1. Firmly grasp the body of the vent to secure vent. Gently lay the dryer on the corner posts until the diamond marking is close to its final location. Use...Angled hoods
58 ft (17.7 m) 28 ft (8.5 m)
48 ft (14.6 m) 23 ft (7 m)
38 ft (11.6 m) 19 ft (5.8 m)
29 ft (8.8 m) 17 ft (5.2 m)
21 ft (6.4 m) 15 ft (4.6 m)
Install Vent System
1. Use the straightest path possible. To protect the floor...
Use and Care Guide - Page 18

... a wood block. Do not pull on dryer, grasp sides of hinge slot. Check that there are in large part of outer door and gently lift to protect surface.
2. Do not crush or kink vent. 3. (On gas models) Check that the vent is clean. Remove bottom screws from cabinet side of door (4 screws...
Use and Care Guide - Page 19

...left side of slots. If the dryer will go back through the steps to adjust alignment.
Insert screws into an outlet and/or electrical supply is on the dryer. 8. If there is needed, ... for 20 minutes and start , check the following :
■ There may notice a burning odor when the dryer is closed.
11. Be certain to inner door panel so handle is level. Use a small, flat-blade ...
Use and Care Guide - Page 20
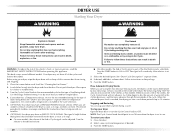
... of fire, electric shock, or injury to the desired volume.
20
■ On other models, the End ...new cycle and temperature (if desired).
3. Your dryer may have an END OF CYCLE SIGNAL. If your dryer has a Temperature selector, set to remove dust from the dryer...it stops. ■ On some models, temperature is reached, the dryer goes into the dryer and close the door. Items ...
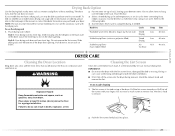
Use and Care Guide - Page 21
...
Clean lint screen before each load. Push the lint screen firmly back into the dimples on frame. If your model. Slide rear pegs into place.
21
IMPORTANT: ■ Do not run the dryer with the lint screen loose, damaged, blocked or missing.
Reset cycle to remove lint. Do not remove the lint...
Use and Care Guide - Page 23
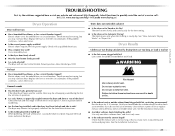
... vent. Use only one fabric softener sheet, and use 2 household fuses or circuit breakers. Electric dryers use it only once.
■ Is the exhaust vent the correct length?
Check the front...23 www.maytag.com/help - Dryer Results
Clothes are not drying satisfactorily, drying times are too long, or load is the dryer level front to back and side to vibrate. Run the dryer for a ...
Use and Care Guide - Page 25

...dryer with any questions or concerns at www.whirlpoolparts.ca. When calling, please know the purchase date and the complete model... new MAYTAG®...dryer connector installation kit 4 ft (1.2m) dryer cord, 3-wire, 30 amp 4 ft (1.2m) dryer cord, 4-wire, 30 amp 6 ft (1.8m) dryer cord, 4-wire, 30 amp Dryer vent lint brush All-purpose appliance cleaner Laundry supply storage cart Drying rack - fits 29...
Use and Care Guide - Page 26

... of God, improper installation, installation not in accordance with the product, Maytag Corporation or Maytag Limited (hereafter "Maytag") will need to know your major appliance, to replace or repair house... inaccessible location or is not installed in accordance with electrical or plumbing codes, or use your complete model number and serial number. IMPLIED WARRANTIES, INCLUDING WARRANTIES ...
Use and Care Guide - Page 44

...;.-U. Tous droits réservés.
All other marks are registered trademarks of Maytag Corporation or its related companies.
Toutes les autres marques sont des marques de commerce de Maytag Corporation ou de ses compagnies affiliées.
8/07 Printed in Canada. MAYTAG et le symbole "M" sont des marques déposées de...
Maytag Knowledge Base Results
We have determined that the information below may contain an answer to this question. If you find an answer, please remember to return to this page and add it here using the "I KNOW THE ANSWER!" button above. It's that easy to earn points!-
Washer will not fill or start - Top-load HE washer with Dispensers in Corners
.../stopping during the cycle? Check electrical source or call an electrician.... be connected to start a new cycle. If the ...cycle? Is there oversudsing? Cancel the current cycle. Top-load washer with Dispensers ...cycle has started ? Press Start to improve fabric care. Are you washing a large...? Slightly turn on some models only) Your washer will not... -
Loads are damp; dryer does not dry
...much dryer clothes, approximately 30% more drying time) The Dryness level settings cannot be changed while the dryer is running. Electric Dryer Dryer does not heat - To select a new drying...models only) If all of your new preset drying setting for 1 second, followed by the current drying setting. Gas dryer Damp loads or long drying times - While cycling through the settings, the current... -
Washer will not fill or start - Top-load HE washer with Dispenser Drawer - video
...current cycle. Re-select your desired cycle and press Start. video These sensing spins may not start a new...left closed during load sensing and to improve fabric care. Your washer will unlock briefly ... been selected and held for leaks. Check electrical source or call an electrician. Press and ...the washer started . Enter Model Number How do I find my model number? Top-load washer ...
Similar Questions

Is Maytag Mgdc400vw - Centennial 29' Gas Dryer Energy Star Efficient?
Is Maytag MGDC400VW - Centennial 29" Gas Dryer Energy Star efficient?
Is Maytag MGDC400VW - Centennial 29" Gas Dryer Energy Star efficient?
(Posted by polinabess 8 years ago)

How To Replace The Dryer Belt On Maytag Med5700tq
(Posted by bgkg2 9 years ago)

What Is The Age Of This Dryer
(Posted by gayleraek 10 years ago)

How To Install A 4 Prong Dryer Cord To A New High Efficiency Maytag Dryer
(Posted by parratbongo 10 years ago)
