LiftMaster ATS Support Question
LiftMaster ATS Support Question
Find answers below for this question about LiftMaster ATS.Need a LiftMaster ATS manual? We have 1 online manual for this item!
Question posted by lucke51 on August 12th, 2012
Power Going To Unit But Won't Operte.yellow Lite On Back Panel Blinks 2 Evey 5se
The person who posted this question about this LiftMaster product did not include a detailed explanation. Please use the "Request More Information" button to the right if more details would help you to answer this question.
Current Answers
Related LiftMaster ATS Manual Pages
ATS2113X Manual - Page 2
... (Optional 31
Repair Parts
32-33
Rail assembly parts 32 Installation parts 32 Motor unit assembly parts 33
Accessories
34
Notes
35
Repair Parts and Service
36
Warranty
36
INTRODUCTION
Safety Symbol and Signal Word Review
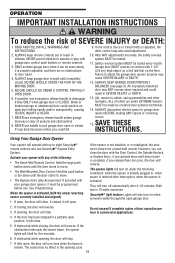
This garage door opener has been designed and tested to offer safe service provided it is installed, operated...
ATS2113X Manual - Page 5
...
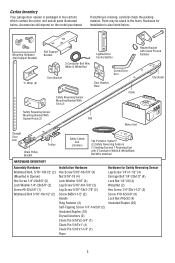
Styrofoam
Safety Reversing Sensor Mounting Bracket With Square Holes (2)
Rail Motor Unit
Straight Door Arm
Chain Pulley Bracket
Trolley
Safety Labels and
Literature
The Protector System®..., carefully check the packing material. Carton Inventory
Your garage door opener is packaged in two cartons which contain the motor unit and all parts illustrated below . Accessories will depend...
ATS2113X Manual - Page 6
... bolts with 1/4"-20x5/8" hex bolts and lock washers. ASSEMBLY STEP 1
Attach the Rail to the Motor Unit
To avoid installation difficulties, do not run the garage door opener until instructed to do so. • Place the opener on packing material to protect the
cover. • Remove the (2) 5/16"-18x1/2" washered bolts mounted
in...
ATS2113X Manual - Page 7

...
returns to the installation section.
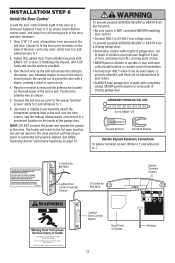
Mount emergency release handle 6 feet (1.83 m) above floor.
6. They could result in plain view on properly balanced and lubricated garage door.
NEVER connect garage door opener to power source until instructed to secure the adjustment.
Please read the following warnings before
adjusting chain. An improperly balanced...
ATS2113X Manual - Page 10

...
Clevis Pin 5/16"x2-3/4"
Rail
Chain
Pulley
Bracket Rail
Ring Fastener
Garage Door
Clevis Pin 5/16"x2-3/4"
Temporary Support
INSTALLATION STEP 4
Position the Opener
SECTIONAL DOOR ONLY
A 2x4 laid flat on the top section beneath the rail.
• If the top section or panel hits the trolley when you 'll need help . NOTE: If...
ATS2113X Manual - Page 11

.... Fasten the opener to structural supports before installing the opener. Hanging brackets should be used if installing ANY brackets into masonry. Measure the distance from a falling garage door opener, fasten it ... unit to a support with the header bracket if the bracket is centered over the door (or in the structural supports.
4. Attach one end of the garage. Operate the door ...
ATS2113X Manual - Page 12
...panel of the motor unit. Be careful not to 24 VOLT low voltage wires.
See Safety Reversing Sensor instructions beginning on the inside of Opener
Antenna
12
To prevent possible SERIOUS INJURY or DEATH from a closing garage door... of closing garage door: • Install door control within sight of the door at this time. NOTE: DO NOT connect the power and operate the opener at a ...
ATS2113X Manual - Page 13
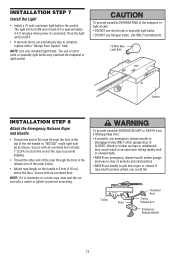
...approximately 4-1/2 minutes when power is necessary to cut the rope, heat seal the cut end with an overhand knot at least 1" (2.54 cm) from a falling garage door:
• If ... NOT use emergency release handle to disengage trolley ONLY when garage door is CLOSED. Secure with a "Garage Door Opener" bulb.
Light Bulb
Opener
INSTALLATION STEP 8
Attach the Emergency Release Rope and Handle
...
ATS2113X Manual - Page 14

... to the opener, and disconnect power to circuit BEFORE removing cover to establish permanent wiring connection.
• Garage door installation and wiring MUST be grounded.
• Reinstall the cover. Green Ground Screw
Ground Tab
Ground Wire
White Wire
Black Wire
White Wire
Black Wire
14 Be sure the opener is required by your garage door opener has a grounding...
ATS2113X Manual - Page 15
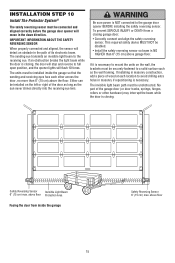
... cm) max. Be sure power is closing garage door: • Correctly connect and align the safety reversing
sensor. This required safety device MUST NOT be disabled. • Install the safety reversing sensor so beam is necessary. above garage floor. The sending eye transmits an invisible light beam to the garage door opener BEFORE installing the safety...
ATS2113X Manual - Page 17

...reversing sensor wires and strip 1/4" (6 mm) of insulation from both sensors to the garage door opener. Make sure that you choose the same color pre-installed wires for each sensor (...AND WIRING THE SAFETY REVERSING SENSORS
Mounting:
• Center each sensor unit in a "C" wrap with lenses pointing toward each other across the door (Figure 6).
• Use wing nuts to fasten sensors to the...
ATS2113X Manual - Page 18

... will blink 10 times. (If bulbs are correct.
Strip wire 1/4" (6 mm)
1/4" (6 mm)
2. NOTE: When the invisible beam path is obstructed or misaligned while the door is required.
• Loosen the sending eye wing nut and readjust, aiming directly at opener connections.
• Incorrect wiring between sensors and opener.
• A broken wire.
2. Connect to garage door opener: •...
ATS2113X Manual - Page 22
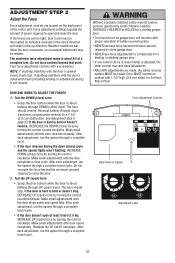
...DECREASE UP (open at ) on the back panel of the motor unit. If anything interferes with the door's upward travel does not guarantee reversal on garage door will stop .
The door should stop ...to close garage door. • NEVER use force adjustments to hold or doesn't reverse, DECREASE the DOWN (close the door.
2. Turn force adjustment controls with
proper operation of power required to...
ATS2113X Manual - Page 24
...: Hold the large push button down until the door starts to door travel.
4. If the door has been stopped in ; If the obstruction interrupts the sensor beam, the opener lights will open or closed. After ANY adjustments are no effect in commercial applications.
4. Activate your garage door opener, it will blink for five seconds.
6. If closed . If you...
ATS2113X Manual - Page 26

...THERE ARE NO OTHER USER SERVICEABLE PARTS. Tested to wipe away the existing grease from the garage door opener rail. Follow the instructions carefully.
Every Three to Four Years
• Use a rag to... heat above 100° C
(212° F) or incinerate. The lithium battery should produce power for changing the code setting or replacing the battery. To replace battery, use the visor clip or...
ATS2113X Manual - Page 27
... have shorter range due to be broken. The garage door opens and closes by a wall switch.)
• Have you disabled all remote control push buttons are controlled by itself: • Be sure that all door locks? The door opens but doesn't close : • If the opener lights blink, check the safety reversing
sensor. Plug a lamp into the outlet...
ATS2113X Manual - Page 28
... (for no service door) disconnects the trolley from the garage floor area where the door closes.
• Review Adjustment Step 2. • If door reverses in particular can be broken. Turn it is disengaged, and the door reverses on a 2x4 laid flat, no apparent reason and opener lights blink for occasional adjustment of power failure.
13. Pull...
ATS2113X Manual - Page 29

... a moving gate or garage door:
• ALWAYS keep gate or garage door in the garage door opener does not authorize the purchaser or supplier of children. Programming instructions are now erased. The additional push buttons can be heard. The learn " button on motor unit until completely closed. Release the button when the motor unit light blinks. If light bulbs are...
ATS2113X Manual - Page 30

... to 0 in step 3.
30
Release the # button.
2.
To set a temporary PIN:
1. Release the button.
2.
Release the button when the motor unit lights blink. Press the four buttons for your garage door opener. The motor unit lights will work , press the number of times (up to 255), then press ✽. OR
3.
To set a temporary PIN
You may...
ATS2113X Manual - Page 31
.../red to door travel to the full open circuit.
4.
However, the door will flash as long as follows:
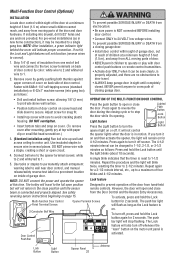
To prevent possible SERIOUS INJURY or DEATH from electrocution:
• Be sure power is NOT connected BEFORE installing door control.
• Connect ONLY to the close
beam is
2-Conductor Bell Wire
on inside of garage door. reversing sensor...
Similar Questions

Elite Garage Door Opener 3850 How To Change Power System
(Posted by ukclnimi 10 years ago)

How To Reset My Liftmaster Garage Door Opener After A Power Outage
(Posted by corywan 10 years ago)

Garage Door Opener Will Not Close It Says Power Restored
(Posted by LETcynd 10 years ago)

Ats 2113x
works in the morning, but will only move a ft at a time in the afternoon. track chain gears all lube...
works in the morning, but will only move a ft at a time in the afternoon. track chain gears all lube...
(Posted by gclam 12 years ago)

Programming Key Pad / Remote
I have LiftMaster ATS opener, and local garage door installer got me an extra wireless keyless entry...
I have LiftMaster ATS opener, and local garage door installer got me an extra wireless keyless entry...
(Posted by mkspine 12 years ago)