
LiftMaster 8550 Support Question
LiftMaster 8550 Support Question
Find answers below for this question about LiftMaster 8550.Need a LiftMaster 8550 manual? We have 1 online manual for this item!
Question posted by carol444 on May 25th, 2014
Liftmaster Excessive Force Error 41. . .
Not in owner's manual . . .how do I re-set my unit? I'm opening & closing manually for now. Plz help! Carol
Current Answers
Answer #1: Posted by online24h on June 7th, 2014 12:31 PM
online24h

Member since:
March 28th, 2014 Points: 531,660

Member since:
March 28th, 2014 Points: 531,660
Hello
See link below
http://errorcodein.com/liftmaster-8550-error-41_inid_518237
Or
http://www.realestate.com/advice/garage-door-opener-troubleshooting-tips-93815/
See link below
http://errorcodein.com/liftmaster-8550-error-41_inid_518237
Or
http://www.realestate.com/advice/garage-door-opener-troubleshooting-tips-93815/
Hope this will be helpful "PLEASE ACCEPT"
Related LiftMaster 8550 Manual Pages
8550 Manual - Page 1

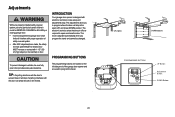
... panel of your garage door opener. ■ This garage door opener is ONLY compatible with MyQ™ and Security✚®2.0
accessories. ■ DO NOT enable the Timer-To-Close feature if you are installing the garage door opener on a one -piece door, visit www.liftmaster.com for future reference: Serial Number:
Date of Purchase:
■ Please read this manual and the enclosed...
8550 Manual - Page 2

....
• Disable ALL locks and remove ALL ropes connected to garage door BEFORE installation and operating garage door opener to avoid entanglement.
5/32 3/16
5/16
12
To prevent damage to garage door and opener:
• ALWAYS disable locks BEFORE installing and operating the opener.
• ONLY operate garage door opener at 120 V, 60 Hz to avoid malfunction and damage.
1/2
5/8
1/4
7/16...
8550 Manual - Page 3

...H17 Insulated Staples (10) Garage door opener
K
J. Depending on the garage door opener model purchased. The images throughout this manuals are not included in this manual. Trolley G. Door bracket
D. Belt L. Safety reversing sensors
with your garage door opener. Pulley and bracket
C. Straight door arm A
B
CF G
D E
F. GARAGE DOOR OPENER ASSEMBLY
A. Safety labels...
8550 Manual - Page 4

... attach with hex screws (H1).
. and styrofoam.
1.3 Fasten the rail with the previously removed
bolts.
1.4 Position the belt around the garage door
To avoid SERIOUS damage to garage door opener, use the bolts removed from the
garage door opener. Place the garage door
opener on the packing material to prevent
H1
To avoid possible SERIOUS INJURY to finger scratching. from moving...
8550 Manual - Page 6

... or DEATH:
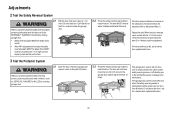
1. Place entrapment warning label on .contact with vehicles to avoid entanglement. 5. Install garage door opener only on inside of installation, test safety reversal system. ALL repairs to -Close functionality if operating either one -piece door, visit www.liftmaster.com for installation instructions. 6
READ AND FOLLOW ALL INSTALLATION WARNINGS AND INSTRUCTIONS. 2. An...
8550 Manual - Page 7

... (not provided) to securely fasten the 2x4 to structural supports.
1.3 Open your door to page 8 ceiling installation.
You can attach it to -Close functionality if operating either one -piece door, visit www.liftmaster.com for the top edge of travel as shown. An unbalanced garage door might NOT reverse when required.
or you can fasten the header...
8550 Manual - Page 9

... raised, pull the trolley release arm down to garage door, rest garage door opener rail on 2x4 placed on top section of door.
4.1 Remove the packing material and lift the
garage door opener onto a ladder. Connected Disconnected
9 NOTE: A 2x4 is not tall enough you will need help at this point.
4.2 Fully open the door and place a 2x4 (laid flat) under the rail...
8550 Manual - Page 10

...
(H3) to attach a support bracket (not provided) to structural supports. Below are three example installations. Measure the distance from a falling garage door opener, fasten it SECURELY to the
5.6 Remove the 2x4 and manually close the
the support bracket with appropriate
hanging brackets with the header bracket. header bracket.
(not provided)
H2
H9 H8
10 The...
8550 Manual - Page 13

...
9.1 Close the door.
the door) about 2" (5 cm). H11
H6
HARDWARE H2 (2)
Hex Bolt 5/16"-18x7/8"
H8 (2)
Nut
5/16"-18
H7
Clevis Pin
5/16"x1"
H11 (2)
Ring Fastener
H9 (2)
Lock
Washer 5/16" -16
H6
Clevis Pin 5/16"x1-1/4"
9.4 Align the straight door arm with the ring fastener (H11). trolley will re-engage automatically when the garage door opener...
8550 Manual - Page 14

..., and there are connected at
(1.5 m), and away from the wall.
Install the Door Control
1 Install the door control
INTRODUCTION
Compatible with door control push buttons or remote control transmitters. NOTE: Older LiftMaster accessories and third party products are not compatible.Your garage door opener is not necessary to cross path of the wire and separate the wires...
8550 Manual - Page 15

...
make sure you use the same wires that are
connected to the red and
white terminals on the garage door opener. Attach the wire to
the garage door opener.
Install the Door Control
k
1.5 Position the bottom hole of the door
control over the screw and slide down into place.
1.6 Lift the push bar up and mark the top...
8550 Manual - Page 23
... travel, it will reverse. If anything interferes with the door's
upward travel it will stop in the open door provides adequate clearance. The electronic controls sense the amount of force required to open and close (DOWN) position.
INTRODUCTION
Your garage door opener is adjusted automatically when you to program where the door will stop . The adjustments allow you program the...
8550 Manual - Page 25
... reversal system, persons (particularly small children) could be SERIOUSLY INJURED or KILLED by a closing garage door.
3.2 Press the remote control push button to
close the door 3 or 4 times to the fact that the sensor is misaligned or obstructed).
If the garage door opener closes the door when the safety reversing sensor is obstructed (and the sensors are made, the safety...
8550 Manual - Page 26

... the garage door
opener.
The battery will either glow solid orange indicating opener is unplugged.
2.2 Open and close the door using the
remote control or door control....LiftMaster part # 485LM for the green Battery Status LED to start flashing before proceeding to test the
battery. NOTE: The garage door opener may explode. Channel
Battery Status LED
2.3 Plug in the garage door opener...
8550 Manual - Page 31

... set the time interval before door closes.
SERVICE
Press and hold the second navigation button, then press the LIGHT button to be programmed through a series of 1-1/2 to 4-1/2 minutes.
SOFTWARE REVISION: Displays software version information.
TTC is to view the Service menu. DISPLAY ERROR: Displays any errors that have occurred. Refer to operate the garage door opener...
8550 Manual - Page 32

... on the remote control that you wish to operate with the additional remote controls or visit www.liftmaster.com. TO REMOTE
4 Remote Control:
Press the button on the side of your choice on the garage door opener. Then press the ENTER button.
Keyless Entry: Enter a 4-digit personal identification number (PIN) of the remote control...
8550 Manual - Page 35

... garage door opener clicks but no Bad logic board movement
Replace the logic board.
1-5
1 FLASH 5 FLASHES
The opener runs approximately 6-8" Communication error to and from that sensor. If the sending sensor
and the light(s) will not
The wires for the door Inspect door control wires for that sensor. If pre-wired
home, check the splices. Close the garage door using...
8550 Manual - Page 36

... FLASHES 5 FLASHES The opener runs
Communication error to Disconnect all power, remove cover, and locate the travel module. Check for binding or obstructions. touching the floor
4-4
4 FLASHES 4 FLASHES My door reverses for no
Obstruction, binding or Manually open and close the door. Check for binding or obstructions. My remote control wil not activate the garage door: • Verify...
8550 Manual - Page 37
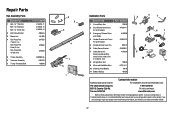
... are ordering a repair part please have the model number of the garage door opener. for 7 foot door
Belt - Repair Parts
Rail Assembly Parts
DESCRIPTION 1 Belt - Tucson, AZ 85706
For installation and service information call: 1-800-528-9131 Or visit us online at:
www.liftmaster.com
Before calling, please have the following information: part number, part...
8550 Manual - Page 39
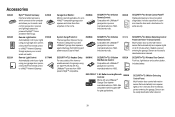
...174;2.0 3-Button Remote Control: Compatible with LiftMaster® garage door openers manufactured since 1993. includes a push bar to open /closed status for up to
4 MyQ™ compatible garage door
openers and close the door and a lock feature for 5 minutes when it detects a person entering the garage. Works with any LiftMaster® Garage Door opener manufactured since 1993. MyQ™...
Similar Questions

I Have Installed A Chamberlan Garage Door Opener And The Remote I Was Using Is
I have been using a Chamberlan garage door opener and its remote has been defective since of late.Pl...
I have been using a Chamberlan garage door opener and its remote has been defective since of late.Pl...
(Posted by donweera42 8 months ago)
Garage Door Opens After Shutting.
My Lift master 8550 inside keypad is Inside wall pad is model #880LM. outside keypad Model # is 877M...
My Lift master 8550 inside keypad is Inside wall pad is model #880LM. outside keypad Model # is 877M...
(Posted by BONNIECA92 2 years ago)

Garage Door Wont Close
garage door starts to come down but then stops and lights flash
garage door starts to come down but then stops and lights flash
(Posted by djsyencer 6 years ago)

Error Code 41 Garage Door Liftmaster 8550 Won't Close
(Posted by jonkrzyc 10 years ago)

Replacing Backup Battery In Garage Door Opener.
How do I replace the backup battery in the LiftMaster 3850 garage door opener? Are there instruction...
How do I replace the backup battery in the LiftMaster 3850 garage door opener? Are there instruction...
(Posted by melindanannin 12 years ago)