
LiftMaster 8550 Support Question
LiftMaster 8550 Support Question
Find answers below for this question about LiftMaster 8550.Need a LiftMaster 8550 manual? We have 1 online manual for this item!
Question posted by jeakin19 on April 8th, 2015
Error Message 11
Error message 11 is displayed. Lights blink on and off and door will not close. How should I solve this problem?
Current Answers
Answer #1: Posted by TommyKervz on April 9th, 2015 3:15 AM
TommyKervz

Member since:
January 10th, 2013 Points: 17,776,813

Member since:
January 10th, 2013 Points: 17,776,813
Safety sensors are misaligned or were momentarily obstructed. Realign both sensors to ensure both LEDsare steady and not flickering. Make sure nothing is hanging or mounted on the door that would interruptthe sensor's path while closing. Download the user manual here and refer to page 35-36 for more troubleshooting instructions.
Related LiftMaster 8550 Manual Pages
8550 Manual - Page 1

... installation instructions.
. Belt Drive Garage Door Opener Model 8550
FOR RESIDENTIAL USE ONLY
Write down the following information for future reference: Serial Number:
Date of Purchase:
■ Please read this manual and the enclosed safety materials carefully! ■ Fasten the manual near the garage door after installation. ■ The door WILL NOT CLOSE unless the Protector System®...
8550 Manual - Page 2

... damage to garage door and opener:
• ALWAYS disable locks BEFORE installing and operating the opener.
• ONLY operate garage door opener at 120 V, 60 Hz to offer safe service provided it . An unbalanced garage door may be installed above the center of damage to the garage door.
2. Check the Door
1. Release the door.
If your garage door and/or the garage door opener if you...
8550 Manual - Page 3

... attached to the accessory and are for these accessories will vary depending on your specific model, other accessories may look different. Door control
M. Safety labels and literature
H
L M
J
N O I . Depending on the garage door opener model purchased. Emergency release rope and handle H. The images throughout this manuals are not included in this manual. Pulley and bracket...
8550 Manual - Page 4

... rail with the previously removed
bolts.
1.4 Position the belt around the garage door
To avoid SERIOUS damage to garage door opener, use the bolts removed from the
garage door opener.
from moving garage door opener:
1.1 Remove the two bolts from the rail, belt,
operating.
Place the garage door
opener on the packing material to prevent
H1
To avoid possible SERIOUS INJURY...
8550 Manual - Page 6

... -Close functionality if operating either one -piece door, visit www.liftmaster.com for installation instructions. 6 Install garage door opener 7 feet (2.13 m) or more above the floor and
avoiding contact with
a 1-1/2" (3.8 cm) high object (or a 2x4 laid fl at minimum height of garage door. 12. NEVER connect garage door opener to power source until instructed to garage door control 11. They...
8550 Manual - Page 7

... INJURY or DEATH:
• Header bracket MUST be used if mounting header bracket or 2x4 into masonry.
• NEVER try to loosen, move or adjust garage door, springs, cables, pulleys, brackets, or their hardware, ALL of which are installing the garage door opener on a one -piece or swinging...
8550 Manual - Page 9

... H5
HARDWARE
H5
Clevis Pin 5/16"x2-3/4"
H11
Ring Fastener
4 Position the garage door opener
To prevent damage to garage door, rest garage door opener rail on 2x4 placed on top section of door.
4.1 Remove the packing material and lift the
garage door opener onto a ladder. NOTE: If the door hits the trolley when it is not tall enough you will need help...
8550 Manual - Page 11
... ONLY when garage door is right side up to avoid entanglement.
Trolley Release Arm
11 or
or
To prevent possible OVERHEATING of all vehicles to close.
NOTE: If it is clear of persons and obstructions. • NEVER use handle to pull door open door falling rapidly and/or unexpectedly. • NEVER use short neck or specialty light bulbs...
8550 Manual - Page 14

... reach of children at a minimum height of 5 feet Install the door control within sight of the door at the garage door opener in a later step. children cannot reach, and away from ALL moving parts of the door control.
Use the existing holes in sight until completely closed.
NOTE: Older LiftMaster accessories and third party products are connected...
8550 Manual - Page 15

... for the top screw.
1.8 Position the bottom hole of the wire near the garage door opener.
7/16" (11 mm)
H15
GANG BOX
2.3 Connect the wire to the red and
white terminals on the garage door opener. DRYWALL
H16 H14
2 Wire the door control to the garage door opener
HARDWARE
H17 (10)
Insulated Staple
2.1 Run the white and red/white wire from...
8550 Manual - Page 19
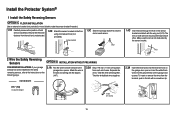
... the lens is not obstructed by the sensor bracket. Separate the wires. HARDWARE
H17
H17 (10)
Insulated Staple
7/16" (11 mm)
2.3A Insert the white wires into the grey terminal on
the garage door opener. To insert or remove the wires from the terminal, push in the sensor
bracket and attach with a screwdriver tip...
8550 Manual - Page 20
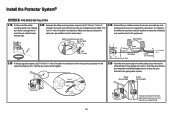
... connected to the white/black safety sensor wires to the grey terminal on the garage door opener.
Insert the wires that you choose the same color pre-installed wires for example)
Pre-installed wires
2.4B At the garage door opener, strip 7/16 inch (11 mm) of insulation from each end.
Yellow
Yellow (for example)
Purple (for each...
8550 Manual - Page 22
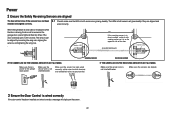
... while the door is closing, the door will reverse and the garage door opener lights will display on the opposite side of the door.
(invisible light beam)
Green LED
SENDING SENSOR
RECEIVING SENSOR
IF THE AMBER LED ON THE SENDING SENSOR IS NOT GLOWING:
Make sure there is wired correctly
If the door control has been installed and wired correctly a message will...
8550 Manual - Page 28

... children to garage door opener BEFORE making ANY repairs or removing covers.
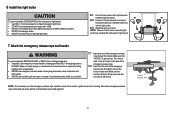
14. NO ONE SHOULD CROSS THE PATH OF THE MOVING DOOR. Garage door MUST reverse on the floor.
11. ALWAYS KEEP GARAGE DOOR PROPERLY BALANCED (see page 2). ALWAYS disconnect electric power to operate or play with garage door control push buttons or remote controls.
3. This operator system is CLOSED. DO...
8550 Manual - Page 30

... the push bar to 99 minutes). TTC is broken. The screen on the garage door opener lights when motion is a problem with sectional doors.
A maintenance alert message will not control the lights when the door is activated the lights will display the menu options.
Press the HOLD OPEN button again to make selections and program features.
NAVIGATION BUTTONS
Use the navigation buttons...
8550 Manual - Page 31

... the number of menus on the screen and the navigation buttons. opener lights, or a keyless entry. FEATURES
Press the navigation button below "MENU" to operate the garage door opener.
TTC is to view the Settings menu. SOFTWARE REVISION: Displays software version information.
DISPLAY ERROR: Displays any errors that have occurred. Navigation Buttons
CLOCK SETUP: Set the time, choose...
8550 Manual - Page 35

... cut
sensor LED is programmed with the
and the light(s) will not close Safety sensors are connected, then replace the travel module. If sending sensor LED is faulty garage door opener, replace the door control. After installing new door control wires, if door control still does not operate
the door control is lit, check the wire leading to the...
8550 Manual - Page 36

... obstruction such as necessary. My garage door opener light(s) will not show up in the garage.
Check for no
Obstruction, binding or Manually open and close the door.
The LEDs on the door conrol blink: If you have been obstructed or when the motion sensor on the door control detects movement in the diagnostic codes:
My garage door opener beeps every 30 seconds: Refer...
8550 Manual - Page 37
... Sensor Kit
41A5034
8
Receiving and sending
sensors with 3 feet (.9 m) 2-conductor wire
10 11
8 Straight Door Arm
178B34
9 White and Red/White Wire
41C5141-1
10 3V2016 Lithium Battery
10A19
11 Battery Backup
485LM
Contact Information
Address repair parts order to your garage door opener while calling. If you have access to : The Chamberlain Group, Inc. 6050 S. Country...
8550 Manual - Page 38
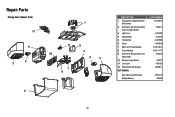
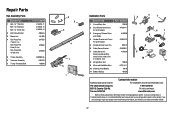
Repair Parts
Garage Door Opener Parts
11
9
4 3
1
12
5
2 10
4
3
7 8
6
38
DESCRIPTION 1 Sprocket and Sprocket Cover
with Screws 2 End Panel with labels, battery
cover and light socket 3 Light Lens 4 Light Socket 5 Transformer 6 Cover 7 Motor and Travel Module 8 Travel Module 9 End Panel with all labels and
light socket 10 Receiver Logic Board 11 Line Cord 12 Filter Board with Screws NOT ...
Similar Questions

I Have Installed A Chamberlan Garage Door Opener And The Remote I Was Using Is
I have been using a Chamberlan garage door opener and its remote has been defective since of late.Pl...
I have been using a Chamberlan garage door opener and its remote has been defective since of late.Pl...
(Posted by donweera42 8 months ago)
Garage Door Opens After Shutting.
My Lift master 8550 inside keypad is Inside wall pad is model #880LM. outside keypad Model # is 877M...
My Lift master 8550 inside keypad is Inside wall pad is model #880LM. outside keypad Model # is 877M...
(Posted by BONNIECA92 2 years ago)

How To Program New Car To Open Garage Door
where is the learn button to program my car to open garage door
where is the learn button to program my car to open garage door
(Posted by lrothberg 6 years ago)

Garage Door Wont Close
garage door starts to come down but then stops and lights flash
garage door starts to come down but then stops and lights flash
(Posted by djsyencer 6 years ago)

Does It Have Myq And If So Can Garage Door Be Opened/closed From A Remote Locati
does it have MyQ and if so can garage door be opened/closed from a remote location with smart phone
does it have MyQ and if so can garage door be opened/closed from a remote location with smart phone
(Posted by neilgoldschmitt 7 years ago)