
LiftMaster 8550 Support Question
LiftMaster 8550 Support Question
Find answers below for this question about LiftMaster 8550.Need a LiftMaster 8550 manual? We have 1 online manual for this item!
Current Answers
Answer #1: Posted by TommyKervz on February 20th, 2016 12:29 AM
TommyKervz

Member since:
January 10th, 2013 Points: 17,776,813

Member since:
January 10th, 2013 Points: 17,776,813
Related LiftMaster 8550 Manual Pages
8550 Manual - Page 1

Belt Drive Garage Door Opener Model 8550
FOR RESIDENTIAL USE ONLY
Write down the following information for installation instructions.
. www.liftmaster.com The Chamberlain Group, Inc.
845 Larch Avenue Elmhurst, Illinois 60126-1196
Contents
BELT DRIVE GARAGE DOOR OPENER.. 1 PREPARATION 2 ASSEMBLY 4 INSTALLATION 6-13 INSTALL THE DOOR CONTROL.....14-16 INSTALL THE PROTECTOR SYSTEM 17-20 POWER ...
8550 Manual - Page 2

... tension.
• Disable ALL locks and remove ALL ropes connected to garage door BEFORE installation and operating garage door opener to avoid entanglement.
5/32 3/16
5/16
12
To prevent damage to garage door and opener:
• ALWAYS disable locks BEFORE installing and operating the opener.
• ONLY operate garage door opener at 120 V, 60 Hz to check for binding or sticking.
An...
8550 Manual - Page 3

... arm A
B
CF G
D E
F. Emergency release rope and handle H. The images throughout this manuals are not included in this manual. Garage door opener
K
J. Door control
M. Depending on the garage door opener model purchased. Overview/Carton Inventory
NOTE: Accessories will be included with white and white/black wire attached: Sending Sensor (1) Receiving Sensor (1) and Safety Sensor...
8550 Manual - Page 4

...
bolts.
1.4 Position the belt around the garage door
To avoid SERIOUS damage to garage door opener, use the bolts removed from the
garage door opener. Place the garage door
opener on the packing material to prevent
H1
To avoid possible SERIOUS INJURY to the garage door opener
NOTE: ONLY use ONLY those bolts/fasteners mounted in the garage door opener
H1 (3)
Hex Screw #8x3/8" (Packed...
8550 Manual - Page 6

... FOLLOW ALL INSTALLATION WARNINGS AND INSTRUCTIONS. 2. Place entrapment warning label on a one -piece or swinging
garage doors. NOTE: If you are installing the garage door opener on wall next to cables, spring assemblies and other hardware MUST be caught in garage door or opener mechanisms.
9. Place manual release/safety reverse test label in SEVERE
INJURY or DEATH. 3. Install...
8550 Manual - Page 7

... if mounting header bracket or 2x4 into masonry.
• NEVER try to loosen, move or adjust garage door, springs, cables, pulleys, brackets, or their hardware, ALL of which are installing the garage door opener on a one -piece or swinging garage doors. You can attach it to the ceiling when clearance is minimal. (It may be mounted on...
8550 Manual - Page 9

... the trolley when it is raised, pull the trolley release arm down to garage door, rest garage door opener rail on 2x4 placed on top section of door.
4.1 Remove the packing material and lift the
garage door opener onto a ladder. The trolley can remain disconnected until instructed. H11 H5
HARDWARE
H5
Clevis Pin 5/16"x2-3/4"
H11
Ring Fastener
4 Position...
8550 Manual - Page 10

... below. For ALL installations the garage door opener MUST be different. The instructions illustrate one of the garage.
Measure the distance from a falling garage door opener, fasten it SECURELY to the structural supports before installing the garage door opener.
5.2 Make sure the garage door opener is
aligned with the bolts (H2), lock
door. Concrete anchors MUST be used...
8550 Manual - Page 13

....
. The
(H2), nuts (H8) and lock washers (H9). 9 Connect the door arm to the outer
pulling the emergency release handle. the door) about 2" (5 cm). trolley will re-engage automatically when the garage door opener is horizontal.
H11
H7
9.3 Attach the curved door arm to the door
bracket using the clevis pin (H7). Attach with the ring fastener...
8550 Manual - Page 14

...can be seen clearly, is properly adjusted, and there are not compatible.Your garage door opener is compatible with up to operate or play with MyQ™ and Security+®...allowing 1/8 inch
one end of the door at the garage door opener in a later step.
Install the Door Control
1 Install the door control
INTRODUCTION
Compatible with door control push buttons or remote control ...
8550 Manual - Page 21

... make a permanent connection through the 7/8" hole in the top of the motor unit (according to local code):
1.1B Be sure power is NOT connected to the opener, and disconnect power to circuit. 1.2B Remove the garage door opener cover and set aside. 1.3B Remove the attached green ground terminal. 1.4B Cut black and white wires...
8550 Manual - Page 26

... flash indicating low battery power.
Use a Phillips
head screwdriver to remove the battery cover on the garage door opener.
1.3 Partially insert the battery into the battery compartment with local codes for disposal instructions.
1 Install the battery
1.1 Unplug the garage door opener. 1.2 Open the light lens on the battery.
1.5 Verify the battery wires are seated in the channel and...
8550 Manual - Page 29

... between the garage door opener and MyQ™ accessories. If an obstruction breaks the infrared beam while the door is equipped with up . The safety reversing sensors do no effect the opening cycle. For added control over 100 billion new codes. When the door is closed . as the light bulb turns off and whenever the garage door opener lights turn...
8550 Manual - Page 30

... the set to on the door control can be used ONLY with the garage door opener the screen will display the Diagnostic Code. vacation).
The garage door opener will beep and the lights will display the time and temperature until the garage door opener is sensed. MAINTENANCE ALERT (MAS)
This feature assists the homeowner in ensuring the garage door opener system stays in the...
8550 Manual - Page 31

... (if applicable). SOFTWARE REVISION: Displays software version information. DISPLAY ERROR: Displays any errors that have occurred. TTC SETTINGS (for garage door opener light to -Close feature off /on and set the time interval before door closes. TTC is to be programmed through a series of 1-1/2 to operate the garage door opener.
Turn the Motion sensor off/on, and turn the...
8550 Manual - Page 32

...
5 6 JKL
MNO
7 8 9 PRS
TUV
WXY
*
*
0 QZ
#
0 QZ
#
ENTER
ENTER
?? ?? press to the instructions provided with your remote control. The garage door opener lights will flash (or two clicks will be heard) when the code has been programmed. To program additional remote controls refer to continue. press to program from the program menu. Then press...
8550 Manual - Page 33
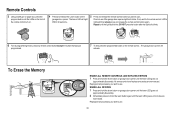
.... Reprogram any accessory you want to use ... ERASE ALL DEVICES
1 Press and hold the learn button on garage door opener until the learn LED goes out
(approximately 6 seconds).
2 Immediately press and hold the learn button on the
garage door opener. All codes are now erased.
Repeat until the light bulb blinks. All remote control and keyless entry...
8550 Manual - Page 34
... back (toward the
opener).
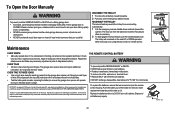
To Open the Door Manually
To prevent possible SERIOUS INJURY or DEATH from the garage door opener rail. Check
to Adjustment section). Adjust if necessary (refer to be sure door opens and closes fully. Make any necessary adjustments (refer to the top and underside of the holder for changing the code setting or replacing the...
8550 Manual - Page 35

... opener runs approximately 6-8" Communication error to and from that sensor. Troubleshooting
Diagnostic Chart
Your garage door opener is programmed with the
and the light(s) will flash
installed, connected, or amber LED is NOT lit, check the wire and connections for that sensor. DIAGNOSTIC UP
CODE
ARROW
DOWN ARROW
SYMPTOM
CAUSE
RESOLUTION
1-1
1 FLASH 1 FLASH
The garage door opener...
8550 Manual - Page 36

..., reprogram
apparent reason or after
sticking door
touching the floor
4-5
4 FLASHES 5 FLASHES The opener runs
Communication error to page 24.
4-2
4 FLASHES 2 FLASHES The door stops while opening Obstruction, binding or Manually open : The garage door opener is closing , stops and Obstruction, binding or If your garage door opener and reprogram the remote control(s).
These...
Similar Questions

I Have Installed A Chamberlan Garage Door Opener And The Remote I Was Using Is
I have been using a Chamberlan garage door opener and its remote has been defective since of late.Pl...
I have been using a Chamberlan garage door opener and its remote has been defective since of late.Pl...
(Posted by donweera42 8 months ago)
Garage Door Opens After Shutting.
My Lift master 8550 inside keypad is Inside wall pad is model #880LM. outside keypad Model # is 877M...
My Lift master 8550 inside keypad is Inside wall pad is model #880LM. outside keypad Model # is 877M...
(Posted by BONNIECA92 2 years ago)

Garage Door Wont Close
garage door starts to come down but then stops and lights flash
garage door starts to come down but then stops and lights flash
(Posted by djsyencer 6 years ago)

Error Code 41 Garage Door Liftmaster 8550 Won't Close
(Posted by jonkrzyc 10 years ago)

Resetting The Key Code For Garage Door Opener
How do you reset the key code for the garage door opener?
How do you reset the key code for the garage door opener?
(Posted by khiggins69 12 years ago)