
LiftMaster 3950 Support Question
LiftMaster 3950 Support Question
Find answers below for this question about LiftMaster 3950.Need a LiftMaster 3950 manual? We have 2 online manuals for this item!
Question posted by karloboni on October 30th, 2013
I need Liftmaster 3950 The Handbook In Spanish?
I searched the manual liftmaster in Spanish but I found
Current Answers
Answer #1: Posted by TommyKervz on October 30th, 2013 8:26 PM
TommyKervz

Member since:
January 10th, 2013 Points: 17,776,813

Member since:
January 10th, 2013 Points: 17,776,813
Greetigs. English only unfortunately.
Related LiftMaster 3950 Manual Pages
3950 Addendum Manual - Page 1

... the drum and door assembly when the door is opened or closed.
To order visit www.liftmaster.com or contact door supplier. The axle is important to identify the door type before attempting an installation of the Model 3950 door operator. ADDENDUM
DOOR COMPATIBILITY FOR MODEL 3950
IMPORTANT INSTALLATION INSTRUCTIONS
It is locked in place while the door opens and closes. The...
3950 Addendum Manual - Page 2

... 3.75" clearance for "Wall" dimension is held up by the Model 3950 driving a chain which spins the drums and rolls the door curtain. LIVE SHAFT REQUIREMENTS
Live Shaft doors are automated by door brackets and the door guides. (Figure 2)
Axle
Drum
Wall
Drum Bracket
Door Guide
Figure 2 - Live Shaft Components
Minimum Side Room
The minimum amount...
3950 Addendum Manual - Page 3

... with a modification (ex. Dead Shaft Door Construction
Spring Clearance
The Model 3950 requires that an extra drum (Figure 4 - 2nd Drum) is added on the end drum (Figure 4 ). Prep for door sprocket mounting. DEAD SHAFT REQUIREMENTS
Dead Shaft Door Construction
Drum
2nd Drum
Spring
Axle
Door Bracket
Door Guide
Figure 4 - Bolt Clearance). Inspect for interference...
3950 Addendum Manual - Page 4

Drum Holes To Inspect For Obstruction
Door Construction
The Dead Shaft Door must not have more than a 2" inset from the curtain edge to provide a maximum 3" of spacers that can be present)
2.25"
Figure 5 - The Model 3950 comes with a selection of spacing.
4 Mounting Hole (PEM nut may be used in conjunction to the drum.
3950 Addendum Manual - Page 5

... bent, the drive chain may not align to be moved away from the door assembly to the outside of the door opening, a minimum of side room depends on which the Model 3950 is required for the desired operator mounting position.
5
Dead Shaft Door brackets should be successful. For a standard wall mount to provide enough room...
3950 Manual - Page 1

®
DOOR OPERATOR Model 3950
For Light Duty Commercial Use
The Chamberlain Group, Inc. 845 Larch Avenue Elmhurst, Illinois 60126-1196
www.liftmaster.com
Com
patible with
Owner's Manual
■ Please read this manual and the enclosed safety materials carefully! ■ The door WILL NOT CLOSE unless The Protector System® is connected and properly aligned. ■...
3950 Manual - Page 2

...Repair Parts and Service
Back Page
INTRODUCTION Safety Symbol Review and Signal Word Review
This door operator has been designed and tested to offer safe service provided it is installed, ...14 Test The Protector System 15 To open door manually 15
Operation
16-18
Operation safety instructions 16 Using your operator 16 Care of your door and/or the door operator if you do not comply ...
3950 Manual - Page 3

.... lb/sec.
10 Cycles per
hour. • DO NOT run operator if the door is locked. • Chain guard to be installed to protect against possible injury.
For live shaft type doors the drive shaft needs to extend 1-1/2" beyond the door mount bracket.
• If the operator is exposed
lower than 8 feet (2.5 m). Preparing Your...
3950 Manual - Page 8

... station to prevent unraveling. Select appropriate knockout and run the wires to prevent slipping.
2. DO NOT EXCEED 10 DOOR OPERATIONS PER HOUR. Weak or broken springs or unbalanced door could result in an open door falling rapidly and/or unexpectedly.
• NEVER use emergency release handle to cross path of the rope to the...
3950 Manual - Page 10

... and cannot be disabled. Extension brackets (see accessories) are available if needed. No part of the door as long as the wall framing. Safety Reversing Sensor 6" (15 cm...open position. Either can be installed on the wall, the brackets must be installed inside . To prevent SERIOUS INJURY or DEATH from inside the building so that the sending and receiving eyes face each location to the door...
3950 Manual - Page 11

...door hardware obstructions are cleared.
• Fasten to the floor with the beam no higher than 6" (15 cm) above the floor.
INSTALLING THE BRACKETS
Be sure power to the operator is needed...using extension brackets or wood blocks, adjust right and left assemblies at each other across the door, with concrete anchors as follows.
Wall installation (Figures 1 and 2):
• Place the...
3950 Manual - Page 12

...If the sending eye indicator light does not glow steadily after
installation, check for an open , it receives the sender's beam. Safety Reversing Sensor
Safety Reversing Sensor
Invisible Light ...; A broken wire. 2. NOTE: When the invisible beam path is obstructed or misaligned while the door is already open wire to wall and ceiling.
• Strip 7/16" (11 mm) of alignment or obstruction....
3950 Manual - Page 13

... , if there appears to be too much pressure on the door, you may toggle the door back and forth using the black and purple buttons. Once the door is binding or sticking.
NOTE: Make sure the door opens high enough for your vehicle.
3. Push the door control. This will stop when moving up or down.
To...
3950 Manual - Page 14

... stop flashing when the force has been programmed. If the garage door opener cannot open and close the door (DOWN). Figure 1
LED
Black Button
Purple Button
Figure 2
Push Purple button twice to open and close (DOWN).
3. The LED will open (UP).
4.
If the door is not sticking or binding. Without a properly installed safety reversal system, persons (particularly small...
3950 Manual - Page 15

... rapidly and/or unexpectedly. • NEVER use the emergency release when door is obstructed, do not operate the door. Safety Reversing Sensor
Safety Reversing Sensor
ADJUSTMENT STEP 4 To Open the Door Manually
• The door should then be able to be opened manually.
• Return the door to the closed position.
• Pull the emergency handle a second time until...
3950 Manual - Page 16

... Manually operate door. ONLY activate door when it is properly adjusted and there are made by a trained door systems technician.
12. NO ONE SHOULD CROSS THE PATH OF THE MOVING DOOR.
....
8. Door MUST reverse on contact with the safety reversing sensor correctly installed and aligned) 1. When the operator is CLOSED. The sensor has no obstructions to garage door opener BEFORE making...
3950 Manual - Page 17

... and/or operator mounting brackets. The operator moves when the door is in any ice or snow from the remote, but won't close the door manually. HAVING A PROBLEM? (TROUBLESHOOTING)
1. Plug a lamp into the outlet. Remove any obstruction or align the receiving eye. The door opens and closes by itself:
• Be sure that all remote...
3950 Manual - Page 18

... reversing sensors wire open (broken or disconnected).
Symptom: Door reverses while closing. • Check the factory installed jumper at door control, touch wires...needed . • Disconnect wires at the terminal connections. If motor unit activates, replace door
control. • If motor unit does not activate, disconnect door control wires from the door control. • Inspect door...
3950 Manual - Page 20
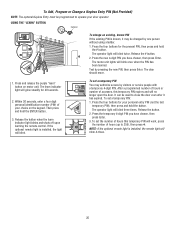
...digit PIN.
NOTE: If the optional remote light is installed, the remote light will no longer open the door. Release the # button.
2.
Press and release the purple "learn" button on the keypad...
To set a temporary PIN
You may be changed by one person without using a ladder.
1. The door should move.
1. The operator light will blink once when the PIN has been learned.
To set a...
3950 Manual - Page 22

... from outside or inside the door guides. Also can be mounted in their door operator remote or from being manually opened once closed.
Chain Guard: The chain guard is required to the model 3900 door operator. EverCharge® Standby Power System: Provides backup power to comply with an additional LiftMaster Security✚® remote.
3950MB
371LM...
Similar Questions

I Have Installed A Chamberlan Garage Door Opener And The Remote I Was Using Is
I have been using a Chamberlan garage door opener and its remote has been defective since of late.Pl...
I have been using a Chamberlan garage door opener and its remote has been defective since of late.Pl...
(Posted by donweera42 8 months ago)

I Need A Replacement Lens Cover For Garage Door Opener Liftmaster Model #1355- 1
I need a replacement Lens Cover for a garage door opener Model # 1355M- 1/2 HP Liftmaste
I need a replacement Lens Cover for a garage door opener Model # 1355M- 1/2 HP Liftmaste
(Posted by nskanson 1 year ago)
Garage Door Opens After Shutting.
My Lift master 8550 inside keypad is Inside wall pad is model #880LM. outside keypad Model # is 877M...
My Lift master 8550 inside keypad is Inside wall pad is model #880LM. outside keypad Model # is 877M...
(Posted by BONNIECA92 2 years ago)

3950 Error Code
My 3950 Will not close the door. The error code is 9 blinks which indicates the facory jumper is loo...
My 3950 Will not close the door. The error code is 9 blinks which indicates the facory jumper is loo...
(Posted by bgh0612 11 years ago)

What Size Shaft Does The Live Sprocket
Fit On Door?
(Posted by jgrowlett 11 years ago)