Get support for LiftMaster 3850

LiftMaster 3850 Support Question

LiftMaster 3850 Support Question

Find answers below for this question about LiftMaster 3850.
Need a LiftMaster 3850 manual? We have 1 online manual for this item!
Question posted by nsrobey on January 21st, 2019

My Garage Door Won't Close

door stop 3" from ground. no obstructions, sensor lights are both on and aligned

Current Answers

Answer #1: Posted by BusterDoogen on January 21st, 2019 11:39 AM
This answer was accepted by the poster of the original question.
BusterDoogen

Member since:
October 30th, 2011

Points: 28,565,407
1,110
points
To program the travel limits:

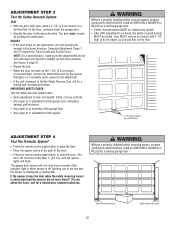
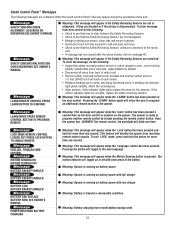
Program the position of the door by using the black-and-purple or black-and-yellow buttons. Black moves the door UP (open) and purple/yellow moves the door DOWN (close).

Setting the UP position
  1. Press and hold the black button until the yellow indicator light starts flashing slowly, then release.
  2. Push and hold the black button until the door reaches the desired UP (open) position.
    NOTE: Check to be sure the door opens high enough for your vehicle.
  3. Push the remote control or door control. This sets the UP (open) limit and begins closing the door.
  4. Immediately when the door begins to move down, press and release either the black or purple/yellow button. This will stop the door.
Setting the DOWN position
  1. Push and hold the purple/yellow button until the door reaches the desired DOWN (closed) position.
  2. Once the door is closed, if there appears to have too much pressure on the door, you may toggle the door back and forth using the black-and-purple/yellow buttons to reach the desired closed position.
  3. Push the remote control or the door control. This sets the DOWN (close) limit and should bring the door to the open position.
Setting the Force
  1. Push the purple/yellow button twice to enter Force Adjustment Mode. The LED Indicator light will flash quickly.
  2. Push the remote control or control console. The door will travel to the DOWN (close) position.
  3. Push the remote control or control console again; the door will travel to the UP (open) position.
  4. Push the remote control or control console a third time to send the door to the DOWN (close) position.
  5. The LED Indicator Light will stop flashing when the force has been learned.

The door must travel through a complete cycle, UP and DOWN, in order for the force to be set properly. If the opener cannot open and close your door fully, inspect your door to insure that it is balanced properly and not sticking or binding.

I hope this is helpful to you!

Please respond to my effort to provide you with the best possible solution by using the "Acceptable Solution" and/or the "Helpful" buttons when the answer has proven to be helpful. Please feel free to submit further info for your question, if a solution was not provided. I appreciate the opportunity to serve you!

Related LiftMaster 3850 Manual Pages

3850 Elite Series Manual - Page 1

... carefully! ■ Fasten the manual near the garage door after installation. ■ The door WILL NOT CLOSE unless the Protector System® is connected and properly aligned. ■ Periodic checks of the opener are required to ensure safe operation. ■ The model number label is located under the light lens on the left side panel of your...
3850 Elite Series Manual - Page 5

... purchased. Carton Inventory Your garage door opener is packaged in the foam. Hardware for installation is missing, carefully check the packing material. If anything is also listed below . Parts may be stuck in two cartons which contain the motor unit and all parts illustrated below . LOCK LIGHT SLmCaDrtMCootniotrnolDPeatencetli®ng Door Control Console SECURITY✚...
3850 Elite Series Manual - Page 8

... 2x4 into masonry. • NEVER try to loosen, move or adjust garage door, springs, cables, pulleys, brackets, or their hardware, ALL of which apply to your door. 1. An unbalanced garage door might not reverse when required. Close the door and mark the inside vertical centerline of Garage Door 2x4 OPTIONAL CEILING MOUNT FOR HEADER BRACKET Structural Supports Level (optional...
3850 Elite Series Manual - Page 13

... 2). NEVER permit anyone to each garage door opener. If installing into gang box) as in new home construction), it can be mounted to secure wire in sight until the sensor beam is slower at lower temperatures although the door control remains fully functional. If additional wall controls are no obstructions to door travel to secure. Adjust screw...
3850 Elite Series Manual - Page 14

... Use ONLY incandescent. The use halogen bulbs. To prevent damage to close the lens. • Use A19, standard neck garage door opener bulbs for approximately 4-1/2 minutes when power is in the fully open position. Light bulb size should be A19, standard neck only. NOTE: Use only standard light bulbs. Channel Battery Battery Cover INSTALLATION STEP 8 Install the...
3850 Elite Series Manual - Page 15

... adapter, or change plug in the release arm of persons and obstructions. • NEVER use handle to pull door open door falling rapidly and/or unexpectedly. • NEVER use emergency release handle to disengage trolley ONLY when garage door is grounded. Weak or broken springs or unbalanced door could fall. To avoid installation difficulties, do not run the...
3850 Elite Series Manual - Page 16

...The invisible light beam path must be installed inside the garage. Either can be disabled. • Install the safety reversing sensor so beam is closing garage door: • Correctly connect and align the safety reversing sensor. This required safety device MUST NOT be installed on the wall, the brackets must be connected and aligned correctly before the garage door opener will...
3850 Elite Series Manual - Page 21

SECTIONAL DOORS ONLY Make sure garage door is horizontal. Figure 1: • Fasten straight door arm section to outer trolley with a ring fastener. • Fasten curved section to the door bracket in straight arm, disconnect straight arm. Figure 2: • Bring arm sections together. Pull the emergency release handle toward the opener at a 45° angle so that the...
3850 Elite Series Manual - Page 22

... release handle, disconnecting the outer trolley from the fully open as the door is being opened or closed . Assemble the Door Arm: • Fasten the straight and curved door arm sections together to the longest possible length (with a 2 or 3 hole overlap). • Make sure the garage door is fully closed from the inner trolley by pulling straight down on...
3850 Elite Series Manual - Page 23

Adjust the position of the door by a closing the door (Figure 3). 4. Once the door is at desired UP position Figure 3 or LOCK LIGHT Figure 4 LED BLACK PURPLE Push either the black or purple button. Push the door control or programmed remote control. Door MUST reverse on contact with proper operation of garage door travel limits will stop when moving up or...
3850 Elite Series Manual - Page 24

... been programmed. Push the door control or programmed remote control again. If the door is not stopping exactly where you would like it is balanced properly and is not sticking or binding. The LED will flash quickly. 2. If the garage door opener cannot open and close (DOWN). 3. The door will close the door fully, inspect the door to ensure that it , repeat...
3850 Elite Series Manual - Page 25

...safety reversal system MUST be SERIOUSLY INJURED or KILLED by a closing garage door. ADJUST • If the door stops on striking the obstruction. The door must reverse on the obstruction, it is not traveling far enough in the down position. Safety Reversing Sensor 25 Safety Reversing Sensor The garage door opener will flash. ADJUSTMENT STEP 3 Test the Safety Reversal System TEST...
3850 Elite Series Manual - Page 26

... one control (force or travel limits) is clear of persons and obstructions. 8. If possible, use . ALL repairs to door travel is 100 watts maximum. Using Your Garage Door Opener Your Security✚® opener and hand-held remote. If the obstruction interrupts the sensor beam, the opener lights will also turn on under EXTREME tension, MUST be tested every month...
3850 Elite Series Manual - Page 27

... the motion sensor. To turn it detects a Language Degrees (F/C) LOCK person entering the garage. (PROG) Learn Feature The door control is reset to 1-1/2 minutes. Press the button of the door control, the light will not control the opener lights when the door is activated. 27 It will come on and then activate the opener, the light will open or close from hand...
3850 Elite Series Manual - Page 29

... reduce the risk of battery in fire. GREEN LED: All systems are normal. • A solid LED light indicates the battery is fully charged. • A flashing LED indicates the battery is indicated by a beep... the battery charge is low. • To test the battery is functioning properly, open and close the garage door. • Re-connect the motor unit power cord back into the electrical outlet....
3850 Elite Series Manual - Page 30

... and obstructions. • NEVER use emergency release handle to be sure door opens & closes fully. The trolley will reconnect on the emergency release handle and lift the door manually. Weak or broken springs or unbalanced door could fall. If it is unbalanced or binding, call a trained door systems technician. • Check to disengage trolley ONLY when garage door is...
3850 Elite Series Manual - Page 31

My door will not close and the light bulbs blink on my motor unit: The safety reversing sensor must be connected and aligned correctly before the garage door opener will still not activate your Smart Control Panel® does not display "Lock Mode." Weather conditions in the down travel limits. This feature activates the light on the following page. 2. My...
3850 Elite Series Manual - Page 32

... steadily, receiving indicator light is programmed with jumper wire. Symptom: Door travels 2-3 inches and stops. • Reprogram limits and forces. Consult Diagnostic Chart below. 1 FLASH Safety reversing sensors wire open (broken or disconnected). If sending eye indicator light glows steadily, attach the receiving eye. • Align sensors, if the indicator lights glow replace the wires...
3850 Elite Series Manual - Page 33

...If sending eye indicator light glows steadily, attach the receiving eye. • Align sensors, if the indicator lights glow replace the wires for more than one second. Once the opener has 'LEARNED' the ... door control or anytime on the opener. Meaning: This message will appear if the Safety Reversing Sensors are out of alignment, if they are blocked or if the wiring is pressed. The opener ...
3850 Elite Series Manual - Page 34

... supplier of the garage door opener, which provides security against code-theft devices, will open and close when you wish to operate with your opener to use. 1. Press the button on the hand-held remote that you wish to operate your garage door. 3. USING THE "LEARN" BUTTON To Add or Reprogram a Hand-held remote control. If light bulbs are...

Similar Questions

My Door In Close Position Start To Close Intead Of Openning De Door. It Change T
The direction of the belt changed by itself. The unit was operating pertfectly. Liftmaster 3850PI tu...
(Posted by wlopez100 3 years ago)
My Door Stopped Shutting Completely. How Do I Adjust It?
My door (MH5011R) stopped shutting completely. It remains about 2 inches above the ground. How do I ...
(Posted by brodgers80406 10 years ago)
Ask a New Question
Use the box below to post a new question about this LiftMaster product .
Points & Prizes
  • You can earn points for nearly everything you do on HelpOwl.com
  • You can trade in those points for gift cards at leading retailers such as Amazon.com and Walmart
  • It's that simple!
See How it Works
Create a Free Account

LiftMaster Manuals

Find free LiftMaster 3850 manuals and user guides available at ManualOwl.com. Try out our unique manual viewer allowing you to interact with manuals from directly within your browser!

LiftMaster Reviews

View thousands of LiftMaster user reviews and customer ratings available at ReviewOwl.com.

Contact Information

Complete LiftMaster customer service contact information including steps to reach representatives, hours of operation, customer support links and more from ContactHelp.com.

Scoreboard Ratings

See detailed LiftMaster customer service rankings, employee comments and much more from our sister site.