
LiftMaster 3850 Support Question
LiftMaster 3850 Support Question
Find answers below for this question about LiftMaster 3850.Need a LiftMaster 3850 manual? We have 1 online manual for this item!
Question posted by HAamu on March 31st, 2014
Lift Master Garage Door Beeping How To Tell Where Light Is
The person who posted this question about this LiftMaster product did not include a detailed explanation. Please use the "Request More Information" button to the right if more details would help you to answer this question.
Current Answers
Related LiftMaster 3850 Manual Pages
3850 Elite Series Manual - Page 1

...! ■ Fasten the manual near the garage door after installation. ■ The door WILL NOT CLOSE unless the Protector System® is connected and properly aligned. ■ Periodic checks of the opener are required to ensure safe operation. ■ The model number label is located under the light lens on the left side panel of...
3850 Elite Series Manual - Page 2

...bracket 10
Position the opener 11
Hang the opener 12
Install the Smart Control Panel 13
Install the EverCharge® Standby Power System (optional 14
Install the lights 14
Attach the ...28
EverCharge® Standby Power System (optional 29
To open the door manually 30
Care of your garage door and/or the garage door opener if you see this Signal Word on the following pages,...
3850 Elite Series Manual - Page 3

...garage door BEFORE installing and operating garage door opener to avoid entanglement.
If your garage door is balanced and is out of the opener, instructions will call for hand tools as shown. An unbalanced garage door... Release the door. Lift the door about halfway as illustrated below. Sectional Door
One-Piece Door
Tools needed
During assembly, installation and adjustment of balance....
3850 Elite Series Manual - Page 5

...Carton Inventory
Your garage door opener is packaged in the foam. Hardware for installation is missing, carefully check the packing material.
Accessories will depend on the model purchased. If anything is also listed below . LOCK
LIGHT
SLmCaDrtMCootniotrnolDPeatencetli®ng Door Control Console
SECURITY✚® 3-Button Remote Control
Models 3850 (1) 3850-267 (2)
SECURITY...
3850 Elite Series Manual - Page 6

... the spring releases and snaps the nut ring against the trolley (Figure 2).
• Place a 7/16" open end wrench on the square end.
Figure 1
Trolley
Nut Ring
Trolley
Nut Ring
Figure 3
BEFORE 1" (2.5 ...the Rail to the Motor Unit
To avoid installation difficulties, do not run the garage door opener until instructed to do so. • Remove the two washered bolts mounted on top of...
3850 Elite Series Manual - Page 7

... floor.
6. To avoid possible SERIOUS INJURY to cables, spring assemblies and other hardware MUST be caught in garage door or opener mechanisms.
9. Door MUST reverse on contact with the three holes in SEVERE INJURY or DEATH.
3.
Install garage door opener ONLY on wall next to avoid entanglement.
5. They could result in mounting plate. Attach with #8x3/8" hex...
3850 Elite Series Manual - Page 13

... and connect to the two screw terminals on screw head and slide down to each garage door opener. Fasten with 6AB x 1-1/4" self-tapping screws (drywall installation) or 6-32 x ...Terminals
Quick-Connect Terminals
R
W
1
2
(BACK VIEW)
Door Control Terminal Screws
LOCK LOCK
Lock Button Light
Button
DoDooroCroCnotnrotrlol CoCnonnenceticotniosns
StriSptwripirew7ir/e167"/1(61"1 mm)
7/167"/(1161...
3850 Elite Series Manual - Page 14

... are seated in the channel. • Replace battery cover. Then the lights will turn OFF.
• Reverse the procedure to close the lens.
• Use A19, standard neck garage door opener bulbs for approximately 4-1/2 minutes when power is in each socket.
The lights will turn ON and remain lit for replacement.
Do not remove the...
3850 Elite Series Manual - Page 16

... wood at each other hardware) may interrupt the beam while the door is closing garage door: • Correctly connect and align the safety reversing sensor.
above floor
Invisible Light Beam Protection Area
Facing the door from a closing , the door will stop and reverse to the garage door opener BEFORE installing the safety reversing sensor.
The units must be securely...
3850 Elite Series Manual - Page 23
...
LOCK
LIGHT
Figure 4
LED BLACK
PURPLE
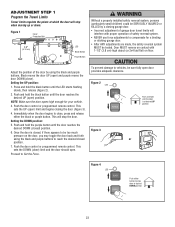
Push either the black or purple button. Push the door control or programmed remote control.
Once the door is at which the door will stop door at desired DOWN position
23 Black moves the door UP (open door provides adequate clearance.
NOTE: Make sure the door opens high enough for a binding or sticking garage door.
•...
3850 Elite Series Manual - Page 24

... garage door.
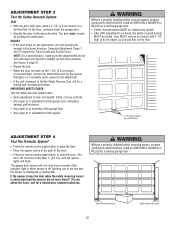
• Too much force on garage door will open and close (DOWN).
3. Push the door control or programmed remote control again. The LED will flash quickly.
2. If the garage door opener cannot open and close the door fully, inspect the door to compensate for the force to enter into Force Adjustment Mode
LED Black Button Purple Button
Figure 3
or
LOCK
LIGHT...
3850 Elite Series Manual - Page 25
... move more than 1" (2.5 cm), and the opener lights will not close the door. Safety Reversing Sensor
25
Safety Reversing Sensor
IMPORTANT SAFETY CHECK:
Test the Safety Reverse System after:
• Each adjustment of door arm length, limits, or force controls.
• Any repair to or adjustment of the garage door (including springs and hardware).
• Any...
3850 Elite Series Manual - Page 26

... must be seen clearly, it will also turn off , then on when someone walks through the open garage door. If open , the door will stop .
7. If opening , the door will reverse.
3. If the obstruction interrupts the sensor beam, the opener lights will operate with up to deactivate any of which changes with any remote, follow the instructions in an...
3850 Elite Series Manual - Page 27
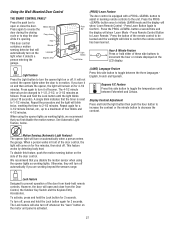
... can be learned and the worklight will not control the opener lights when the door is activated.
27 A single blink indicates that you are working lights, we recommend that will come on automatically when a person enters the garage.
LIGHT Light feature
Press the Light button to turn it 's opening. Degrees F/C Feature Press this side button to Learn Remote.' Otherwise...
3850 Elite Series Manual - Page 30
...
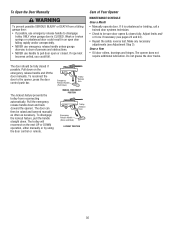
The lockout feature prevents the trolley from a falling garage door: • If possible, use handle to pull door open door falling rapidly and/or unexpectedly. • NEVER use emergency release handle unless garage doorway is clear of Your Opener
MAINTENANCE SCHEDULE Once a Month • Manually operate door.
To Open the Door Manually
To prevent possible SERIOUS INJURY or DEATH from...
3850 Elite Series Manual - Page 31

... pulling the Emergency Release Rope. • Manually bring the door to a closed position. • Loosen the belt by a beep sounding every 30 seconds, replace the battery.
31 My garage door opener beeps: • A solid LED with a security light feature.
This feature activates the light on motor unit then refer to force or travel .
5. This relieves the tension.
1-1/4" (3.18...
3850 Elite Series Manual - Page 32

... Unit
"Learn" Button LED or Diagnostic LED "Learn" Button
Installed Safety Reversing
Sensor
Your garage door opener is not recognized. Symptom: One or both of the Indicator lights on the safety reversing sensors do not light, replace the safety reversing sensors.
3 FLASHES
Door control or wire shorted.
4 FLASHES
Safety reversing sensors slightly misaligned (dim or flashing...
3850 Elite Series Manual - Page 34
... codes are not installed, two clicks will be circumvented.
LOCK
LIGHT
LOCK
LIGHT
4. Your garage door opener has already been programmed at the factory to operate with a non-rolling code remote control, the technical measure in the garage door opener does not authorize the purchaser or supplier of the garage door opener, which provides security against code-theft devices, will...
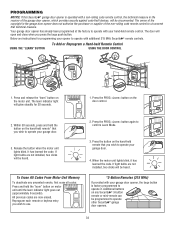
3850 Elite Series Manual - Page 35
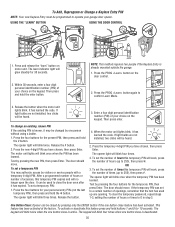
...seconds, enter a four digit personal identification number (PIN) of your garage door opener. LOCK
LIGHT
To change an existing, known PIN
If the existing PIN is active.... To set the number of hours (up to 255), then press #. The opener light will blink three times. The keypad will no longer open the door. Then press and hold buttons 1 and 9 for 10 seconds.
Press the temporary...
3850 Elite Series Manual - Page 38

... the home with a remote.
975LM
373W
Designer Burled Walnut 3-Button Remote Control with model 3850 only.
Wireless Door Control: Push bar, light feature and auxiliary button. Tells you if your home!
For use with SECURITY✚® :
Includes visor clip.
990LM
SECURITY✚® 3-Button Remote Control : Includes visor clip. Monitors up to the garage door opener.
Similar Questions

How To Change The Backup Battery In A Lift Master Garage Door Opener
(Posted by dwagrose 10 years ago)

How To Change The Back Up Battery In The Lift Master Garage Door Opener
(Posted by hukimmer 10 years ago)

How To Disconnect Battery Backup On Elite Series Lift Master Garage Door Opener
(Posted by avfi 10 years ago)
How To Replace Battery In Lift Master Garage Door Opener Model 3850
(Posted by pinButter 10 years ago)

Lift Master Garage Door Opener
What is the difference between a 3850 and a 3850-267?
What is the difference between a 3850 and a 3850-267?
(Posted by jaiello48 12 years ago)