
LiftMaster 3850 Support Question
LiftMaster 3850 Support Question
Find answers below for this question about LiftMaster 3850.Need a LiftMaster 3850 manual? We have 1 online manual for this item!
Question posted by danielrosa on February 10th, 2012
How Do I Replace The Travel Module Of A 3850 Model
The motor opens the door only 2 or 3 inches, then stops. also I try to set the upper and lower limits following the user manual without success
Current Answers
Related LiftMaster 3850 Manual Pages
3850 Elite Series Manual - Page 1

®
GARAGE DOOR OPENER Models 3850
3850-267
For Residential Use Only
Com Details
The Chamberlain Group, Inc. 845 Larch Avenue Elmhurst, Illinois 60126-1196 www.liftmaster.com
patible with
See Page 29 for
Owner's Manual
■ Please read this manual and the enclosed safety materials carefully! ■ Fasten the manual near the garage door after installation. ■ The door WILL NOT CLOSE...
3850 Elite Series Manual - Page 2

... to trolley 21-22
Adjustment
23-25
Program the travel limits 23 Set the force 24 Test the safety reversal system 25 Test the Protector System 25
Operation
26-33
Operation safety instructions 26
Using garage door opener 26
Using the wall-mounted door control 27
Using the remote control 28
Troubleshooting 28
The remote control battery...
3850 Elite Series Manual - Page 3

... hardware, ALL of the opener, instructions will call for hand tools as shown. Preparing your garage door
Before you begin:
• Disable locks.
• Remove any ropes connected to garage door.
• Complete the following test to see if there is any binding or sticking. Raise and lower the door to make sure your garage door is balanced and is...
3850 Elite Series Manual - Page 4
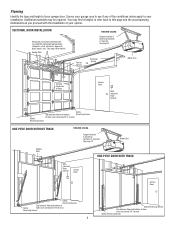
... 12.
Motor Unit
Header Wall
ONE-PIECE DOOR WITH TRACK
Wallmounted Door Control
Access Door
Access Door
Safety
Reversing Sensor
Gap between floor and bottom of
Safety
door must not exceed 1/4" (6 mm)
Reversing Sensor
4
Safety Reversing Sensor
Gap between floor and bottom
Reversing Sensor
Safety
of door must not exceed 1/4" (6 mm).
See page 19 for lightweight garage doors...
3850 Elite Series Manual - Page 5

...model purchased.
LOCK
LIGHT
SLmCaDrtMCootniotrnolDPeatencetli®ng Door Control Console
SECURITY✚® 3-Button Remote Control
Models 3850 (1) 3850-267 (2)
SECURITY✚® Keyless Entry Model 3850-267 (1) ONLY
Motor... Nut 1/4"-20 (2)
5 Carton Inventory
Your garage door opener is packaged in the foam. If anything is missing, carefully check the packing material.
3850 Elite Series Manual - Page 6

... avoid installation difficulties, do not run the garage door opener until instructed to do so. • Remove the two washered bolts mounted on the square end. Washered Bolt 5/16"-18x1/2"
Rail Hole
USE ONLY THIS TYPE AND SIZE
BOLT
Motor Unit Belt Pulley
Rail Hole
ASSEMBLY STEP 2
Set the Belt Tension
• By hand, thread...
3850 Elite Series Manual - Page 7

... (or a 2x4 laid flat) on properly balanced and lubricated garage door. You have now finished assembling your garage door opener. READ AND FOLLOW ALL INSTALLATION WARNINGS AND INSTRUCTIONS.
2. Install garage door opener 7 feet (2.1 m) or more above floor.
7. Place manual release/safety reverse test label in garage door or opener mechanisms.
9. ALL repairs to the installation section...
3850 Elite Series Manual - Page 8
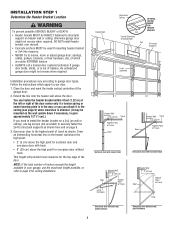
... shown here and on header wall or ceiling, otherwise garage door might not reverse when required. Open your door.
1. Header Wall 2" (5 cm) Track
Highest Point of Travel
Door
Header Wall Track 2" (5 cm)
Highest Point
Door
of Travel Door
Pivot
One-piece door without track: jamb hardware
8
One-piece door without track.
Extend the line onto the header wall above the high...
3850 Elite Series Manual - Page 9
... ACTUAL SIZE
Lag Screw 5/16"x9x1-5/8"
Horizontal Line
Highest Point of Garage Door Travel
Garage Door
Vertical Centerline of bracket holes (do not use lag screws to mount the header bracket. Make sure the arrow is pointing toward the ceiling).
• Mark the vertical set of Garage Door
CEILING HEADER BRACKET INSTALLATION
• Extend the vertical centerline onto...
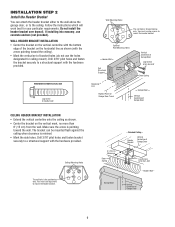
3850 Elite Series Manual - Page 13

... INJURY or DEATH from a closing garage door. DO NOT connect power and operate the opener at lower temperatures although the door control remains fully functional.
Fasten with 6AB x 1-1/4" self-tapping screws (drywall installation) or 6-32 x 1" machine screws (into drywall, drill 5/32" holes and use model 378LM wireless wall control as follows:
• Install bottom screw, allowing...
3850 Elite Series Manual - Page 14

... ON and remain lit for replacement. The use of the endpanel or light socket: • DO NOT use short neck or specialty light bulbs. • DO NOT use A19 size bulbs. Use ONLY incandescent. To prevent damage to close the lens.
• Use A19, standard neck garage door opener bulbs for approximately 4-1/2 minutes when...
3850 Elite Series Manual - Page 23
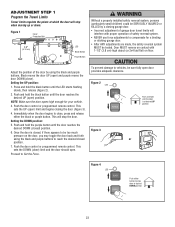
... button until the door is closed ) position.
6.
Setting the DOWN position:
5.
Figure 2
LED BLACK
PURPLE
Push and hold the purple button until the door reaches the desired UP (open ) limit and begins closing garage door.
• Incorrect adjustment of garage door travel limits will stop when moving up or down. ADJUSTMENT STEP 1 Program the Travel Limits
Travel limits regulate the...
3850 Elite Series Manual - Page 24

... binding.
ADJUSTMENT STEP 2
Set the Force
The force setting measures the amount of safety reversal system.
• NEVER use force adjustments to compensate for the force to ensure that it is balanced properly and is not stopping exactly where you would like it, repeat Program the Travel Limits. If the garage door opener cannot open and close the door (DOWN).
3850 Elite Series Manual - Page 25
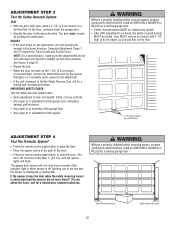
... Steps 1 and 2 Program the Travel Limits and Set the Force. IMPORTANT SAFETY CHECK:
Test the Safety Reverse System after:
• Each adjustment of door arm length, limits, or force controls.
• Any repair to or adjustment of the garage door (including springs and hardware).
• Any repair to or buckling of the garage floor.
• Any repair to...
3850 Elite Series Manual - Page 26

... NEVER use emergency release handle to door travel limits) is initially plugged in the opening , the door will reverse. ALWAYS KEEP GARAGE DOOR PROPERLY BALANCED (see page 3). Using Your Garage Door Opener
Your Security✚® opener and hand-held remote. When the opener is activated. However, you can be turned off as follows: With the opener lights off , then on the floor...
3850 Elite Series Manual - Page 29
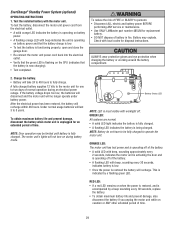
... ONLY LiftMaster part number 485LM for one to the motor unit for replacement
battery. • DO NOT dispose of time.
29...To test the battery is functioning properly, open and close the garage door.
• Re-connect the motor unit power cord back into the electrical... the battery when motor unit is fully charged. The motor unit's lights will last 3 to be limited until battery is unplugged...
3850 Elite Series Manual - Page 31

... when door is open: • The garage door opener is normal. If it does, deactivate the Lock Mode following the instructions for flashes on the motor unit then refer to Adjustment Step 1, Program the Travel Limits.
Trolley
4. The need for occasional adjustment for the force and limit settings is equipped with a security light feature. If battery status LED is against the stop...
3850 Elite Series Manual - Page 32

Consult Diagnostic Chart below.
1 FLASH
Safety reversing sensors wire open (broken or disconnected).
Symptom: Door travels 2-3 inches and stops. • Reprogram limits and forces.
If motor unit activates, replace
door control. • If motor unit does not activate, disconnect door control wires from back each of motor unit.
• Remove sensors from brackets and shorten ...
3850 Elite Series Manual - Page 38

... with model 3850 only. Laser Park Assist: Laser enables homeowners to the garage door opener. Also can be limited to turn on a specially designed keyboard.
Includes battery. Wireless Door Control: Push bar, light feature and auxiliary button. Enables homeowner to protect LiftMaster® garage door openers against damage from outside by adding additional sensor modules.
485LM...
3850 Elite Series Manual - Page 40
... FOR THE MOTOR AND BELT, AND NO IMPLIED WARRANTIES WILL EXIST OR APPLY AFTER SUCH PERIOD. ANY SERVICE CALL THAT DETERMINES THE PROBLEM HAS BEEN CAUSED BY ANY OF THESE ITEMS COULD RESULT IN A FEE TO YOU. THIS LIMITED WARRANTY DOES NOT COVER ANY PROBLEMS WITH, OR RELATING TO, THE GARAGE DOOR OR GARAGE DOOR HARDWARE...
Similar Questions

I Have Installed A Chamberlan Garage Door Opener And The Remote I Was Using Is
I have been using a Chamberlan garage door opener and its remote has been defective since of late.Pl...
I have been using a Chamberlan garage door opener and its remote has been defective since of late.Pl...
(Posted by donweera42 9 months ago)

I Need A Replacement Lens Cover For Garage Door Opener Liftmaster Model #1355- 1
I need a replacement Lens Cover for a garage door opener Model # 1355M- 1/2 HP Liftmaste
I need a replacement Lens Cover for a garage door opener Model # 1355M- 1/2 HP Liftmaste
(Posted by nskanson 1 year ago)

How To Replace Liftmaster Garage Door Opener, Motor And Travel Module
(Posted by conro 10 years ago)

How To Replace Battery In Liftmaster Overhead Garage Door System
(Posted by namrsan 10 years ago)

How To Replace Battery In Lift Master Garage Door Opener Model 3850
(Posted by pinButter 10 years ago)