
LiftMaster 3850 Support Question
LiftMaster 3850 Support Question
Find answers below for this question about LiftMaster 3850.Need a LiftMaster 3850 manual? We have 1 online manual for this item!
Question posted by jimakyoss on June 16th, 2014
How To Replace Back Up Battery On Liftmaster Garage Opener
The person who posted this question about this LiftMaster product did not include a detailed explanation. Please use the "Request More Information" button to the right if more details would help you to answer this question.
Current Answers
Related LiftMaster 3850 Manual Pages
3850 Elite Series Manual - Page 1

...;
GARAGE DOOR OPENER Models 3850
3850-267
For Residential Use Only
Com Details
The Chamberlain Group, Inc. 845 Larch Avenue Elmhurst, Illinois 60126-1196 www.liftmaster.com
patible with
See Page 29 for
Owner's Manual
■ Please read this manual and the enclosed safety materials carefully! ■ Fasten the manual near the garage door after installation. ■ The door...
3850 Elite Series Manual - Page 2

...
Operation
26-33
Operation safety instructions 26
Using garage door opener 26
Using the wall-mounted door control 27
Using the remote control 28
Troubleshooting 28
The remote control battery 28
EverCharge® Standby Power System (optional 29
To open the door manually 30
Care of damage to your opener 30
Having a problem? (Troubleshooting 31
Diagnostic chart 32...
3850 Elite Series Manual - Page 3

...ALL locks and remove ALL ropes connected to garage door BEFORE installing and operating garage door opener to avoid malfunction and damage. To prevent damage to garage door and opener:
• ALWAYS disable locks BEFORE installing and operating the opener.
• ONLY operate garage door opener at 120V, 60 Hz to avoid entanglement. Lift the door about halfway as illustrated below. If balanced...
3850 Elite Series Manual - Page 4
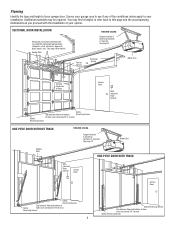
... details. See page 12. See page 19 for lightweight garage doors (fiberglass, steel, aluminum, door with the installation of the conditions below apply to see if any of your opener. See page 12. Vertical Centerline of Door
Access Door
Wallmounted Door Control
Safety
Gap between floor and bottom of door must not exceed 1/4" (6 mm)
Reversing Sensor
ONE-PIECE...
3850 Elite Series Manual - Page 5

...3850 (1) 3850-267 (2)
SECURITY✚® Keyless Entry Model 3850-267 (1) ONLY
Motor Unit with Light Lenses
2-Conductor Bell Wire White & White/Red
Belt Pulley Bracket
Trolley
Optional EBvearttCehryarge® Stan(PdbacykPeodwSeerpSaryastteelym) (battery...Wing Nut 1/4"-20 (2)
5 Carton Inventory
Your garage door opener is missing, carefully check the packing material. Hardware for installation ...
3850 Elite Series Manual - Page 6

...spring releases and snaps the nut ring against the trolley (Figure 2).
• Place a 7/16" open end wrench on the square end.
Tighten bolts securely. ASSEMBLY STEP 1 Attach the Rail to the...Figure 3). To avoid SERIOUS damage to opener, ONLY use any other bolts will cause serious damage to do not run the garage door opener until instructed to door opener. • Position belt over belt...
3850 Elite Series Manual - Page 7

... on contact with #8x3/8" hex screws provided. You have now finished assembling your garage door opener. Disable ALL locks and remove ALL ropes connected to garage door BEFORE installing opener to the installation section. Install wall-mounted garage door control:
• within sight of the garage door.
• out of reach of children at minimum height of 5 feet (1.5 m).
• away...
3850 Elite Series Manual - Page 8
...).)
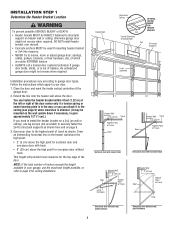
If you can fasten the header bracket within 4 feet (1.22 m) of the left or right of the door center only if a torsion spring or center bearing plate is out of balance. Open your door to your garage, use lag screws (not provided) to securely fasten the 2x4 to page 9 for ceiling installation.
An unbalanced...
3850 Elite Series Manual - Page 10
NOTE: If the door spring is in the way you'll need help. Have someone hold the opener securely on a temporary support to allow the rail to clear the spring.
... SHOWN ACTUAL SIZE
Clevis Pin 5/16"x2-3/4"
Ring Fastener
10 Header Wall Header Bracket Belt Pulley Bracket
Garage Door
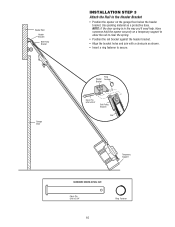
INSTALLATION STEP 3 Attach the Rail to secure. Use packing material as shown.
• Insert a ring fastener to...
3850 Elite Series Manual - Page 11

...this point.
Header Bracket
Top of Motor Unit
Top of Door
2x4 is not tall enough.
• Open the door all the way and place a 2x4 laid flat on ...door, pull down on top section of the opener to determine
the correct mounting height
from ceiling.
11 SECTIONAL DOOR OR ONE-PIECE DOOR WITH TRACK
A 2x4 laid flat is completed. To prevent damage to garage door, rest garage door opener...
3850 Elite Series Manual - Page 12

... CEILING - Hanging brackets should be angled (Figure 1) to the structural support. 2. Measure the distance from a falling garage door opener, fasten it SECURELY to a support with the header bracket if the bracket is not centered above the door). 7. Grease the top and underside of the hanging bracket to required lengths. 3. HARDWARE SHOWN ACTUAL SIZE
To...
3850 Elite Series Manual - Page 13

....
• Position bottom of door control on screw head and slide down to a single gang box (Figure 1). DO NOT overtighten.
• Replace cover by inserting top tabs first... from ALL moving parts of door and door hardware. NOTE: The functional temperature range of the door control to each garage door opener. CAUTION: Continuous exposure of the door control is connected and properly ...
3850 Elite Series Manual - Page 14

... (-) wires from motor unit to close the lens.
• Use A19, standard neck garage door opener bulbs for replacement.
To prevent possible OVERHEATING of lens. Use ONLY incandescent.
ALWAYS wear protective gloves and eye protection when changing the battery or working around the battery compartment.
INSTALLATION STEP 7 Install the EverCharge® Standby Power System (optional)
•...
3850 Elite Series Manual - Page 15

... use handle to disengage
trolley ONLY when garage door is required by your garage door opener has a grounding type plug with an overhand knot.
To prevent possible SERIOUS INJURY or DEATH from electrocution or fire:
• Disconnect ALL electric and battery power BEFORE performing ANY service or maintenance.
• Garage door installation and wiring MUST be grounded.
•...
3850 Elite Series Manual - Page 16

... repositioning is NO HIGHER
than 6" (15 cm) above floor
16 This required safety device MUST NOT be installed inside the garage. The units must be connected and aligned correctly before the garage door opener will detect an obstacle in the down direction. Safety Reversing Sensor 6" (15 cm) max.
To prevent SERIOUS INJURY or DEATH...
3850 Elite Series Manual - Page 29
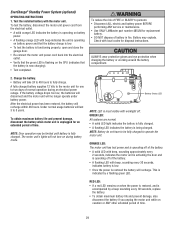
... beep indicates the unit is operating on battery power and that the battery charge is low.
• To test the battery is functioning properly, open and close the garage door.
• Re-connect the motor unit power cord back into the electrical outlet.
• Verify that the battery is unplugged for replacement
battery. • DO NOT dispose of FIRE...
3850 Elite Series Manual - Page 31

...door reverses for the force and limit settings is accompanied by adjusting the outer nut 4 to a closed position. • Loosen the belt by a beep sounding every 30 seconds, replace the battery... the motor unit is activating the door and is operating off when door is open: • The garage door opener is equipped with beep, sounding every 30 seconds, indicates battery is low. • If a...
3850 Elite Series Manual - Page 32

... "Learn" Button
Installed Safety Reversing
Sensor
Your garage door opener is programmed with jumper wire.
Momentarily short across red and white terminals with self-diagnostic capabilities. Symptom: No movement, motor runs 2-3 seconds. • Reconnect the emergency release. • Motor may need to be replaced.
32 Symptom: The door doesn't activate from motor unit. The "Learn...
3850 Elite Series Manual - Page 38

... with model 3850 only.
EverCharge® Standby Power System: Provides backup power to operate garage door opener from lightning and power surges.
38 Also can be limited to a programmable number of hours or entries.
370LM 378LM
915LM
CLOSED OPEN
Garage Door Monitor:
Security for the largest door of your garage door is designed to protect LiftMaster® garage door openers against...
3850 Elite Series Manual - Page 40
... REPAIRED OR REPLACED UNIT, REPLACEMENT OF BATTERIES IN REMOTE CONTROL...LIFTMASTER® SERVICE IS ON CALL
OUR LARGE SERVICE ORGANIZATION SPANS AMERICA
INSTALLATION AND SERVICE INFORMATION IS AS NEAR AS YOUR TELEPHONE. THIS LIMITED WARRANTY DOES NOT COVER ANY PROBLEMS WITH, OR RELATING TO, THE GARAGE DOOR OR GARAGE DOOR HARDWARE, INCLUDING BUT NOT LIMITED TO THE DOOR SPRINGS, DOOR ROLLERS, DOOR...
Similar Questions

Problem With Elite Series Garage Door Model 3850 Won't Close
(Posted by acerseerki 9 years ago)

How To Replace Liftmaster Garage Door Opener, Motor And Travel Module
(Posted by conro 9 years ago)

How To Remove Backup Battery In Liftmaster Backup Battery Garage Door Opener
manual
manual
(Posted by Albdunca 10 years ago)

Replacement Battery For Elite Series Liftmaster Garage Door Opener
Where can I buy a replacement battery?
Where can I buy a replacement battery?
(Posted by sriley85800 11 years ago)