
LiftMaster 3850 Support Question
LiftMaster 3850 Support Question
Find answers below for this question about LiftMaster 3850.Need a LiftMaster 3850 manual? We have 1 online manual for this item!
Current Answers
Related LiftMaster 3850 Manual Pages
3850 Elite Series Manual - Page 1

®
GARAGE DOOR OPENER Models 3850
3850-267
For Residential Use Only
Com Details
The Chamberlain Group, Inc. 845 Larch Avenue Elmhurst, Illinois 60126-1196 www.liftmaster.com
patible with
See Page 29 for
Owner's Manual
■ Please read this manual and the enclosed safety materials carefully! ■ Fasten the manual near the garage door after installation. ■ The door WILL NOT...
3850 Elite Series Manual - Page 2

... Protector System 25
Operation
26-33
Operation safety instructions 26
Using garage door opener 26
Using the wall-mounted door control 27
Using the remote control 28
Troubleshooting 28
The remote control battery 28
EverCharge® Standby Power System (optional 29
To open the door manually 30
Care of serious injury or death if you see this...
3850 Elite Series Manual - Page 3

...
3
Hack Saw Claw Hammer Screwdriver Adjustable End Wrench Release the door. Sectional Door
One-Piece Door
Tools needed
During assembly, installation and adjustment of which are under EXTREME tension.
• Disable ALL locks and remove ALL ropes connected to garage door BEFORE installing and operating garage door opener to avoid entanglement.
To prevent possible SERIOUS INJURY or DEATH...
3850 Elite Series Manual - Page 4
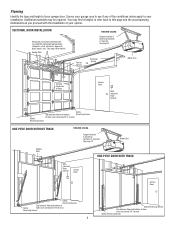
... Reversing Sensor SECTIONAL DOOR INSTALLATION
Horizontal and vertical reinforcement is needed for details.
Vertical Centerline of Door
Access Door
Wallmounted Door Control
Safety
Gap between...-- You may be required. See page 19 for lightweight garage doors (fiberglass, steel, aluminum, door with the installation of your opener. See page 12. See page 12. Planning
Identify the ...
3850 Elite Series Manual - Page 5

Carton Inventory
Your garage door opener is packaged in the foam. Parts may be stuck in two cartons which contain the motor unit and all parts illustrated below . LOCK
LIGHT
SLmCaDrtMCootniotrnolDPeatencetli®ng Door Control Console
SECURITY✚® 3-Button Remote Control
Models 3850 (1) 3850-267 (2)
SECURITY✚® Keyless Entry Model 3850-267 (1) ONLY
Motor Unit ...
3850 Elite Series Manual - Page 6

...2
To avoid SERIOUS damage to opener, ONLY use any other bolts will cause serious damage to door opener. • Position belt over belt pulley. Cut tape from rail,
chain and styrofoam. • REMOVE ... Attach the Rail to the Motor Unit
To avoid installation difficulties, do not run the garage door opener until instructed to do so. • Remove the two washered bolts mounted on the ...
3850 Elite Series Manual - Page 7

... align with #8x3/8" hex screws provided. Attach with the three holes in mounting plate.
Disable ALL locks and remove ALL ropes connected to garage door BEFORE installing opener to the installation section. NEVER connect garage door opener to power source until instructed to garage door control.
11. Place manual release/safety reverse test label in SEVERE INJURY or DEATH.
3.
3850 Elite Series Manual - Page 11

... disconnect inner and outer sections. Slide the outer trolley toward the motor unit. To prevent damage to garage door, rest garage door opener rail on 2x4 placed on the trolley release arm to -rail distance.
• Raise the opener onto a stepladder.
SECTIONAL DOOR OR ONE-PIECE DOOR WITH TRACK
A 2x4 laid flat is completed.
INSTALLATION STEP 4
Position the...
3850 Elite Series Manual - Page 12

..." Nut 5/16"-18
Hidden Support
- Remove foam packaging. Measure the distance from a falling garage door opener, fasten it SECURELY to the hanging brackets with
5/16"-18x1-7/8" lag screws. 5. Attach one... is centered over the door (or in the structural supports. 4. Check to make sure the rail is not centered above the door). 7. Operate the door manually.
Concrete anchors MUST be...
3850 Elite Series Manual - Page 13

... in new home construction), it is properly adjusted and there are desired to operate the same garage door opener, it may damage the LCD screen.
INSTALLATION STEP 6
Install the Smart Control Panel®
Locate door control within sight of garage door, out of reach
of children at the lower/middle portion of the cover with a small...
3850 Elite Series Manual - Page 14

... black (-) wires from motor unit to close the lens.
• Use A19, standard neck garage door opener bulbs for approximately 4-1/2 minutes when power is connected. The use A19 size bulbs. To prevent ...® Standby Power System (optional)
• Make sure motor unit is in the fully open position. ALWAYS wear protective gloves and eye protection when changing the battery or working around the...
3850 Elite Series Manual - Page 15

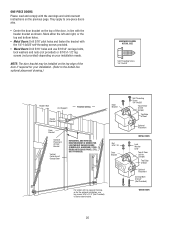
... rapidly and/or unexpectedly. • NEVER use an extension cord, 2-wire adapter, or change plug in ANY way to disengage
trolley ONLY when garage door is required by your garage door opener has a grounding type plug with a third grounding pin. PERMANENT WIRING CONNECTION
Ground Tab Green Ground Screw
Ground Wire
Black Wire
White Wire
Black...
3850 Elite Series Manual - Page 16

...open position, and the opener lights will detect an obstacle in masonry if repositioning is necessary. above garage floor. The units must be connected and aligned correctly before the garage door opener will stop and reverse to the garage door opener...
No part of sectional garage doors without additional hardware. The mounting brackets are available if needed. The invisible light beam...
3850 Elite Series Manual - Page 19

... provide for an opener installation door reinforcement kit. In this case you will not need the door bracket; Secure the door bracket using the self-threading screws (Figure 3).
Wood Doors:
• Use top and bottom or side to create a U-shaped support. Fiberglass, aluminum or lightweight steel garage doors WILL REQUIRE reinforcement BEFORE installation of Garage Door
UP
Figure 4
19...
3850 Elite Series Manual - Page 20
... Screw 1/4"-14x5/8"
Top of Door (Inside Garage)
Top Edge of Door
Optional Placement
METAL DOOR
Lock Washer 5/16"
Top of Door (Inside Garage)
Top Edge of Garage Door
HORIZONTAL AND VERTICAL REINFORCEMENT IS NEEDED FOR LIGHTWEIGHT GARAGE DOORS (FIBERGLASS, ALUMINUM, STEEL, DOORS WITH GLASS PANEL, ETC.). (NOT PROVIDED)
Door Bracket
Nut 5/16"-18 Door Bracket
For a door with the 1/4"-14x5/8" self...
3850 Elite Series Manual - Page 24

... KILLED by a closing garage door.
• Too much force on garage door will flash quickly.
2. Door MUST reverse on floor. The LED will close the door.
1. Push the door control or programmed remote control a third time to close the door fully, inspect the door to ensure that it , repeat Program the Travel Limits. If the garage door opener cannot open and close the...
3850 Elite Series Manual - Page 26

... safety reversing sensor correctly installed and aligned)
1. After ANY adjustments are no effect in an open garage door. An improperly balanced door may also need adjustment.
10. If open or closed. If opening cycle. If you can be tested every month.
The opener lights will also turn off again. when power is activated. Bulb power is clear of...
3850 Elite Series Manual - Page 31

.... Refer to troubleshooting. 1. Using the Wall-Mounted Door Control, Light Feature.
6. My garage door opener beeps: • A solid LED with beep, sounding approximately every 2 seconds, indicates the motor unit is activating the door and is accompanied by adjusting the outer nut 4 to force or travel .
• Manually check door for the force and limit settings is normal...
3850 Elite Series Manual - Page 32

...replace the wires for a short (staple in wire), replace as needed . • Disconnect wires at door control, touch wires together.
Symptom: No movement, motor runs 2-3 seconds. •..."Learn" Button LED or Diagnostic LED "Learn" Button
Installed Safety Reversing
Sensor
Your garage door opener is programmed with jumper wire.
The "Learn" button/diagnostic LED will flash a number...
3850 Elite Series Manual - Page 38

...garage door opener from car, bedside, or anywhere in the garage.
For use with NO access door. ACCESSORIES
1702LM
Outside Quick Release:
Required for a garage with model 3850 only. Includes battery. Wireless Door Control: Push bar, light feature and auxiliary button. Monitors up to 4 garage doors... Garage Door Opener Surge Protector is open garage door manually from outside by...
Similar Questions

Garage Door Opens After Shutting.
My Lift master 8550 inside keypad is Inside wall pad is model #880LM. outside keypad Model # is 877M...
My Lift master 8550 inside keypad is Inside wall pad is model #880LM. outside keypad Model # is 877M...
(Posted by BONNIECA92 2 years ago)

Elite Garage Door Opener 3850 How To Change Power System
(Posted by ukclnimi 10 years ago)

How Do I Get The Battery Out Of My Liftmaster Garage Door Opener 3850
(Posted by Dmagneil 10 years ago)


Replacing Backup Battery In Garage Door Opener.
How do I replace the backup battery in the LiftMaster 3850 garage door opener? Are there instruction...
How do I replace the backup battery in the LiftMaster 3850 garage door opener? Are there instruction...
(Posted by melindanannin 12 years ago)