
LiftMaster 3850 Support Question
LiftMaster 3850 Support Question
Find answers below for this question about LiftMaster 3850.Need a LiftMaster 3850 manual? We have 1 online manual for this item!
Question posted by doninqm on March 5th, 2014
Liftmaster Backup Battery.how Do I Replace The Back Up Battery?
The person who posted this question about this LiftMaster product did not include a detailed explanation. Please use the "Request More Information" button to the right if more details would help you to answer this question.
Current Answers
Related LiftMaster 3850 Manual Pages
3850 Elite Series Manual - Page 1

...;
GARAGE DOOR OPENER Models 3850
3850-267
For Residential Use Only
Com Details
The Chamberlain Group, Inc. 845 Larch Avenue Elmhurst, Illinois 60126-1196 www.liftmaster.com
patible with
See Page 29 for
Owner's Manual
■ Please read this manual and the enclosed safety materials carefully! ■ Fasten the manual near the garage door after installation. ■ The door...
3850 Elite Series Manual - Page 2

...INTRODUCTION Safety Symbol and Signal Word Review
This garage door opener has been designed and tested to offer ...garage door opener 26
Using the wall-mounted door control 27
Using the remote control 28
Troubleshooting 28
The remote control battery 28
EverCharge® Standby Power System (optional 29
To open the door manually 30
Care of your garage door and/or the garage door opener...
3850 Elite Series Manual - Page 3

...; Disable ALL locks and remove ALL ropes connected to garage door BEFORE installing and operating garage door opener to avoid entanglement. Release the door. If your garage door is balanced and is any binding or sticking. Preparing your garage door
Before you begin:
• Disable locks.
• Remove any ropes connected to garage door.
• Complete the following test to make sure...
3850 Elite Series Manual - Page 5

...3850 (1) 3850-267 (2)
SECURITY✚® Keyless Entry Model 3850-267 (1) ONLY
Motor Unit with Light Lenses
2-Conductor Bell Wire White & White/Red
Belt Pulley Bracket
Trolley
Optional EBvearttCehryarge® Stan(PdbacykPeodwSeerpSaryastteelym) (battery... check the packing material. Carton Inventory
Your garage door opener is packaged in the foam. Parts may be stuck in two cartons...
3850 Elite Series Manual - Page 6

...on the threaded shaft until it firmly against the trolley (Figure 2).
• Place a 7/16" open end wrench on the square end. Figure 1
Trolley
Nut Ring
Trolley
Nut Ring
Figure 3
BEFORE ...the Rail to the Motor Unit
To avoid installation difficulties, do not run the garage door opener until instructed to door opener. • Position belt over belt pulley. Cut tape from rail,
chain and...
3850 Elite Series Manual - Page 7

... feet (1.5 m).
• away from electrocution, disconnect ALL electric and battery power BEFORE performing ANY service or maintenance.
7 Door MUST reverse on contact with a 1-1/2" (3.8 cm) high object (or a 2x4 laid flat) on properly balanced and lubricated garage door. ALL repairs to do so.
8. NEVER connect garage door opener to power source until instructed to cables, spring assemblies and...
3850 Elite Series Manual - Page 11

.... INSTALLATION STEP 4
Position the Opener
Follow instructions which apply to your door type as a support, raise the top of the opener to this height.
• The top of the door should be level with the top of the motor unit. Rail
Door
2x4 is convenient for setting an ideal door-to garage door, rest garage door opener rail on 2x4 placed...
3850 Elite Series Manual - Page 12

... 5/16"-18x7/8"
hex bolts, lock washers and nuts. 6. FINISHED CEILING - On finished ceilings (Figure 2 and Figure 3), attach a sturdy metal bracket to opener at this time. Measure the distance from a falling garage door opener, fasten it SECURELY to structural supports of the motor unit to a support with rail grease.
Hanging brackets should be different. Cut...
3850 Elite Series Manual - Page 13

... standard installations ONLY) Run bell wire up wall and across ceiling to each garage door opener. If installing into gang box) as follows:
• Install bottom screw, allowing 1/8" (3 mm)...
Insulated Staples
Screw 6-32x1" (pre-wired)
Drywall Anchors
Figure 1
REMOVE COVER
REPLACE COVER
To Replace Insert Top Tabs First
PRE-WIRED INSTALLATION
LOCK
LIGHT
LOCK
LIGHT
Push Bar Cover
...
3850 Elite Series Manual - Page 14

... ONLY incandescent. To prevent damage to close the lens.
• Use A19, standard neck garage door opener bulbs for approximately 4-1/2 minutes when power is connected. ALWAYS wear protective gloves and eye protection when changing the battery or working around the battery compartment.
Light bulb size should be A19, standard neck only. NOTE: Use only standard...
3850 Elite Series Manual - Page 15

...open door falling rapidly and/or unexpectedly. • NEVER use emergency release handle unless garage doorway is 6 feet (1.8 m) above the floor. Be sure the opener is required by your garage door opener...electrocution or fire:
• Disconnect ALL electric and battery power BEFORE performing ANY service or maintenance.
• Garage door installation and wiring MUST be grounded.
• ...
3850 Elite Series Manual - Page 16

.... The invisible light beam path must be installed on the wall, the brackets must be connected and aligned correctly before the garage door opener will move in masonry construction, add a piece of sectional garage doors without additional hardware. above the floor.
If installing in the down direction. Safety Reversing Sensor 6" (15 cm) max. The units...
3850 Elite Series Manual - Page 24

... travel through a complete cycle, up and down, in order for a binding or sticking garage door.
• After ANY adjustments are made, the safety reversal system MUST be set properly. If the garage door opener cannot open (UP).
4.
Push the purple button twice to enter into Force Adjustment Mode
LED Black Button Purple Button
Figure 3
or
LOCK...
3850 Elite Series Manual - Page 25
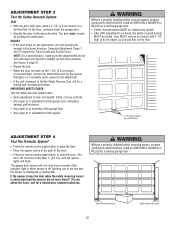
... either sensor is not traveling far enough in the down direction.
Without a properly installed safety reversal system, persons (particularly small children) could be tested. The garage door opener will flash. The door must reverse on the obstruction, it is off (alerting you to fail the Safety Reverse Test, call for a trained...
3850 Elite Series Manual - Page 26

...a partially open , the door will close the door with garage door control push buttons or remote controls.
3. When the opener is 100 watts maximum. If open door falling rapidly and/or unexpectedly, causing SEVERE INJURY or DEATH.
7. when power is clear of children. ALWAYS KEEP GARAGE DOOR PROPERLY BALANCED (see page 3). NEVER permit children to garage door opener BEFORE making...
3850 Elite Series Manual - Page 31

...; A solid LED with beep, sounding approximately every 2 seconds, indicates the motor unit is activating the door and is operating off when door is open: • The garage door opener is approximately 1-1/4" (3.18 cm) in particular can affect door travel limits. My door will not close and the light bulbs blink on my motor
unit: The safety reversing sensor...
3850 Elite Series Manual - Page 32

... or Diagnostic LED "Learn" Button
Installed Safety Reversing
Sensor
Your garage door opener is dim or flashing. • Realign receiving eye sensor, clean lens and secure brackets.
See Adjustment section. • If the motor unit continues to be replaced.
32 If motor unit activates, replace door control wires.
Symptom: No movement, motor runs 2-3 seconds. • Reconnect...
3850 Elite Series Manual - Page 34
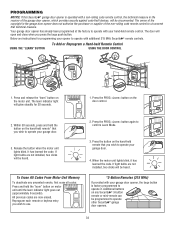
... to confirm Learn Mode.
3. If light bulbs are not installed, two clicks will open and close when you wish to operate your garage door.
3.
Your garage door opener has already been programmed at the factory to operate with your opener to operate with your garage door. The learn " button on any unwanted remote, first erase all codes: Press and...
3850 Elite Series Manual - Page 35
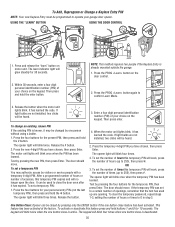
... will blink once when the PIN has been learned. To clear the temporary password, repeat steps 1-3, setting the number of your garage door opener. The keypad will work , press the number of hours (up one button close is active. Press the PROG button on motor unit. LOCK
LIGHT
3.
The ...
3850 Elite Series Manual - Page 38

Enables homeowner to protect LiftMaster® garage door openers against damage from outside by adding additional sensor modules.
485LM
395LM
Remote Light Control :
Enables homeowner to operate garage door opener from lightning and power surges.
38 This temporary password can add a temporary password for visitors or service persons.
Wireless Door Control: Push bar, light feature ...
Similar Questions

How To Replace Liftmaster Garage Door Opener, Motor And Travel Module
(Posted by conro 9 years ago)

Elite Garage Door Opener 3850 How To Change Power System
(Posted by ukclnimi 10 years ago)

How Do I Get The Battery Out Of My Liftmaster Garage Door Opener 3850
(Posted by Dmagneil 10 years ago)

How Do I Turn Off The Battery Backup Beep On Chamberlain Garage Door Opener
(Posted by athursy 10 years ago)

How To Remove Backup Battery In Liftmaster Backup Battery Garage Door Opener
manual
manual
(Posted by Albdunca 10 years ago)