
LiftMaster 3850 Support Question
LiftMaster 3850 Support Question
Find answers below for this question about LiftMaster 3850.Need a LiftMaster 3850 manual? We have 1 online manual for this item!
Question posted by donahanna on September 4th, 2012
Battery Is Beeping
I assume the beep is result of low battery,#485LM. I finally found the barttery,but not able to remove it. So I have to remove more than the door to the battery compartment? I can I get the battery out of the battery area?
Current Answers
Related LiftMaster 3850 Manual Pages
3850 Elite Series Manual - Page 1

®
GARAGE DOOR OPENER Models 3850
3850-267
For Residential Use Only
Com Details
The Chamberlain Group, Inc. 845 Larch Avenue Elmhurst, Illinois 60126-1196 www.liftmaster.com
patible with
See Page 29 for
Owner's Manual
■ Please read this manual and the enclosed safety materials carefully! ■ Fasten the manual near the garage door after installation. ■...
3850 Elite Series Manual - Page 2

...
Operation
26-33
Operation safety instructions 26
Using garage door opener 26
Using the wall-mounted door control 27
Using the remote control 28
Troubleshooting 28
The remote control battery 28
EverCharge® Standby Power System (optional 29
To open the door manually 30
Care of your garage door and/or the garage door opener if you do not comply with the...
3850 Elite Series Manual - Page 3

... which are under EXTREME tension.
• Disable ALL locks and remove ALL ropes connected to garage door BEFORE installing and operating garage door opener to avoid malfunction and damage. To prevent damage to garage door and opener:
• ALWAYS disable locks BEFORE installing and operating the opener.
• ONLY operate garage door opener at 120V, 60 Hz to avoid entanglement.
Sectional...
3850 Elite Series Manual - Page 4
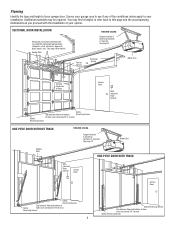
... back to your garage area to see if any of the conditions below apply to this page and the accompanying illustrations as you proceed with glass panels, etc.). Torsion Spring
Extension
Spring OR
Motor Unit
--- --- -- Header Wall
FINISHED CEILING
Support bracket & fastening hardware is required.
Vertical Centerline of Door
Access Door
Wallmounted Door Control
Safety...
3850 Elite Series Manual - Page 5

...
Your garage door opener is packaged in the foam.
Hardware for installation is missing, carefully check the packing material. Parts may be stuck in two cartons which contain the motor unit and all parts illustrated below . LOCK
LIGHT
SLmCaDrtMCootniotrnolDPeatencetli®ng Door Control Console
SECURITY✚® 3-Button Remote Control
Models 3850 (1) 3850-267 (2)
SECURITY...
3850 Elite Series Manual - Page 6

...the garage door opener until instructed to door opener. &#...8226; Position belt over belt pulley.
Figure 1
Trolley
Nut Ring
Trolley
Nut Ring
Figure 3
BEFORE 1" (2.5 cm)
AFTER RELEASE 1-1/4" (3.18 cm)
6
Trolley Threaded Shaft
Spring/Trolley Nut
Square End
Trolley
Threaded
Nut
Shaft
Ring
Nut Ring Slots
Figure 2 Cut tape from rail,
chain and styrofoam. • REMOVE...
3850 Elite Series Manual - Page 7

...8226; away from electrocution, disconnect ALL electric and battery power BEFORE performing ANY service or maintenance.
7 Mount emergency release handle 6 feet (1.8 m) above floor.
6. Upon completion of garage door.
12.
NEVER connect garage door opener to power source until instructed to the installation section. They could result in SEVERE INJURY or DEATH.
3. Attach with...
3850 Elite Series Manual - Page 8
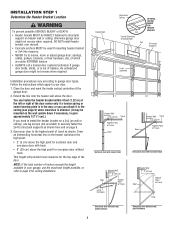
... the header wall above the high point for sectional door and one-piece door with horizontal track
Header Wall 8" (20 cm)
Door
Highest
Point
of Travel
Jamb Hardware
Header Wall 8" (20 cm)
Highest Point of the garage door.
2. An unbalanced garage door might not reverse when required.
Open your garage, use lag screws (not provided) to securely fasten the...
3850 Elite Series Manual - Page 10
..."x2-3/4"
Belt Pulley Bracket
Rail
Temporary Support
HARDWARE SHOWN ACTUAL SIZE
Clevis Pin 5/16"x2-3/4"
Ring Fastener
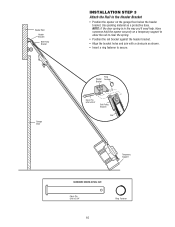
10 Header Wall Header Bracket Belt Pulley Bracket
Garage Door
INSTALLATION STEP 3 Attach the Rail to the Header Bracket
• Position the opener on a temporary support to allow the rail to secure.
NOTE: If the...
3850 Elite Series Manual - Page 11

... floor, measure the distance from ceiling.
11 Slide the outer trolley toward the motor unit.
INSTALLATION STEP 4
Position the Opener
Follow instructions which apply to your door type as a support, raise the top of the opener to garage door, rest garage door opener rail on 2x4 placed on the trolley release arm to -rail distance.
• Raise the...
3850 Elite Series Manual - Page 12

... different. Cut both pieces of the garage. Grease the top and underside of the motor unit to the hanging brackets with rail grease. Remove foam packaging. Fasten the opener to the structural support. 2. Check to a support with the header bracket if the bracket is centered over the door (or in the structural supports. 4. HARDWARE...
3850 Elite Series Manual - Page 13

... a closing garage door.
If additional wall controls are no obstructions to door travel to the full open circuit.
4. Fasten with care to 24 VOLT low voltage wires....door control within sight of garage door, out of reach
of children at lower temperatures although the door control remains fully functional. CAUTION: Continuous exposure of the buttons, loosen the top mounting screw.
Remove...
3850 Elite Series Manual - Page 14

... light bulbs. To prevent damage to close the lens.
• Use A19, standard neck garage door opener bulbs for approximately 4-1/2 minutes when power is unplugged. • Using a Phillips head screwdriver, remove the battery cover on
the motor unit. • Partially insert battery into motor unit with terminals facing
out. • Connect the red (+) and black (-) wires...
3850 Elite Series Manual - Page 15

... will only fit into the outlet you could result in ANY way to make a permanent connection through the 7/8" (2 cm) hole in the release arm of all vehicles to the green ground screw.
NOTE: If it fit outlet. Be sure the opener is required by your garage door opener has a grounding type plug with an overhand...
3850 Elite Series Manual - Page 16

...174;
The safety reversing sensor must be connected and aligned correctly before the garage door opener will detect an obstacle in the path of its electronic beam. IMPORTANT INFORMATION... No part of the garage door (or door tracks, springs, hinges, rollers or other across the door, no more than 6" (15 cm) above floor
Invisible Light Beam Protection Area
Facing the door from a closing ....
3850 Elite Series Manual - Page 17
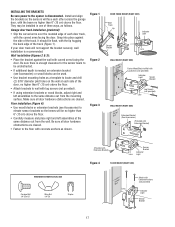
... Figure 2 Figure 3
DOOR TRACK MOUNT (RIGHT SIDE)
Door Track
Lip
Indicator Light
Sensor Bracket
Lens
WALL MOUNT (RIGHT SIDE)
IGWnasariladl gee
Fasten Wood Block to the opener is disconnected. Snap into...& 3):
• Place the bracket against the side of the door, no higher than 6" (15 cm) above the floor. Garage door track installation (preferred):
• Slip the curved arms over the ...
3850 Elite Series Manual - Page 29
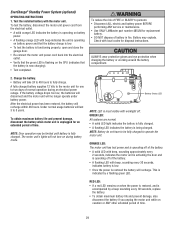
... fully charged. • A flashing LED indicates the battery is accompanied by a flashing green LED. NOTE: Battery do not have to 5 years.
Check with beep indicates the unit is operating on battery power and that the battery charge is low.
• To test the battery is functioning properly, open and close the garage door.
• Re-connect the motor unit power...
3850 Elite Series Manual - Page 31

... a Problem (Troubleshooting)
NOTE: Always unplug battery prior to Operation section; My garage door opener beeps: • A solid LED with a security light feature. My door will not close and the light bulbs blink... is not lit properly: • Check battery connections.
8. If the trolley re-engages with beep, sounding every 30 seconds, indicates battery is low. • If a red LED remains ...
3850 Elite Series Manual - Page 38

...floor.
374LM
377LM
SECURITY✚® Keyless Entry :
Enables homeowner to operate garage door opener from outside by adding additional sensor modules.
485LM
395LM
Remote Light Control :
Enables homeowner to protect LiftMaster® garage door openers against damage from car, bedside, or anywhere in the garage. Tells you if your home!
Also can be limited to a programmable number...
3850 Elite Series Manual - Page 40
...HEREBY. NO PERSON IS AUTHORIZED TO ASSUME FOR US ANY OTHER LIABILITY IN ...ANY OF THESE ITEMS COULD RESULT IN A FEE TO YOU....THE GARAGE DOOR OR GARAGE DOOR HARDWARE, INCLUDING BUT NOT LIMITED TO THE DOOR SPRINGS, DOOR ROLLERS, DOOR ...REPAIRED OR REPLACED UNIT, REPLACEMENT OF BATTERIES IN REMOTE CONTROL TRANSMITTERS AND LIGHT...installation, parts and service, contact your area. Look for him in the Yellow...
Similar Questions

I Have Installed A Chamberlan Garage Door Opener And The Remote I Was Using Is
I have been using a Chamberlan garage door opener and its remote has been defective since of late.Pl...
I have been using a Chamberlan garage door opener and its remote has been defective since of late.Pl...
(Posted by donweera42 7 months ago)


Garage Door Lights
Both side lights on opener unit stopped working at same time. Replaced bulbs but lights do not come ...
Both side lights on opener unit stopped working at same time. Replaced bulbs but lights do not come ...
(Posted by bja3758 9 years ago)

Mh Liftmaster Garage Door Will Not Open Intermittently.
On the occasion when the garage door will not open, there is power to the opener. Both leds on the p...
On the occasion when the garage door will not open, there is power to the opener. Both leds on the p...
(Posted by kellhowarda 11 years ago)

Replacing Backup Battery In Garage Door Opener.
How do I replace the backup battery in the LiftMaster 3850 garage door opener? Are there instruction...
How do I replace the backup battery in the LiftMaster 3850 garage door opener? Are there instruction...
(Posted by melindanannin 12 years ago)