
LiftMaster 3280 Support Question
LiftMaster 3280 Support Question
Find answers below for this question about LiftMaster 3280.Need a LiftMaster 3280 manual? We have 1 online manual for this item!
Question posted by azbljam24 on June 7th, 2014
Troubleshoot Chamberlain 3280 Wont Open
The person who posted this question about this LiftMaster product did not include a detailed explanation. Please use the "Request More Information" button to the right if more details would help you to answer this question.
Current Answers
Related LiftMaster 3280 Manual Pages
3280 Manual - Page 1
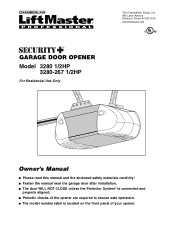
®
GARAGE DOOR OPENER Model 3280 1/2HP
3280-267 1/2HP
For Residential Use Only
The Chamberlain Group, Inc. 845 Larch Avenue Elmhurst, Illinois 60126-1196
www.liftmaster.com
Owner's Manual
■ Please read this manual and the enclosed safety materials carefully! ■ Fasten the manual near the garage door after installation. ■ The door WILL NOT CLOSE unless the Protector...
3280 Manual - Page 2

... reversal system 25
Test the Protector System 25
Operation
26-30
Operation safety instructions 26
Using your garage door opener 26
Using the wall-mounted door control 27
To open the door manually 27
Care of damage to your garage door opener 28
Having a problem 29
Diagnostic chart 30
Programming
31-32
To add or reprogram a hand-held remote...
3280 Manual - Page 3
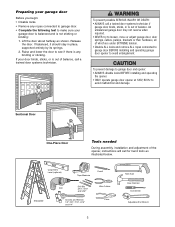
... EXTREME tension. • Disable ALL locks and remove ALL ropes connected to garage door BEFORE installing and operating garage door opener to make sure your door binds, sticks, or is any ropes connected to garage door. • Complete the following test to avoid entanglement. Preparing your garage door
Before you begin: • Disable locks. • Remove any binding or sticking...
3280 Manual - Page 4
.... See page 12. You may be required. Header Wall
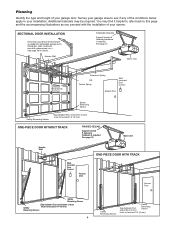
FINISHED CEILING Support bracket & fastening hardware is required. Planning
Identify the type and height of your opener. See page 19 for lightweight garage doors (fiberglass, steel, aluminum, door with the installation of Door
Extension Spring OR Torsion Spring
Wallmounted...
3280 Manual - Page 5
...illustrated below . LOCK
LIGHT
Multi-Function Door Control Panel
SECURITY✚® 3-Button Remote Control
Models 3280 (1)
3280-267 (2)
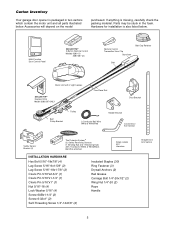
Remote Control Transmitter Visor Clip... (2) Wing Nut 1/4"-20 (2) Rope Handle
Straight Door Arm Section
5 Hardware for installation is also listed below .
Carton Inventory
Your garage door opener is packaged in the foam. Accessories will depend...
3280 Manual - Page 6

... 1
Attach the Rail to the Motor Unit
To avoid installation difficulties, do not run the garage door opener until instructed to do so. • Remove the two washered bolts mounted in top of ...h5/e92s-e5/b16o/9lt2s-!5/U21s/9e2 -o6f/2a/9n2y other bolts will cause6/1s1e/9r2ious damage to door opener. • Position belt over sprocket. Cut tape
from rail, belt and styrofoam. • REMOVE ...
3280 Manual - Page 7
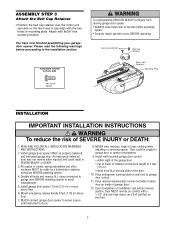
...
WARNING
IMPORTANT INSTALLATION INSTRUCTIONS
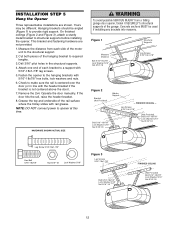
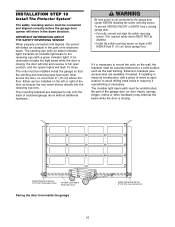
WARNING To reduce the risk of installation, test safety reversal system. Install garage door opener 7 feet (2.13 m) or more above floor.
7. Install garage door opener ONLY on the floor.
7 They could result in mounting plate. Door MUST reverse on contact with 8x3/8" hex screws provided. Attach with a 1-1/2" (3.8 cm) high object (or a 2x4...
3280 Manual - Page 8
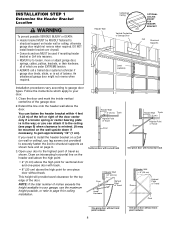
... to garage door types. An unbalanced garage door might not reverse when required. Close the door and mark the inside vertical centerline of Garage Door
2x4
Structural
Supports
Level (optional)
Installation procedures vary according to your door to the highest point of Travel
Pivot
One-piece door without track: jamb hardware
8
One-piece door without track.
Open your door...
3280 Manual - Page 10
... SIZE
Clevis Pin 5/16"x2-3/4"
10
Ring Fastener
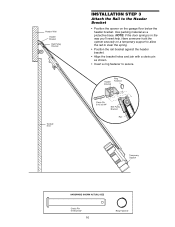
NOTE: If the door spring is in the way you'll need help. Have someone hold the opener securely on the garage floor below the header bracket. Header Wall Header Bracket Belt Pulley Bracket
Garage Door
INSTALLATION STEP 3
Attach the Rail to the Header Bracket
• Position...
3280 Manual - Page 11
... of the motor unit.
You will need help at this point if the ladder is convenient for setting an ideal door-to disconnect inner and outer sections. To prevent damage to garage door, rest garage door opener rail on 2x4 placed on the trolley release arm to -rail distance.
• Remove foam packaging.
• Raise the...
3280 Manual - Page 12
... installing any brackets into masonry. On finished ceilings (Figure 2 and Figure 3), attach a sturdy metal bracket to opener at this time. Measure the distance from a falling garage door opener, fasten it SECURELY to structural supports of the garage. Fasten the opener to the structural support. 2. Remove the 2x4. Grease the top and underside of the motor
unit...
3280 Manual - Page 13
... insulation from electrocution: • Be sure power is connected and properly aligned. NOTE: DO NOT connect power and operate opener at a minimum height of 5 feet (1.5 m), and away from all moving parts of garage door. To prevent possible SERIOUS INJURY or DEATH from end of bell wire. NOTE: After installation, a green or amber indicator...
3280 Manual - Page 14
Light bulb size should be A19, standard neck only.
Ensure that the rope and handle clear the tops of all vehicles to vibration, replace with a Garage Door Opener bulb.
Then the lights will turn OFF.
• Reverse the procedure to close the lens.
• If the bulbs burn out prematurely due to avoid ...
3280 Manual - Page 15
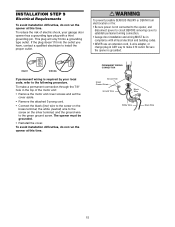
... fit into the outlet you have, contact a qualified electrician to the following procedure. Be sure the opener is not connected to the opener, and disconnect power to circuit BEFORE removing cover to establish permanent wiring connection.
• Garage door installation and wiring MUST be grounded.
• Reinstall the cover. and the ground wire to...
3280 Manual - Page 16
... System®
The safety reversing sensor must be connected and aligned correctly before the garage door opener will move in masonry construction, add a piece of its electronic beam. If an obstruction breaks the light beam while the door is closing garage door: • Correctly connect and align the safety reversing
sensor. The mounting brackets are available...
3280 Manual - Page 17

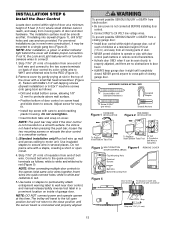
... the wall at the same distance out from the mounting surface. INSTALLING THE BRACKETS
Be sure power to the opener is recommended.
Wall installation (Figure 2 & 3):
• Place the bracket against the side of three ways, as shown.
Garage door track installation (preferred):
• Slip the curved arms over the rounded edge of the...
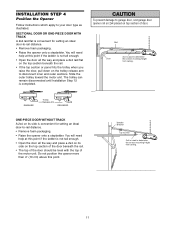
3280 Manual - Page 19

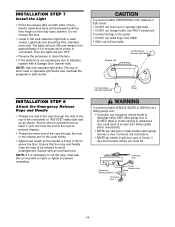
... cover the height of the top panel. Contact your garage door manufacturer for reinforcement kit. Drill 5/16" holes through the door and secure bracket with your door manufacturer for an opener installation door reinforcement kit. INSTALLATION STEP 11
Fasten the Door Bracket
Follow instructions which apply to your door type as illustrated below any structural support across the...
3280 Manual - Page 21

...line up and join with cut end down as possible to increase door arm rigidity. Pull the emergency release handle toward the opener at a 45° angle so that line up and join ...Fasten curved section to the door bracket in straight arm, disconnect straight arm. Reconnect to trolley with bolts, lock washers and nuts.
SECTIONAL DOORS ONLY Make sure garage door is horizontal. Secure the ...
3280 Manual - Page 23
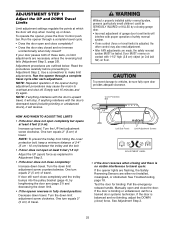
.... Run the opener through a complete travel . Read the procedures carefully before proceeding to make limit adjustments.
One turn equals 2" (5 cm) of travel .
Turn the down limit adjustment screw counterclockwise. Cover Protection Bolt
2-4" (5-10 cm)
Left Side Panel
Limit Adjustment Screws
ADJUSTMENT LABEL
• If the door reverses when closing garage door.
• Incorrect...
3280 Manual - Page 24

... with proper operation of a complete turn. Make small adjustments until the door reverses normally. If the door is about halfway through a complete travel . Make small adjustments until door opens completely. Readjust the UP limit if necessary. After each adjustment, run the opener through DOWN (close garage door.
• NEVER use force adjustments to compensate for a binding or...
Similar Questions

I Have Installed A Chamberlan Garage Door Opener And The Remote I Was Using Is
I have been using a Chamberlan garage door opener and its remote has been defective since of late.Pl...
I have been using a Chamberlan garage door opener and its remote has been defective since of late.Pl...
(Posted by donweera42 9 months ago)

Chamberlain 3280 Lift Master Professional Formula 1
Frequency for outside door opener?
Frequency for outside door opener?
(Posted by saintgeodragon 2 years ago)

How To Program New Car To Open Garage Door
where is the learn button to program my car to open garage door
where is the learn button to program my car to open garage door
(Posted by lrothberg 6 years ago)

