
LiftMaster 3265 Support Question
LiftMaster 3265 Support Question
Find answers below for this question about LiftMaster 3265.Need a LiftMaster 3265 manual? We have 1 online manual for this item!
Question posted by joannhanowski on November 9th, 2012
How To I Sync My Remote With My New Volvo Homelink System?
The person who posted this question about this LiftMaster product did not include a detailed explanation. Please use the "Request More Information" button to the right if more details would help you to answer this question.
Current Answers
Related LiftMaster 3265 Manual Pages
3265M Manual - Page 1
...
Elmhurst, Illinois 60126-1196 www.liftmaster.com
®
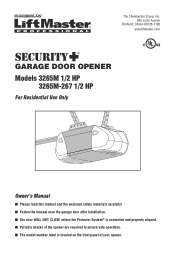
GARAGE DOOR OPENER Models 3265M 1/2 HP
3265M-267 1/2 HP
For Residential Use Only
Owner's Manual
■ Please read this manual and the enclosed safety materials carefully! ■ Fasten the manual near the garage door after installation. ■ The door WILL NOT CLOSE unless the Protector System® is...
3265M Manual - Page 2
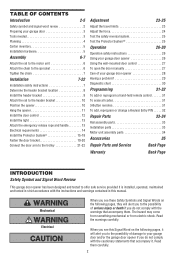
... following pages, they will alert you to the possibility of damage to your garage door opener 28 Having a problem 29 Diagnostic chart 30
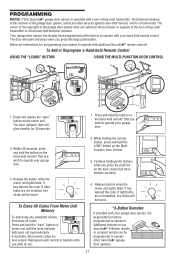
Programming
31-32
To add or reprogram a hand-held remote control 31 To erase all codes 31 3-Button remotes 31 To add, reprogram or change a Keyless Entry PIN . . . . . 32
Repair Parts
33...
3265M Manual - Page 3
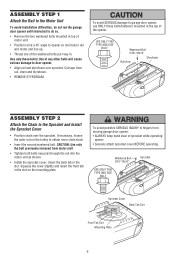
... out of which are under EXTREME tension.
• Disable ALL locks and remove ALL ropes connected to garage door BEFORE installing and operating garage door opener to see if there is not sticking or binding:
1.
Release the door.
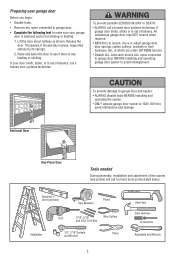
Preparing your garage door
Before you begin:
• Disable locks.
• Remove any binding or sticking. To prevent possible SERIOUS...
3265M Manual - Page 5
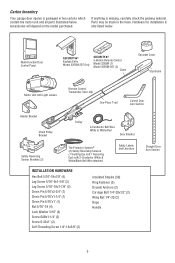
... depend on the model purchased. Carton Inventory
Your garage door opener is packaged in the foam.
Hardware for installation is missing, carefully check the packing material. LOCK LIGHT
Multi-Function Door Control Panel
SECURITY✚® Keyless Entry Model 3265M-267 Only
SECURITY✚® 3-Button Remote Control Model 3265M (1) Model 3265M-267 (2)
Chain
Sprocket...
3265M Manual - Page 6
... through the rail into the motor unit as shown.
• Install the sprocket cover: Insert the back tab in . To avoid possible SERIOUS INJURY to garage door opener, use ONLY those bolts/fasteners mounted in the slot on the trolley to the Sprocket and Install the Sprocket Cover
• Position chain over sprocket.
3265M Manual - Page 7
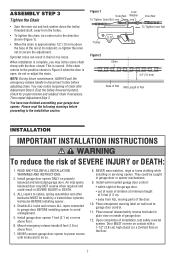
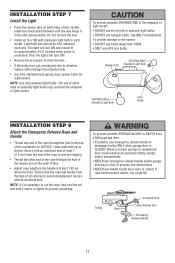
... hardware MUST be caught in plain view on wall next to the installation section. Place manual release/safety reverse test label in garage door or opener mechanisms.
9. You have now finished assembling your garage door
opener. Install garage door opener 7 feet (2.1 m) or more above floor.
7. Mount emergency release handle 6 feet (1.8 m) above floor.
6. NEVER connect...
3265M Manual - Page 10
... to disconnect inner and outer sections. You will need help
at this point.
10
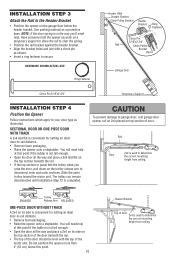
Header Bracket
Top of Door 2x4 is completed. To prevent damage to garage door, rest garage door opener rail on 2x4 placed on the garage floor below the header bracket. INSTALLATION STEP 3
Attach the Rail to the Header Bracket
• Position the...
3265M Manual - Page 11
... the header bracket. Drill 3/16" pilot holes in line with 5/16"-18x7/8" hex bolts, lock washers and nuts.
6. Fasten the opener to opener at this time. Measure the distance from a falling garage door opener, fasten it securely to structural supports of the motor unit to provide rigid support. Yours may be angled (Figure 1) to the...
3265M Manual - Page 13
....
• If the bulbs burn out prematurely due to disengage trolley ONLY when garage door is 6 feet (1.83 m) above the floor. Secure with a Garage Door Opener bulb.
• Use A19, standard neck garage door opener bulbs for approximately 4-1/2 minutes when power is in an open position. Gently rotate lens back and downward until the lens hinge is connected...
3265M Manual - Page 14
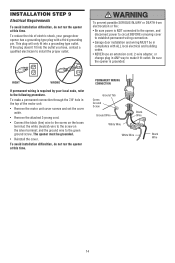
... install the proper outlet.
If the plug doesn't fit into a grounding type outlet. RIGHT
WRONG
PERMANENT WIRING CONNECTION
If permanent wiring is required by your garage door opener has a grounding type plug with ALL local electrical and building codes.
• NEVER use an extension cord, 2-wire adapter, or change plug in ANY way...
3265M Manual - Page 15
... align the safety reversing
sensor.
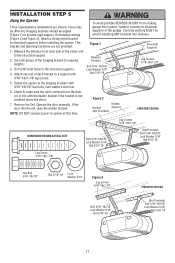
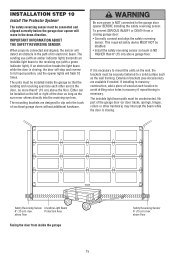
INSTALLATION STEP 10
Install The Protector System®
The safety reversing sensor must be connected and aligned correctly before the garage door opener will detect an obstacle in the path of its electronic beam. The mounting brackets are available if needed. If installing in the down direction. Be...
3265M Manual - Page 17
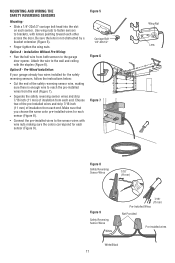
...inch (11 mm) of insulation from each end. Pre-Wired Installation:
If your garage already has wires installed for the safety reversing sensors, follow the instructions below:
•... Provided
Pre-installed wires
White/Black 17 Be sure the lens is enough wire to the garage door opener.
MOUNTING AND WIRING THE SAFETY REVERSING SENSORS
Mounting:
• Slide a 1/4"-20x1/2" carriage ...
3265M Manual - Page 18
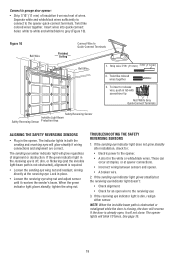
.... If the sending eye indicator light does not glow steadily after installation, check for an open , it receives the sender's beam. Connect to Quick-Connect Terminals
Bell Wire
1. Figure 10 Bell Wire
Finished Ceiling
Connect Wire to garage door opener:
• Strip 7/16" (11 mm) of insulation from each set of alignment or obstruction...
3265M Manual - Page 25
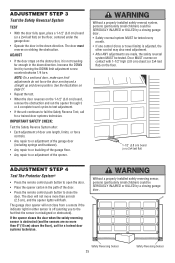
... in the path of the door.
• Press the remote control push button to fail the Safety Reverse Test, call for a trained door systems technician.
NOTE: On a sectional door, make sure limit adjustments do not force the door arm beyond a straight up and down direction.
The garage door opener will not close the door. Without a properly installed safety reversing...
3265M Manual - Page 26

... accessing over 100 billion new codes. When the opener is clear of the following conditions: when the opener is A19. The sensor has no obstructions to disengage trolley ONLY when garage door is activated. After ANY adjustments are under the following : • The hand-held remote control have been factory-set to pull garage door open or
INSTRUCTIONS. ALWAYS...
3265M Manual - Page 28
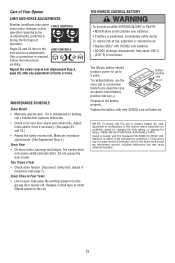
...away the existing grease from the garage door opener rail. Repeat the safety reverse test (Adjustment Step 3, page 25) after any adjustment of old battery properly. The opener does not require additional lubrication.... and (2) this receiver and/or transmitter are prohibited, except for up (+). THE REMOTE CONTROL BATTERY
To prevent possible SERIOUS INJURY or DEATH: • NEVER allow small ...
3265M Manual - Page 29

... is not blinking. My door reverses for Using the Wall Mounted Door Control.
• Reprogram remotes following the programming instructions. Refer to the Diagnostic Chart on my motor unit: The safety reversing sensor must be connected and aligned correctly before the garage door opener will not turn off when door is open:
• The garage door opener is normal. Refer to...
3265M Manual - Page 31
.... The owner of the copyright in the receiver of the garage door opener, which provides security against code-theft devices, will be heard.
*3-Button Remotes
If provided with your garage door opener, the large button is operated with a non-rolling code transmitter, the technical measure in the garage door opener does not authorize the purchaser or supplier of the non...
3265M Manual - Page 32
...The door should move .
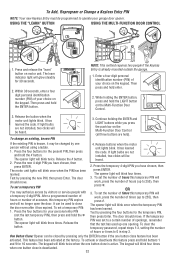
One Button Close: Opener can be changed by one opening. The keypad will be heard.
2. Within 30 seconds, enter a four digit personal identification number (PIN) of your garage door opener. While...the motor unit lights blink. Press the new 4-digit PIN you have chosen, then press ENTER. It can be closed by pressing the new PIN, then press Enter. To set...
3265M Manual - Page 35
...by disengaging trolley.
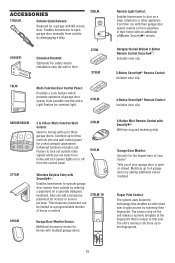
395LM
Remote Light Control:
Enables homeowner to open or closed.
CLOSED OPEN
Garage Door Monitor: Security for homes with Security✚®:
Enables homeowner to operate garage door opener from the control panel.
370LM 915LM
Wireless Keyless Entry with multiple garage doors. CLOSED OPEN
379LM-10
916LM
Garage Door Monitor Sensor:
Additional accessory...
Similar Questions

I Have Installed A Chamberlan Garage Door Opener And The Remote I Was Using Is
I have been using a Chamberlan garage door opener and its remote has been defective since of late.Pl...
I have been using a Chamberlan garage door opener and its remote has been defective since of late.Pl...
(Posted by donweera42 8 months ago)
Garage Door Opens After Shutting.
My Lift master 8550 inside keypad is Inside wall pad is model #880LM. outside keypad Model # is 877M...
My Lift master 8550 inside keypad is Inside wall pad is model #880LM. outside keypad Model # is 877M...
(Posted by BONNIECA92 2 years ago)

How To Program Remote For Chamberlain Sl3000ul Garage Door Opener
(Posted by mhoPool 10 years ago)

Noise From Garage Door Opener
I have a liftmaster garage door opener. It makes a loud screeching noise when the door is lowered....
I have a liftmaster garage door opener. It makes a loud screeching noise when the door is lowered....
(Posted by tom19097 11 years ago)

My Garage Door Opener Isn't Working - Chain Doesn't Move - Motor Runs Though.
(Posted by leefriedman 11 years ago)