
LiftMaster 3265 Support Question
LiftMaster 3265 Support Question
Find answers below for this question about LiftMaster 3265.Need a LiftMaster 3265 manual? We have 1 online manual for this item!
Question posted by Kevingolankiewicz on October 13th, 2012
Light Does Not Come On
Light has been replaced with new bulbs. Still does not work.
Current Answers
Related LiftMaster 3265 Manual Pages
3265M Manual - Page 1
...
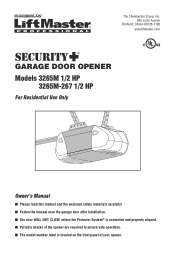
Elmhurst, Illinois 60126-1196 www.liftmaster.com
®
GARAGE DOOR OPENER Models 3265M 1/2 HP
3265M-267 1/2 HP
For Residential Use Only
Owner's Manual
■ Please read this manual and the enclosed safety materials carefully! ■ Fasten the manual near the garage door after installation. ■ The door WILL NOT CLOSE unless the Protector System® is...
3265M Manual - Page 2
... may come from something mechanical or from electric shock.
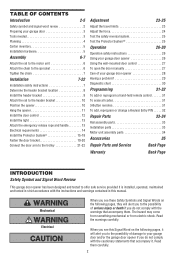
TABLE OF CONTENTS
Introduction
2-5
Safety symbol and signal word review 2 Preparing your garage door 3 ...10 Position the opener 10 Hang the opener 11 Install the door control 12 Install the light 13 Attach ... garage door opener 26 Using the wall-mounted door control 27 To open the door manually 27 Care of your garage door opener...
3265M Manual - Page 3
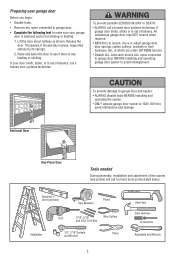
..., sticks or is out of which are under EXTREME tension.
• Disable ALL locks and remove ALL ropes connected to garage door BEFORE installing and operating garage door opener to avoid entanglement.
Carpenter's Level (optional)
12
Tape Measure
Pencil
Stepladder
Drill
3/16", 5/16"
Wire Cutters
and 5/32" Drill Bits
1/2", 7/16" Sockets and Wrench
Pliers
3
...
3265M Manual - Page 5
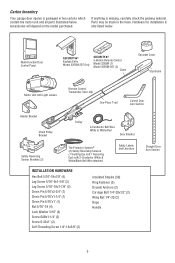
Carton Inventory
Your garage door opener is packaged in the foam. Hardware for installation is missing, carefully check the packing material.
If anything is also listed below .
LOCK LIGHT
Multi-Function Door Control Panel
SECURITY✚® Keyless Entry Model 3265M-267 Only
SECURITY✚® 3-Button Remote Control Model 3265M (1) Model 3265M-267 (2)
Chain
Sprocket...
3265M Manual - Page 6
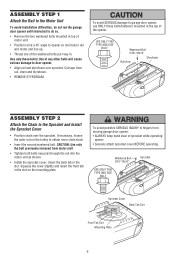
... the Motor Unit
To avoid installation difficulties, do not run the garage door opener until instructed to do so. • Remove the two washered bolts mounted in top of
motor unit. • Position rail at a 45˚ angle to opener so one hole in rail
and motor unit line up. • Thread...
3265M Manual - Page 7
...
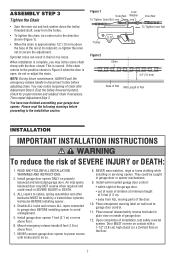
proceeding to the installation section.
You may notice loosening of chain after
Base of the door.
10. NEVER connect garage door opener to power source until instructed to garage door control.
11. Install wall-mounted garage door control:
• within sight of the garage door.
• out of reach of children at minimum height of 5 feet (1.5 m).
• away from the...
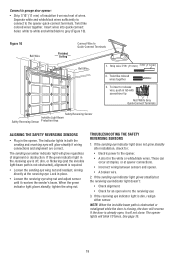
3265M Manual - Page 10
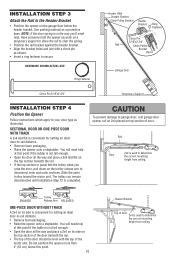
... Bracket Chain Pulley Bracket
Header Bracket
Ring Fastener
Clevis Pin
5/16"x2-3/4"
Rail
Chain Pulley
Bracket
Rail
Garage Door
Clevis Pin 5/16"x2-3/4"
Temporary Support
INSTALLATION STEP 4
Position the Opener
Follow instructions which apply to garage door, rest garage door opener rail on 2x4 placed on the trolley release arm to -rail distance. • Remove foam packaging. •...
3265M Manual - Page 11
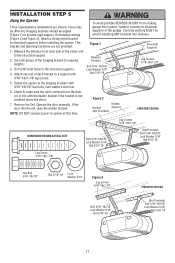
Hanging brackets should be used if installing ANY brackets into masonry. Measure the distance from a falling garage door opener, fasten it securely to structural supports of the motor unit to provide rigid support. Concrete anchors MUST be angled (Figure 1) to the structural support.
2.
On &#...
3265M Manual - Page 13
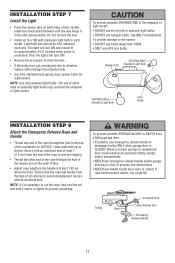
... 100W. • ONLY use handle to vibration, replace with an overhand knot.
Ensure that the rope and handle clear the tops of lens. To prevent damage to prevent unraveling. Light bulb size should be A19, standard neck only. Secure with a Garage Door Opener bulb.
• Use A19, standard neck garage door opener bulbs for approximately 4-1/2 minutes when power is in each...
3265M Manual - Page 14
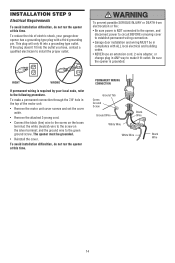
... disconnect power to circuit BEFORE removing cover to establish permanent wiring connection.
• Garage door installation and wiring MUST be grounded.
• Reinstall the cover. Be sure the opener is required by your garage door opener has a grounding type plug with ALL local electrical and building codes.
• NEVER use an extension cord, 2-wire adapter, or...
3265M Manual - Page 15
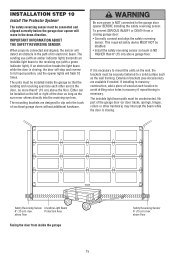
... the receiving eye (with an amber indicator light) transmits an invisible light beam to clip onto the track of sectional garage doors without additional hardware.
If an obstruction breaks the light beam while the door is NOT connected to full open position, and the opener lights will stop and reverse to the garage door opener BEFORE installing the safety reversing sensor. Either...
3265M Manual - Page 17
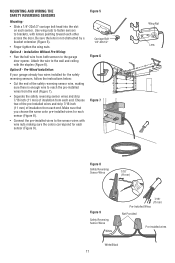
... pre-installed wires for each sensor (Figure 8).
• Connect the pre-installed wires to the garage door opener. Be sure the lens is enough wire to reach the pre-installed wires from the wall (Figure...sensors to the sensor wires with the staples (Figure 6). Pre-Wired Installation:
If your garage already has wires installed for each sensor.
Choose two of the pre-installed wires and...
3265M Manual - Page 18
...
Bell Wire
1. Separate white and white/black wires sufficiently to connect to the opener quick-connect terminals. Twist like colored wires together
3. The indicator lights in the opener. If the door is dim, realign either sensor. Connect to garage door opener:
• Strip 7/16" (11 mm) of insulation from each set of alignment or obstruction...
3265M Manual - Page 25
...garage door opener will flash. The door must reverse on the floor, centered under the garage door.
• Operate the door in the down direction. NOTE: On a sectional door, make sure limit adjustments do not force the door...for a trained door systems technician.
The door will not move more than an inch (2.5 cm), and the opener lights will not close the door. Without a ...
3265M Manual - Page 26

... risk of which changes with each use, randomly accessing over 100 billion new codes. Using Your Garage Door Opener
6. Security✚® light feature: Lights will close the door with the Door Control, the Outside Keylock, or Keyless Entry, if you release them until down until the door starts to eight Security✚® remote controls and one control...
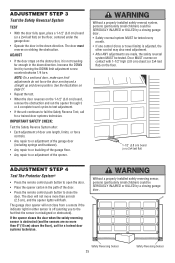
3265M Manual - Page 29

... Indicator Light) (Green Indicator Light)
3. This feature activates the light on my motor unit: The safety reversing sensor must be connected and aligned correctly before the garage door opener will ... the door to Operation section; Decrease down travel limits. Having a Problem?
1.
Using the Wall Mounted Door Control, Light Feature.
6. My door will not close and the light bulbs blink ...
3265M Manual - Page 30
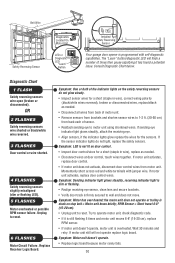
... the sensor indicator lights do not glow steady.
• Inspect sensor wires for a short (staple in wire), replace as needed .
• Disconnect wires at door control, touch wires together. Bell Wire
Safety Reversing Sensor
Diagnostics Located On Motor Unit
LED or Diagnostic LED
"Learn" Button
Installed Safety Reversing
Sensor
Your garage door opener is programmed with...
3265M Manual - Page 31
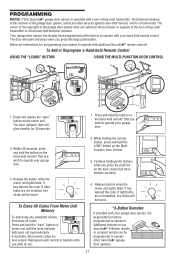
... be circumvented.
To Add or Reprogram a Hand-held remote control. If light bulbs are not installed, two clicks will be heard. Release buttons when the motor unit lights blink. It has learned the code. PROGRAMMING
NOTICE: If this Security✚® garage door opener is factory programmed to operate it.
Press and hold the button on...
3265M Manual - Page 32
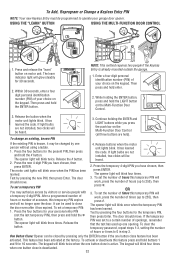
... press and hold buttons 1 and 9 for 10 seconds. Release the button when the motor unit lights blink.
Press the new 4-digit PIN you have chosen, then press ENTER. The motor unit lights will work , press the number of your garage door opener. To set a temporary PIN
You may be used up to close is known, it has...
3265M Manual - Page 35
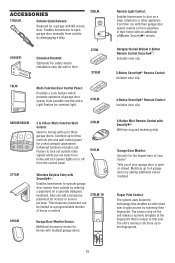
ACCESSORIES
1702LM
Outside Quick Release:
Required for a garage with multiple garage doors. CLOSED OPEN
379LM-10
916LM
Garage Door Monitor Sensor:
Additional accessory sensor for homes with NO access door. CLOSED OPEN
Garage Door Monitor: Security for the largest door of garage door opener from portable remotes and a Light Feature for visitors or service persons. Tells you are away ...
Similar Questions

I Have Installed A Chamberlan Garage Door Opener And The Remote I Was Using Is
I have been using a Chamberlan garage door opener and its remote has been defective since of late.Pl...
I have been using a Chamberlan garage door opener and its remote has been defective since of late.Pl...
(Posted by donweera42 8 months ago)

I Need A Replacement Lens Cover For Garage Door Opener Liftmaster Model #1355- 1
I need a replacement Lens Cover for a garage door opener Model # 1355M- 1/2 HP Liftmaste
I need a replacement Lens Cover for a garage door opener Model # 1355M- 1/2 HP Liftmaste
(Posted by nskanson 1 year ago)
Garage Door Opens After Shutting.
My Lift master 8550 inside keypad is Inside wall pad is model #880LM. outside keypad Model # is 877M...
My Lift master 8550 inside keypad is Inside wall pad is model #880LM. outside keypad Model # is 877M...
(Posted by BONNIECA92 2 years ago)

Noise From Garage Door Opener
I have a liftmaster garage door opener. It makes a loud screeching noise when the door is lowered....
I have a liftmaster garage door opener. It makes a loud screeching noise when the door is lowered....
(Posted by tom19097 11 years ago)

Chamberlin Liftmaster Garage Door Opener Model # 3265-267
Where do I put the trolley before I attach the chain to the sprocket?
Where do I put the trolley before I attach the chain to the sprocket?
(Posted by garretmegan 11 years ago)