
LiftMaster 3245 Support Question
LiftMaster 3245 Support Question
Find answers below for this question about LiftMaster 3245.Need a LiftMaster 3245 manual? We have 1 online manual for this item!
Question posted by suzbullock on December 17th, 2012
Upgrade Hp From 1/3 Hp To 1/2 Hp?
I currently have a Liftmaster 3245 1/3 hp, but motor gave out. I would like to replace with beefier unit. Can I sub in with the 3255 1/2 hp and use same chain, rail etc? They are listed together in same manual and this would sure simplify things!
Current Answers
Answer #1: Posted by GarageDoorMafiadotcom on December 23rd, 2012 11:12 PM
GarageDoorMafiadotcom

Member since:
November 4th, 2012 Points: 25,600

Member since:
November 4th, 2012 Points: 25,600
Yes you can. They are both the same, but the 1/2hp has a slightly bigger motor and start capacitor.
It's rare that the electric motor itself dies. If you can hear the motor run, but nothing moving, its probably the gear inside that's stripped(If you upgrade to the 1/2hp the gear and sprocket is the same) If it only click it can be the start capacitor, but can also be some on the logic board.
Make sure your door is balance correct. A heavy, binding and sticking door will wear out any opener. The 1/3hp is OK for a balance 16X7 door.
Supporting Image
You can click the image below to enlarge
GarageDoorMafia.com One stop online shop for all your garage door and opener needs.
Related LiftMaster 3245 Manual Pages
3255 Manual - Page 1
®
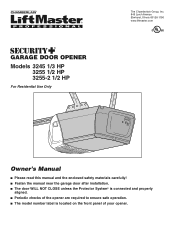
GARAGE DOOR OPENER
Models 3245 1/3 HP 3255 1/2 HP 3255-2 1/2 HP
For Residential Use Only
The Chamberlain Group, Inc. 845 Larch Avenue Elmhurst, Illinois 60126-1196
www.liftmaster.com
Owner's Manual
■ Please read this manual and the enclosed safety materials carefully! ■ Fasten the manual near the garage door after installation. ■ The door WILL NOT CLOSE unless the ...
3255 Manual - Page 2

... your garage door 3
Tools needed 3
Planning 4
Carton inventory 5
Hardware inventory 5
Assembly
6-7
Attach the rail to the motor unit 6
Attach the chain to the sprocket 6
Tighten the chain 7
Installation
7-22
Installation safety instructions 7
Determine the header bracket location 8
Install the header bracket 9
Attach the rail to the header bracket 10
Position the opener...
3255 Manual - Page 3
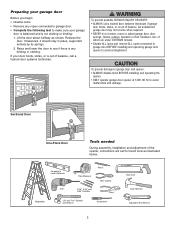
... see if there is any ropes connected to garage door. • Complete the following test to avoid entanglement. To prevent damage to garage door and opener:
• ALWAYS disable locks BEFORE installing and operating the opener.
• ONLY operate garage door opener at 120V, 60 Hz to loosen, move or adjust garage door, door springs, cables, pulleys, brackets or their hardware, ALL...
3255 Manual - Page 4
... (6 mm). Motor Unit
Vertical Centerline of your opener. Safety Reversing Sensor
Safety Reversing Sensor
Gap between floor and bottom of door must not exceed 1/4" (6 mm). FINISHED CEILING
Support bracket & fastening hardware is closed .
Motor Unit
Wallmounted Door Control
Access Door
ONE-PIECE DOOR WITH TRACK
Slack in chain tension is normal when garage door is needed...
3255 Manual - Page 5

... If anything is also listed below .
Trolley
One-Piece Rail
Curved Door Arm Section
Chain Pulley Bracket
Door Bracket
Safety Sensor Bracket (2)
The Protector System® (2) Safety Reversing Sensors (1 Sending Eye and 1 Receiving Eye) with Light Lens
CEILING MOUNT ONLY UP
Header Bracket
2 Conductor Bell Wire White & White/Red? Carton Inventory
Your garage door opener is packaged in...
3255 Manual - Page 6
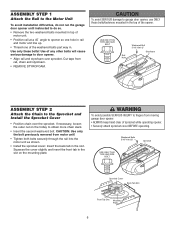
... the Chain to fingers from moving garage door opener: • ALWAYS keep hand clear of sprocket while operating opener. • Securely attach sprocket cover BEFORE operating. CAUTION: Use only the bolt previously removed from
rail, chain and styrofoam. • REMOVE STYROFOAM.
Cut tape from motor unit!
• Tighten both bolts securely through the rail into the motor unit as shown...
3255 Manual - Page 7

... noise can result if chain is normal.
Base of Rail Mid Length of SEVERE INJURY or DEATH:
1. Please read the following warnings before
adjusting chain. Install garage door opener only on the floor.
7 Install wall-mounted garage door control:
• within sight of the garage door.
• out of reach of garage door.
12. When installation is open, do so.
8.
ALL repairs...
3255 Manual - Page 8
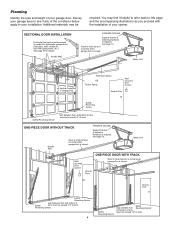
...Open your door to the highest point of travel clearance for sectional door and one-piece door with horizontal track
Header Wall 8" (20 cm)
Door
Highest Point of Travel
Pivot
One-piece door without track: jamb hardware
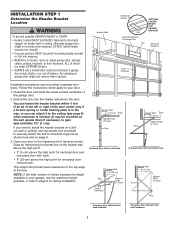
One-piece door... garage door types. INSTALLATION STEP 1
Determine the Header Bracket Location
To prevent possible SERIOUS INJURY or DEATH: • Header bracket MUST be used...
3255 Manual - Page 9
.... Ceiling Mounting Holes
CEILING MOUNT ONLY
UP The nail hole is for your particular requirements. You must use concrete anchors (not provided). The bracket can attach the header bracket either to the wall above the garage door, or to a structural support with the hardware provided.
Optional Wall Mounting Holes
Header Wall
2x4 Structural...
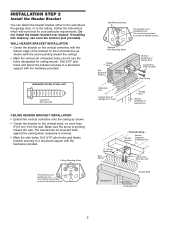
3255 Manual - Page 12
...: DO NOT connect power to structural supports before installing the opener.
Yours may be different. Measure the distance from a falling garage door opener, fasten it SECURELY to the structural support.
2. Cut both pieces of the motor unit to structural supports of the rail surface where the trolley slides with 5/16"-18x1-7/8" lag screws.
5. Drill 3/16" pilot holes...
3255 Manual - Page 13
...anyone to motor unit. The ...manual release/safety reverse test label in tab with a staple, creating a short or open position but will travel . • ALWAYS keep garage door in sight until the sensor beam is connected and properly aligned. Fasten with 6ABx1-1/4" self-tapping screws (drywall installation) or 6-32x1" machine screws (into drywall (Figure 1), drill 5/32" holes and use...
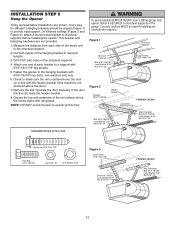
3255 Manual - Page 22

... the connection.
• Secure with a ring fastener.
2. It may be adjusted.
Manually raise the door to the open position as illustrated below .
• Open door adjustment: decrease UP travel to the fully open as shown in the illustration. Press the Door Control push button. If the door has a slight "backward" slant in the illustration. Limit adjustment screws are...
3255 Manual - Page 23

...trolley and the bolt.
• If door does not open at least 5 feet (1.5 m):
Adjust the UP (open and close the door. Manually open completely but opens at least five feet (1.5 m):
Increase... the door reverses when closing garage door. • Incorrect adjustment of garage door travel limits will stop . Run the opener through a complete travel cycle.
• Does the door open ) force...
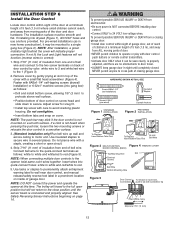
3255 Manual - Page 27
... often as the Lock feature is reset to
1-1/2 minutes. Using the Wall-Mounted Door Control
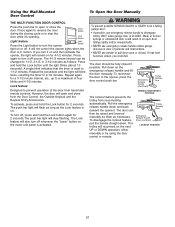
To Open the Door Manually
THE MULTI-FUNCTION DOOR CONTROL
Press the push bar to open and close the door. The push bar light will remain on the motor unit panel is CLOSED. The door should be fully closed . Lock feature
Designed to prevent operation of...
3255 Manual - Page 28
...°C (212°F)
or incinerate.
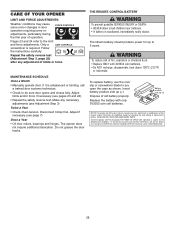
To replace battery, use the visor clip or screwdriver blade to be sure door opens and closes fully. Tested to the limit and force adjustments. Follow the instructions carefully. MAINTENANCE SCHEDULE
Once a Month
• Manually operate door.
Once a Year
• Oil door rollers, bearings and hinges. Replace the battery with FCC Standards FOR...
3255 Manual - Page 29
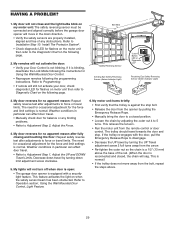
...;.
• Check diagnostic LED for flashes on motor unit then refer to Diagnostic Chart on my motor unit: The safety reversing sensor must be connected and aligned correctly before the garage door opener will move away from the opener by pulling the Emergency Release Rope.
• Manually bring the door to a closed , the chain will not close and the light bulbs...
3255 Manual - Page 33
... pin and fastener
8 41A5047
Door bracket with clevis pin and fastener
9 178B35
Curved door arm section
10 178B34
Straight door arm section
11 41A5034
Safety sensor...listed on page 5)
114A3080 Owner's manual
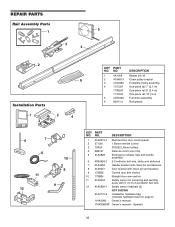
114A3080SP Owner's manual - NO. REPAIR PARTS
Rail Assembly Parts 5
1
3 4
2 Installation Parts
KEY PART NO. NO.
DESCRIPTION
1
4A1008
Master link kit
6
2
41A4813 Chain...
3255 Manual - Page 34
...Motor shaft bearing kit Opener assembly hardware kit (includes screws not designated by a number in illustration)
34 End panel with all labels
Light socket
Lens
Capacitor - 1/2 HP Capacitor - 1/3 HP
Capacitor bracket
Terminal block with screws
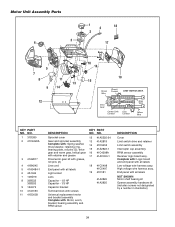
Universal replacement motor and bracket assembly Complete with: Motor... board assy. Motor Unit Assembly Parts 3
6
1 4
18
2
17
5...
3255 Manual - Page 35

...clip.
Surge Protector: The Garage Door Opener Surge Protector is open garage door manually from outside by disengaging trolley.
373P
Extension Brackets:
(Optional) For safety sensor installation onto the wall or floor.
374LM
377LM
915LM
CLOSED OPEN
395LM
SECURITY✚® Keyless Entry:
Enables homeowner to protect LiftMaster® garage door openers against damage from outside by...
3255 Manual - Page 36
... THIS PRODUCT), LABOR CHARGES FOR REINSTALLING A REPAIRED OR REPLACED UNIT, REPLACEMENT OF BATTERIES AND LIGHT BULBS OR UNITS INSTALLED FOR NON-RESIDENTIAL USE. THIS LIMITED WARRANTY DOES NOT COVER ANY PROBLEMS WITH, OR RELATING TO, THE GARAGE DOOR OR GARAGE DOOR HARDWARE, INCLUDING BUT NOT LIMITED TO THE DOOR SPRINGS, DOOR ROLLERS, DOOR ALIGNMENT OR HINGES.
NO PERSON IS AUTHORIZED TO ASSUME...
Similar Questions

3850 Liftmaster Garage Door Opener Manual
My liftmaster 3850 smart control panel doesn't show time or temperature.....screen is just lit with ...
My liftmaster 3850 smart control panel doesn't show time or temperature.....screen is just lit with ...
(Posted by dsprangel 9 years ago)

Liftmaster Elite Garage Door Opener Manual
i have a 3585s opener. always workusing inside control. it has been failing to open at times useing ...
i have a 3585s opener. always workusing inside control. it has been failing to open at times useing ...
(Posted by lgwinnjr 10 years ago)

Liftmaster Garage Door Opener 8355 Manual
How Long If The Power Chord For This Model
How Long If The Power Chord For This Model
(Posted by VINCED 10 years ago)
Light Timer
Is it possable to adust the time the stays on after the door has closed?
Is it possable to adust the time the stays on after the door has closed?
(Posted by jamesjohnson118 10 years ago)
