
Lexmark 782e Support Question
Lexmark 782e Support Question
Find answers below for this question about Lexmark 782e - X Color Laser.Need a Lexmark 782e manual? We have 6 online manuals for this item!
Question posted by carolhall on April 23rd, 2013
Need To Reset Our Lexmark C782e To Factory Settings But Buttons Don't Match Inst
We have lost our menu pin/pw and need to restore factory base settings, however the instructions we have found depict a different control panel and ours dos not have the buttons you are instructed to push while restarting the machine. We do not have the check button or the right arrow button. Which buttons do we push and hold on our model?
Current Answers
Answer #1: Posted by LexmarkListens on April 24th, 2013 1:06 AM
LexmarkListens

Member since:
July 1st, 2011 Points: 1,410,540

Member since:
July 1st, 2011 Points: 1,410,540
If you have the C782e, it should have the check and right arrow buttons. Try the steps below:
To enter the Configuration Menu:
1. Turn the printer off.
2. Press and hold the Select and Return buttons.
3. Turn the printer on.
4. Release the buttons when Performing Self Test is displayed.
If it doesn't help, it would be best if you can contact our technical support team via phone.
Lexmark Listens
Phone:
USA: 1-800-539-6275
Canada: (877) 856-5540
UK: 0800 121 4726
South Africa: 0800 981 435
Related Lexmark 782e Manual Pages
IPDS Printer and Host Setup Guide - Page 10
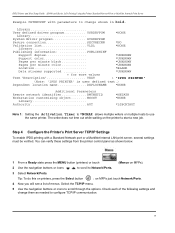
...can verify these settings from the printer control panel as needed to start a new job. The writer does not time out while waiting on printers, press the Select button
; Check ...
Publishing information PUBLISHINF
Support duplex
*UNKNOWN
Support color
*UNKNOWN
Pages per minute black
*UNKNOWN
Pages per minute color
*UNKNOWN
Location
*BLANK
Data streams supported
*...
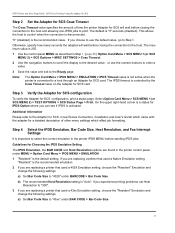
IPDS Printer and Host Setup Guide - Page 16
... = 0 - 6).
1 Use the control panel MENU as described above to the Ready page. Select the desired value. Step 2 Set the Adapter for SCS Twinax Timeout
The ...device address for the adapter SCS emulation or to disable the adapter SCS emulation.
1 Use the control panel MENU as an option in Step 1A (page 15) to SCS MENU 1 (or SCS MENU 2) > IPDS Options > IPDS Dev. Addr.
5 Use the navigation buttons...
IPDS Printer and Host Setup Guide - Page 17
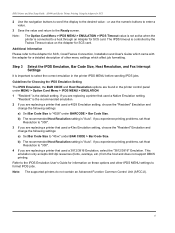
... the host and does not support DBCS printing. or use the numeric buttons to enter a value.
3 Save the value and return to select the correct emulation in the printer control panel under MENU > Option Card Menu > IPDS MENU > EMULATION.
1 "Resident" is "Auto".
If you experience printing problems, set Host Resolution to "300".
3 If you experience printing problems...
IPDS Printer and Host Setup Guide - Page 25

... Print Server
Example PSF STARTUP PROC - You can verify these settings from the printer control panel as shown below.
25 JCL and PRINTDEV.
Example PSF STARTUP ...SYS1.PDEFLIB,DISP=SHR /* SYSTEM PAGE DEFS
*/
//
DD DSN=INST.PDEFLIB,DISP=SHR/* PAGE DEFS
*/
// *
// FDEF01 DD DSN=INST.FDEFLIB,DISP=SHR /* SYSTEM FORM DEFS
*/
//
DD DSN=INST.FDEFLIB,DISP=SHR/* FORM DEFS
*/
// *
// PRT7 CNTL...
IPDS Printer and Host Setup Guide - Page 30
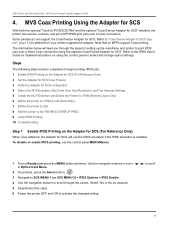
... Printing Using the Adapter for detailed instructions on the Adapter for SCS (For Reference Only)
When coax-attached, the Adapter for SCS" installed, the printer can receive, process, and print AFP/IPDS print jobs over a direct Coax connection using the control panel to select and change option settings. MVS Coax Printing Using the Adapter...
IPDS Printer and Host Setup Guide - Page 31
..., choose the "Resident" Emulation and change the following settings:
a) Set Bar Code Size to "43xx" under MENU > Option Card Menu > IPDS MENU > EMULATION.
1 "Resident" is 255.
1 Use the control panel MENU as described in the printer IPDS MENU before sending IPDS jobs.
Select Option Card Menu > SCS MENU 1 (or SCS MENU 2) > TEST OPTIONS > SCS Status Page > Print. If you experience printing...
IPDS Printer and Host Setup Guide - Page 35
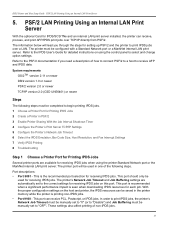
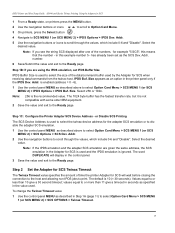
...jobs. The printer port will lead you need a description of how to connect PSF/2...settings on this port. The printer's Network Job Timeout and Job Buffering settings are automatically set to begin printing IPDS jobs. 1 Choose a Printer Port for detailed instructions... for receiving IPDS jobs when using the control panel to the correct settings for setting up PSF/2 and the printer to receive...
IPDS Printer and Host Setup Guide - Page 39
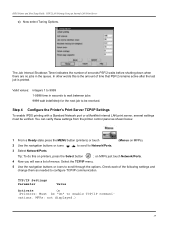
... Timer indicates the number of menus.
You can verify these settings from the printer control panel as needed to be verified.
In other words this on MFPs just touch...is the amount of the following settings and change them as shown below.
1 From a Ready state press the MENU button (printers) or touch
(Menus on MFPs).
2 Use the navigation buttons or icons
to scroll to enable...
IPDS Printer and Host Setup Guide - Page 45
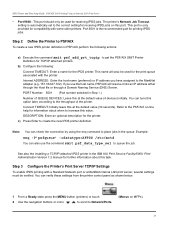
...set to queue the job. You can verify these settings from the printer control panel as shown below.
1 From a Ready state press the MENU button (printers) or touch
2 Use the navigation buttons... (30 seconds). The printer's Network Job Timeout setting is the recommended port for information about this at the default value (4 devices) initially. b) Configure the following actions:
a) Execute...
IPDS Printer and Host Setup Guide - Page 46

....115.7 (Address of the following settings and change them as End-of menus. Using the control panel MENU/Menus, select Reports > Network Setup Page. This can be "On" to scroll through the options. Note that the Network Job Timeout is On. Select the TCP/IP menu.
5 Use the navigation buttons or icons to enable TCP/IP...
SCS/TNe Emulation User’s Guide - Page 10
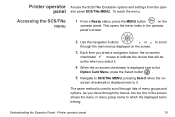
... you move through lists of menu groups and options. Understanding the Operator Panel: Printer operator panel
10 Printer operator Access the SCS/TNe Emulation options and settings from the operpanel ator panel SCS/TNe MENU.
As you select it .
To reach the menu:
Accessing the SCS/TNe menu
1 From a Ready status, press the MENU button
.
screen checkmark is used to...
SCS/TNe Emulation User’s Guide - Page 76

..., click Reports and choose Device Settings. In the following reference tables, an asterisk (*) indicates the default factory value. How to access the Menu Settings Page
• Reset ALL Def
You will always be able to see the selected value for each option on the Menu Settings page.
• From the Operator Panel: Select Menus > Reports > Menu Settings Page.
• Through the...
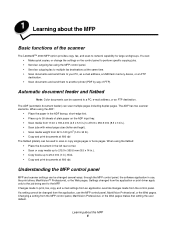
Troubleshooting Guide - Page 1
... the key icon on the menu settings page.
For other network device. • The scanner cable is securely attached to find a solution. The message Error reading USB drive appears when using may not be supported or has an error.
The serial number is also listed on the MFP control
panel.
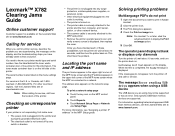
Lexmark™ X782 Clearing Jams Guide...
Troubleshooting Guide - Page 3

...using . Rubber feed rollers do not turn the printer on the menu settings page, but print media jams when it is securely connected, and... is properly attached to see the Software and Documentation CD that is pushed
Check the following :
• Flex the paper. More than one...not lower when the door is opened and the paper tray button is loaded. For more details, see if your printer. Hard...
User's Guide - Page 4

...Automatic document feeder and flatbed ...8 Understanding the MFP control panel ...8 Using the LCD touch-screen buttons ...14 Menus ...20
Chapter 2: Copying ...21...Setting the duplex option ...26 Reducing and enlarging copies ...26 Adjusting copy quality ...26 Setting collation options ...27 Placing separator sheets between copies ...27 Setting...color documents ...32 Creating an e-mail shortcut ...32
4
User's Guide - Page 8
..., a USB flash memory device, or an FTP destination. • Scan documents and send them to another printer (PDF by way of the scanner
The Lexmark™ 4600 MFP option provides copy, fax, and scan-to a PC, e-mail address, or an FTP destination. Settings changed several ways: through the MFP control panel, the software application in...
User's Guide - Page 20
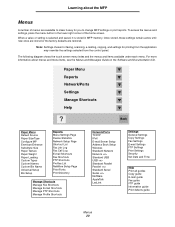
... for printing from the application may override the settings selected from the control panel.
Back
Paper Menu Default Source Paper Size/Type Configure MP Envelope Enhance Substitute Size Paper Texture Paper Weight Paper Loading Custom Types Custom Names Custom Bin Name Universal Setup Bin Setup
Reports Menu Settings Page Device Statistics Network Setup Page Shortcut List Fax...
User's Guide - Page 89

... Selection appears. Administrative support 89 12 Administrative support
Adjusting control panel brightness
If you are restored. Brightness values can be adjusted through the Settings menu. These settings are the original MFP settings. (Factory defaults may vary for different regions.) When you select a new setting from the control panel, you may notice an asterisk (*) to the left arrow...
User's Guide - Page 90

... touch Restore Now, all menu settings return to increase the time. The settings available range from 15-300 minutes.
Administrative support
6 Touch the left arrow or right arrow until Power Saver appears. 6 Touch the left arrow to decrease the time, or touch the right arrow to the factory default values, except: • The control panel Display Language setting...
User's Guide - Page 93
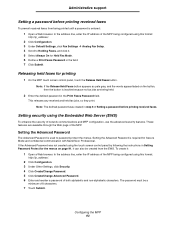
... using the touch screen control panel by following the instructions in Setting Password Protect for Held Fax Mode. 6 Define a Print Faxes Password in the field. 7 Click Submit. Setting the Advanced Password
The Advanced Password is required for printing
1 On the MFP touch screen control panel, touch the Release Held Faxes button. Administrative support
Setting a password before printing...
Similar Questions

How Do I Reset Admin Password / Settings Pin For X548
pin was set by previous owner, and now unable to use USB print function and also shows "copy" as wat...
pin was set by previous owner, and now unable to use USB print function and also shows "copy" as wat...
(Posted by paulhorley 5 years ago)

Lexmark X544 Color Laser Printer How To Adjust The Black Settings
(Posted by bebectank3 9 years ago)
How To Reset A X658de To Factory Settings
(Posted by ahha 9 years ago)

How To Reset To Factory Settings Lexmark X654de
(Posted by billapo 10 years ago)
How To Get A Meter Read From A Lexmark C782e With The Cables To The Scanner
(Posted by Anonymous-60871 11 years ago)