
Lenovo IdeaPad Tablet K1 Support Question
Lenovo IdeaPad Tablet K1 Support Question
Find answers below for this question about Lenovo IdeaPad Tablet K1.Need a Lenovo IdeaPad Tablet K1 manual? We have 1 online manual for this item!
Question posted by meircuj on April 9th, 2014
How To Remove Back Cover Lenovo Ideapad K1
The person who posted this question about this Lenovo product did not include a detailed explanation. Please use the "Request More Information" button to the right if more details would help you to answer this question.
Current Answers
Related Lenovo IdeaPad Tablet K1 Manual Pages
Lenovo IdeaPad Tablet K1 Hardware Maintenance Manual - Page 3
... management 25 Screen blank mode 25 Sleep (standby) mode 25 Hibernation mode 26
Lenovo IdeaPad Tablet K1 27 Specifications 27 FRU replacement notices 29
Screw notices 29 Removing and replacing an FRU 30
1010 Base cover 31 1020 Battery pack 33 1030 Middle cover 34 1040 Docking bracket 35 1050 System board 36 1060 Switch board, SD...
Lenovo IdeaPad Tablet K1 Hardware Maintenance Manual - Page 4

... computers. •• The product-specific section includes service, reference, and product-specific
parts information. Important: This manual is divided into the following Lenovo IdeaPad product:
Lenovo IdeaPad Tablet K1 Use this manual to troubleshoot problems effectively. Use this manual to read all the information under "Safety information" on page 1 and "Important service...
Lenovo IdeaPad Tablet K1 Hardware Maintenance Manual - Page 6

... force. Make sure that can stand safely without slipping. 2. IdeaPad Tablet K1 Hardware Maintenance Manual
General safety
Follow these rules below to ensure general...make sure that other service representatives and the customer are not in a hazardous position. •• Place removed covers and other parts in a safe place, keeping them with labels or stickers.
2 Do not attempt to ...
Lenovo IdeaPad Tablet K1 Hardware Maintenance Manual - Page 9
..., you must not be the type specified in good condition. If any unsafe conditions are any non-Lenovo IdeaPad alterations. 7. Turn off , and the power cord disconnected. A third-wire ground connector in the parts list. Remove the cover. 6. Checklist: 1. Disconnect the power cord. 3. Check the power cord for damage (loose, broken, or sharp edges...
Lenovo IdeaPad Tablet K1 Hardware Maintenance Manual - Page 18

... CD-ROM drive, the DVD-ROM drive, or any other than those drives. If one of Lenovo IdeaPad computer are no serviceable parts inside those specified herein might result in exposure to hazardous laser radiation. IdeaPad Tablet K1 Hardware Maintenance Manual
Laser compliance statement
Some models of these drives is installed, it is certified in...
Lenovo IdeaPad Tablet K1 Hardware Maintenance Manual - Page 24

... on laptop products
The following symptoms might indicate that you must include the following is covered under warranty: •• LCD panel cracked from the application of excessive force or from being
dropped •• Scratched (cosmetic) parts •• Distortion, deformation, or discoloration of purchase 5. Failing FRU name and part number 7. IdeaPad Tablet K1...
Lenovo IdeaPad Tablet K1 Hardware Maintenance Manual - Page 25
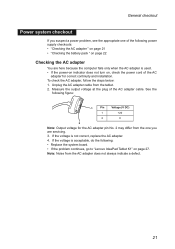
...8226;• Replace the system board. •• If the problem continues, go to "Lenovo IdeaPad Tablet K1" on page 27. Measure the output voltage at the plug of the AC adapter cable. General... the AC adapter does not always indicate a defect.
21 Unplug the AC adapter cable from the tablet. 2. If the voltage is acceptable, do the following power supply checkouts: •• "Checking...
Lenovo IdeaPad Tablet K1 Hardware Maintenance Manual - Page 28
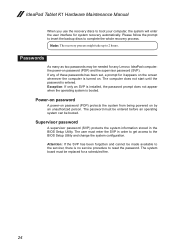
...password (SVP) protects the system information stored in order to get access to 2 hours. IdeaPad Tablet K1 Hardware Maintenance Manual
When you use the recovery discs to reset the password. Note: The ...prompt for it appears on password (POP) and the supervisor password (SVP). If any Lenovo IdeaPad computer: the power-on the screen whenever the computer is no service procedure to boot your...
Lenovo IdeaPad Tablet K1 Hardware Maintenance Manual - Page 31

...-specific parts information: •• "Specifications" on page 27 •• "FRU replacement notices" on page 29 •• "Removing and replacing an FRU" on page 30 •• "Locations" on page 46 •• "Parts list" on back
27 Lenovo IdeaPad Tablet K1
Lenovo IdeaPad Tablet K1
This chapter presents the following table lists the specifications of the...
Lenovo IdeaPad Tablet K1 Hardware Maintenance Manual - Page 33
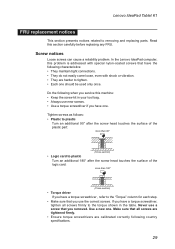
... tighten. •• Each one . Use a new one should be used only once. Lenovo IdeaPad Tablet K1
FRU replacement notices
This section presents notices related to the torque shown in your tool bag. &#...8226;• Always use the correct screws. Never use a screw that you removed. Make sure that have one.
If you have the following characteristics: •• They ...
Lenovo IdeaPad Tablet K1 Hardware Maintenance Manual - Page 35

Otherwise, it may cause permanent damage to the tablet.
31 Removal steps of base cover
Remove the base cover in the direction shown by arrows 1 2.
2 1 Note: Turn off the tablet first. Lenovo IdeaPad Tablet K1 1010 Base cover
Figure 1.
Lenovo IdeaPad Tablet K1 Hardware Maintenance Manual - Page 37

Disconnect the connector in the direction shown by arrow 3.
Removal steps of battery pack
Remove four screws 1. Lenovo IdeaPad Tablet K1
1020 Battery pack
For access, remove this FRU: •• "1010 Base cover" on page 31
DANGER
Only use the battery specified in the direction shown by arrow 2.
1
2
1
1 1
Step
1
Screw (quantity) M4.5 x 3 mm, flat-head, nylon-coated (4)
...
Lenovo IdeaPad Tablet K1 Hardware Maintenance Manual - Page 39

Lenovo IdeaPad Tablet K1
1040 Docking bracket
For access, remove these FRUs in the direction shown by arrow 2.
1 1
2
Step
1
Screw (quantity) M4.5 x 3 mm, flat-head, nylon-coated (2)
Color Silver
Torque 1.5-2.0 kg/cm
35 Removal steps of docking bracker
Remove two screws 1 and then remove the docking bracker in order: •• "1010 Base cover" on page 31 •• "1020...
Lenovo IdeaPad Tablet K1 Hardware Maintenance Manual - Page 41

Removal steps of system board (continued)
4 4
4 4 4
When installing: Make sure that all the connectors are attached firmly. Lenovo IdeaPad Tablet K1
Figure 5. Step
4
Screw (quantity) M4.5 x 3 mm, flat-head, nylon-coated (5)
Color Silver
Torque 1.5-2.0 kg/cm
Remove the system board in the direction shown by arrow 5.
5
37
Lenovo IdeaPad Tablet K1 Hardware Maintenance Manual - Page 43

...)
Remove two screws 3, then remove the SD board in the direction shown by arrow 4.
3
3
4
Remove two screws 5, then remove the SD board bracket in the direction shown by arrow 6.
5 5
6
Step
3 5
Screw (quantity) M4.5 x 3 mm, flat-head, nylon-coated (2) M4.5 x 3 mm, flat-head, nylon-coated (2)
Color Silver Silver
Torque 1.5-2.0 kg/cm 1.5-2.0 kg/cm
39 Lenovo IdeaPad Tablet K1
Figure...
Lenovo IdeaPad Tablet K1 Hardware Maintenance Manual - Page 45

... page 33 •• "1030 Middle cover" on page 34 •• "1040 Docking bracket" on page 35 •• "1050 System board" on page 36 •• "1060 Switch board, SD board and HDMI board" on page 38 Figure 7. Lenovo IdeaPad Tablet K1 1070 Speaker
For access, remove these FRUs in the direction shown by...
Lenovo IdeaPad Tablet K1 Hardware Maintenance Manual - Page 47

...Remove two screws 1, then remove the panel support bracket in order: •• "1010 Base cover" on page 31 •• "1020 Battery pack" on page 33 •• "1030 Middle cover...8226; "1080 Optical finger navigation (OFN) module" on page 42
Figure 9. Lenovo IdeaPad Tablet K1
1090 Panel support bracket
For access, remove these FRUs in the direction shown by arrow 2.
1 1
2
2
Step
...
Lenovo IdeaPad Tablet K1 Hardware Maintenance Manual - Page 49

...Tension could cause the cables to be broken.
45 Lenovo IdeaPad Tablet K1
1110 Antenna assembly
For access, remove these FRUs in the direction shown by the cable guides...antenna boards with adhesive tapes. Removal steps of antenna assembly Peel off the adhesive tapes securing the antenna boards, and then remove the
antenna assembly in order: •• "1010 Base cover" on page 31 •&#...
Lenovo IdeaPad Tablet K1 Hardware Maintenance Manual - Page 51

Bottom and Left-side view 1 Integrated camera 2 Built-in microphone 3 Power button 4 Volume button 5 Screen rotation lock 6 Micro SD slot
1
Lenovo IdeaPad Tablet K1
2 3 4 5 6
47
Lenovo IdeaPad Tablet K1 Hardware Maintenance Manual - Page 55
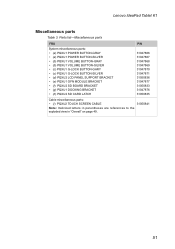
... miscellaneous parts:
• (i) PQXU2 TOUCH SCREEN CABLE
31050841
Note: Italicized letters in parentheses are references to the exploded view in "Overall" on page 49 .
51 Lenovo IdeaPad Tablet K1
Miscellaneous parts
Table 3.


