Lenovo IdeaPad P580 Support Question
Lenovo IdeaPad P580 Support Question
Find answers below for this question about Lenovo IdeaPad P580.Need a Lenovo IdeaPad P580 manual? We have 1 online manual for this item!
Question posted by qwerrcypr on July 21st, 2014
How To Restore Lenovo Ideapad N580 Without Disks
The person who posted this question about this Lenovo product did not include a detailed explanation. Please use the "Request More Information" button to the right if more details would help you to answer this question.
Current Answers
Related Lenovo IdeaPad P580 Manual Pages
Ideapad P580, P585, N580, N581, N585, N586 User Guide V1.0 (English) - Page 1
Lenovo IdeaPad P580/P585/N580/ N581/N585/N586
User Guide V1.0
Read the safety notices and important tips in the included manuals before using your computer.
Ideapad P580, P585, N580, N581, N585, N586 User Guide V1.0 (English) - Page 2
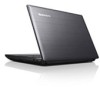
... computer and/or your computer may include features that are not described in this user guide. • The illustrations used in this manual are for Lenovo IdeaPad N580 unless otherwise stated. • The illustrations in this guide may assume that you are using other Windows operating system, some operations may differ from the...
Ideapad P580, P585, N580, N581, N585, N586 User Guide V1.0 (English) - Page 3
...
Appendix A. Connecting to know your computer 22 Using Switchable Graphics (specific models only 23
Chapter 3. CRU instructions 28
Replacing the battery 28 Replacing the hard disk drive 30 Replacing memory ...35 Replacing the wireless LAN card 38 Removing the optical drive 40
Trademarks 42 Index...43
i
Ideapad P580, P585, N580, N581, N585, N586 User Guide V1.0 (English) - Page 6

Chapter 1. Getting to know your computer
„ N580/N585
1
2b
3
5
N580
4
8
6 7
2
Ideapad P580, P585, N580, N581, N585, N586 User Guide V1.0 (English) - Page 13

... battery latch keeps the battery pack secured in place.
b Battery pack
For details, see "Using AC adapter and battery" on page 12. d Optical drive/ Hard disk drive (HDD)/Memory/ CPU (Central processing unit)/ Mini PCI Express Card slot compartment
9
Ideapad P580, P585, N580, N581, N585, N586 User Guide V1.0 (English) - Page 15
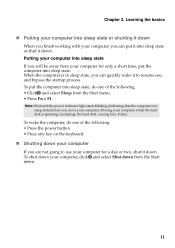
Chapter 2. Moving your computer while the hard disk is spinning can damage the hard disk, causing loss of the following . • Press the power button. • Press any key on the keyboard.
„ Shutting down .
To put it down your ...
Ideapad P580, P585, N580, N581, N585, N586 User Guide V1.0 (English) - Page 16
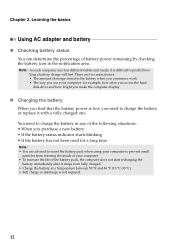
... battery • If the battery status indicator starts blinking • If the battery has not been used for example, how often you access the hard disk drive and how bright you make the computer display.
„ Charging the battery
When you find that the battery power is not required.
12 There...
Ideapad P580, P585, N580, N581, N585, N586 User Guide V1.0 (English) - Page 17
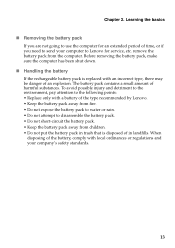
...points: • Replace only with an incorrect type, there may be danger of the type recommended by Lenovo. • Keep the battery pack away from fire. • Do not expose the battery pack to...substances. Chapter 2. Learning the basics
„ Removing the battery pack
If you are not going to Lenovo for service, etc. remove the battery pack from children. • Do not put the battery pack...
Ideapad P580, P585, N580, N581, N585, N586 User Guide V1.0 (English) - Page 18
Chapter 2.
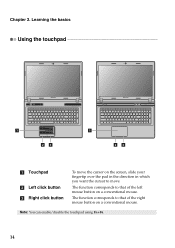
Note: You can enable/disable the touchpad using Fn+F6.
14 Learning the basics
Using the touchpad
N580
P580
1 23
1 23
a Touchpad
b Left click button c Right click button
To move the cursor on the screen, slide your fingertip over the pad in the direction ...
Ideapad P580, P585, N580, N581, N585, N586 User Guide V1.0 (English) - Page 23
Learning the basics
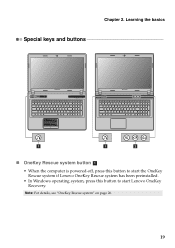
Special keys and buttons
N580
P580
1
1
2
„ OneKey Rescue system button a
• When the computer is powered-off, press this button to start the OneKey Rescue system if Lenovo OneKey Rescue system has been preinstalled.
• In Windows operating system, press this button to start Lenovo OneKey Recovery. Chapter 2. Note: For details...
Ideapad P580, P585, N580, N581, N585, N586 User Guide V1.0 (English) - Page 26
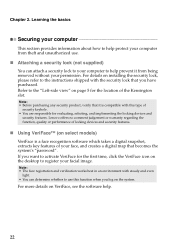
... the Kensington slot. For details on select models)
VeriFace is compatible with steady and even
light. • You can attach a security lock to your permission. Lenovo offers no comment judgement or warranty regarding the function, quality or performance of your facial image. Note: • Before purchasing any security product, verify that...
Ideapad P580, P585, N580, N581, N585, N586 User Guide V1.0 (English) - Page 27
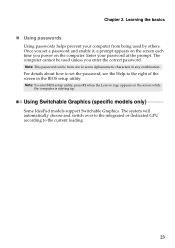
... utility. Note: This password can be used by others. Note: To enter BIOS setup utility, press F2 when the Lenovo logo appears on the computer. Using Switchable Graphics (specific models only
Some IdeaPad models support Switchable Graphics. Chapter 2.
The computer cannot be from being used unless you enter the correct password.
Learning...
Ideapad P580, P585, N580, N581, N585, N586 User Guide V1.0 (English) - Page 28
... wiring to homes and small businesses
over ordinary telephone lines.
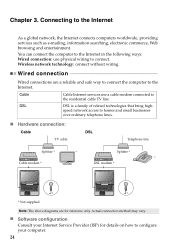
„ Hardware connection:
Cable
DSL
TV cable
Telephone line
Splitter *
*
Splitter *
*
Cable modem *
DSL modem *
N580
N580
*
*
* Not supplied.
Ideapad P580, P585, N580, N581, N585, N586 User Guide V1.0 (English) - Page 29
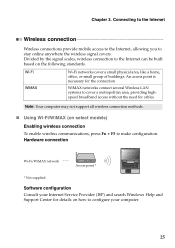
... signal covers. Connecting to the Internet
Wireless connection
Wireless connections provide mobile access to the Internet, allowing you to configure your computer.
25
Hardware connection
N580
Wi-Fi/WiMAX network Access point *
* Not supplied
Software configuration Consult your Internet Service Provider (ISP) and search Windows Help and Support Center for cables...
Ideapad P580, P585, N580, N581, N585, N586 User Guide V1.0 (English) - Page 30
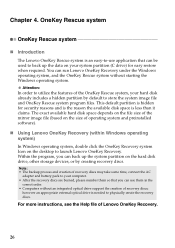
...mirror image file (based on your hard disk already includes a hidden partition by creating recovery discs. This default partition is hidden for easy restore when required. however an appropriate external ...program files. Within the program, you can back up the data on the size of Lenovo OneKey Recovery.
26
Note: • The backup process and creation of recovery discs;
For...
Ideapad P580, P585, N580, N581, N585, N586 User Guide V1.0 (English) - Page 31
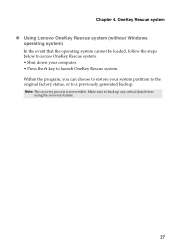
... recovery process is irreversible.
Make sure to a previously generated backup. Within the program, you can choose to restore your computer. • Press the key to launch OneKey Rescue system. OneKey Rescue system
„ Using Lenovo OneKey Rescue system (without Windows operating system)
In the event that the operating system cannot be loaded...
Ideapad P580, P585, N580, N581, N585, N586 User Guide V1.0 (English) - Page 32
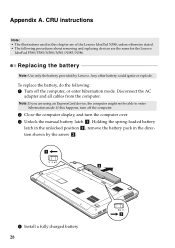
...: If you are the same for the Lenovo
IdeaPad P580/P585/N580/N581/N585/N586.
Holding the spring-loaded battery
latch in the unlocked position b, remove the battery pack in this happens, turn the computer over. 3 Unlock the manual battery latch a. Appendix A. If this chapter are of the Lenovo IdeaPad N580, unless otherwise stated. • The following...
Ideapad P580, P585, N580, N581, N585, N586 User Guide V1.0 (English) - Page 34
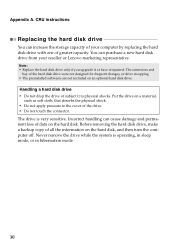
..., or drive swapping. • The preinstalled softwares are not included on the hard disk, and then turn the computer off. You can increase the storage capacity of your reseller or Lenovo marketing representative. Put the drive on the hard disk. The drive is operating, in sleep mode, or in hibernation mode.
30 Incorrect...
Ideapad P580, P585, N580, N581, N585, N586 User Guide V1.0 (English) - Page 35
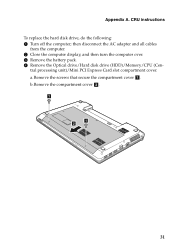
..., and then turn the computer over. 3 Remove the battery pack. 4 Remove the Optical drive/Hard disk drive (HDD)/Memory/CPU (Cen- a.Remove the screws that secure the compartment cover a . CRU instructions To replace the hard disk drive, do the following: 1 Turn off the computer; tral processing unit)/Mini PCI Express Card slot...
Ideapad P580, P585, N580, N581, N585, N586 User Guide V1.0 (English) - Page 37

... e .
5
8 Remove the screws and detach the metal frame from the hard disk drive. 9 Attach the metal frame to a new hard disk drive and tighten the screws. 0 Put the hard disk drive gently into space.
33 then push it firmly into the hard disk drive bay with the tab
facing upwards and the connectors facing...


