Lenovo G580 Support Question
Lenovo G580 Support Question
Find answers below for this question about Lenovo G580.Need a Lenovo G580 manual? We have 1 online manual for this item!
Question posted by alagawe on January 6th, 2014
Lenovo G580 Numlock How Do I Enable It All The Time
The person who posted this question about this Lenovo product did not include a detailed explanation. Please use the "Request More Information" button to the right if more details would help you to answer this question.
Current Answers
Related Lenovo G580 Manual Pages
User Guide - Page 1
Lenovo G480/G485/ G580/G585/G780
User Guide V1.0
Read the safety notices and important tips in the included manuals before using your computer.
User Guide - Page 2
...manual may differ from the actual product. First Edition (December 2011) © Copyright Lenovo 2011. LIMITED AND RESTRICTED RIGHTS NOTICE: If data or software is delivered pursuant a ...Lenovo Safety and General
Information Guide first. • Some instructions in this guide may assume that are not described in this user guide. • The illustrations used in this manual are for Lenovo G580...
User Guide - Page 6
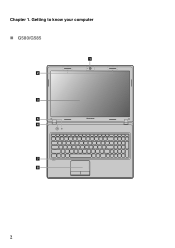
Getting to know your computer
„ G580/G585
1 2 3 5 4
7 8
2 Chapter 1.
User Guide - Page 9
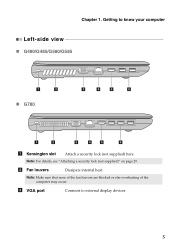
... a security lock (not supplied)" on page 29.
b Fan louvers
Dissipate internal heat.
c VGA port
Connects to know your computer
Left-side view
„ G480/G485/G580/G585
1
2
„ G780
3
4
5
6
1
2
3
4
5
6
a Kensington slot
Attach a security lock (not supplied) here. Getting to external display devices...
User Guide - Page 11
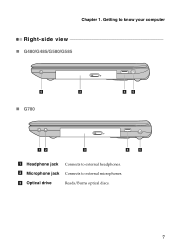
c Optical drive
Reads/Burns optical discs.
7 Getting to know your computer
Right-side view
„ G480/G485/G580/G585
6
3
„ G780
45
12
3
4
5
a Headphone jack Connects to external microphones. Chapter 1. b Microphone jack Connects to external headphones.
User Guide - Page 13
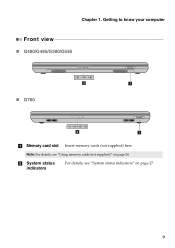
b System status indicators
For details, see "Using memory cards (not supplied)" on page 27.
9 Note: For details, see "System status indicators" on page 24. Getting to know your computer
Front view
„ G480/G485/G580/G585
„ G780
2
1
2
1
a Memory card slot Insert memory cards (not supplied) here.
Chapter 1.
User Guide - Page 16

Getting to know your computer
„ G580/G585
1
2
3
5
4
5
12 Chapter 1.
User Guide - Page 23
... regulations and your computer to use the computer for service, etc. When
disposing of time, or if you are not going to Lenovo for an extended period of the battery, comply with a battery of the type recommended by Lenovo. • Keep the battery pack away from fire. • Do not expose the battery...
User Guide - Page 25

... keys incorporated in its standard keyboard.
„ Numeric keypad G480/G485
The keyboard has keys that, when enabled, work as a 10-key numeric keypad. To enable or disable the numeric keypad, press Fn+F8 .
To enable or disable the numeric keypad, press the Num Lock key. Note: The Num lock indicator will light...
User Guide - Page 26
Chapter 2. G480/G485 b
b a G580/G585/G780 b
a b
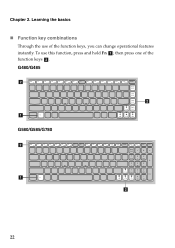
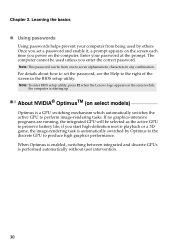
22 To use of the function keys b . then press one of the function keys, you can change operational features instantly. Learning the basics
„ Function key combinations
Through the use this function, press and hold Fn a ;
User Guide - Page 27
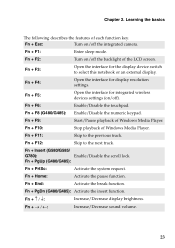
... on /off the backlight of Windows Media Player. Fn + F1:
Enter sleep mode. Fn + Insert (G580/G585/
G780):
Enable/Disable the scroll lock. Fn
Increase/Decrease display brightness. Fn + F8 (G480/G485): Enable/Disable the numeric keypad.
Fn + F6:
Enable/Disable the touchpad.
Fn + F2:
Turn on /off ).
Fn + PgDn (G480/G485): Activate the...
User Guide - Page 31
Chapter 2. G480/G485/G580/G585
G780
3
4
1
1
2
3
4
5
6
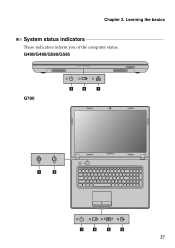
27 Learning the basics
System status indicators
These indicators inform you of the computer status.
User Guide - Page 33
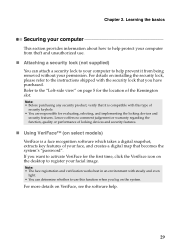
... computer to the instructions shipped with the security lock that becomes the system's "password". Lenovo offers no comment judgement or warranty regarding the function, quality or performance of your facial image...page 5 for the location of
security keyhole. • You are responsible for the first time, click the VeriFace icon on the system. Chapter 2. Note: • The face registration...
User Guide - Page 34
...correct password.
Note: To enter BIOS setup utility, press F2 when the Lenovo logo appears on the screen each time you start high-definition movie playback or a 3D game, the image-rendering ... on select models
Optimus is starting up. For details about how to set a password and enable it, a prompt appears on the screen while the computer is a GPU switching mechanism which automatically...
User Guide - Page 37
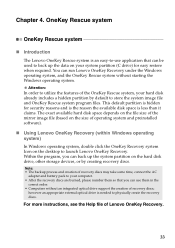
...: • The backup process and creation of operating system and preinstalled software).
„ Using Lenovo OneKey Recovery (within Windows operating system)
In Windows operating system, double click the OneKey Recovery system... the mirror image file (based on the size of recovery discs may take some time, connect the AC
adapter and battery pack to physically create the recovery discs. For...
User Guide - Page 39
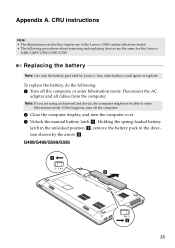
Disconnect the AC
adapter and all cables from the computer. G480/G485/G580/G585
1
3
2
35 Appendix A. Replacing the battery
Note: Use only the battery ... not be able to enter hibernation mode. Note: If you are the same for the Lenovo
G480/G485/G580/G585/G780. If this chapter are of the Lenovo G580, unless otherwise stated. • The following : 1 Turn off the computer.
2 Close...
User Guide - Page 44
G480/G485/G580/G585
3 3
G780
3 3
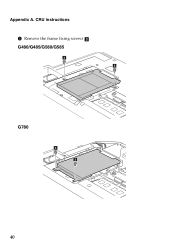
40 Appendix A. CRU instructions
5 Remove the frame fixing screws c .
User Guide - Page 45
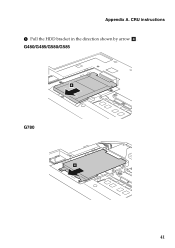
G480/G485/G580/G585
4
G780
4
41 CRU instructions 6 Pull the HDD bracket in the direction shown by arrow d. Appendix A.
User Guide - Page 46
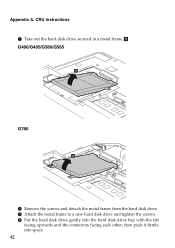
... frame e. then push it firmly into the hard disk drive bay with the tab
facing upwards and the connectors facing each other; Appendix A. G480/G485/G580/G585
5
G780
5
8 Remove the screws and detach the metal frame from the hard disk drive. 9 Attach the metal frame to a new hard disk drive and...
User Guide - Page 54

CRU instructions
Removing the optical drive
To remove the optical drive, do the following: G480/G485/G580/G585 1 Remove the Hard disk drive/Memory/Central processing unit/Mini PCI
Express Card slot compartment cover. 2 Remove the screw shown in the illustration a . 3 Gently pull the optical drive out b .
1 2
50 Appendix A.
Similar Questions


My Lenovo G580 Beeps 5 Times With A Blank Lcd. What Does That Mean?
My lenovo froze on me, so i cut it off but when i tried to cut it back on it was blank and it starte...
My lenovo froze on me, so i cut it off but when i tried to cut it back on it was blank and it starte...
(Posted by mommyluvmia12 10 years ago)

I Have A New Laptop, Lenovo G580
I have just switched it on for the first time and all I see is a black screen with instructions: ent...
I have just switched it on for the first time and all I see is a black screen with instructions: ent...
(Posted by idos 11 years ago)

Network Not Enabled On Lenovo G580
I have installed Ubuntu 8.04 on my new lenovo g580. installation was successful but network is not w...
I have installed Ubuntu 8.04 on my new lenovo g580. installation was successful but network is not w...
(Posted by shiningvinod 11 years ago)