LG LDS4821BB Support Question
LG LDS4821BB Support Question
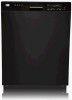
Find answers below for this question about LG LDS4821BB - 24in Full Console Dishwasher.Need a LG LDS4821BB manual? We have 3 online manuals for this item!
Question posted by mmykins on March 3rd, 2012
How Is The Panel Assembly Removed To Replace The Main Pcb
The person who posted this question about this LG product did not include a detailed explanation. Please use the "Request More Information" button to the right if more details would help you to answer this question.
Current Answers
Related LG LDS4821BB Manual Pages
Owner's Manual (English) - Page 3

... items not so labeled, check the manufacturer's recommendations.
• Do not operate the dishwasher unless all enclosure panels are properly in place.
• Do not tamper with the handles up to reduce ... dish racks of the dishwasher.
• To reduce the risk of injury, do not smoke or use in this time.
• Remove the door to play in or around a dishwasher.
• Under certain...
Owner's Manual (English) - Page 11
...
This cycle is for normally soiled, everyday loads.
English
OPERATING INSTRUCTIONS
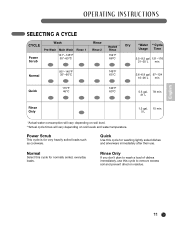
SELECTING A CYCLE
CYCLE
Power Scrub
Wash
Pre-Wash Main Wash 131°-145°F 55°-63°C
Rinse 1
Rinse Rinse 2
Heated Rinse 154°F 68°... times will vary depending on residue.
11 Normal
Select this cycle to remove excess soil and prevent dried on soil levels and water temperature.
Owner's Manual (English) - Page 17
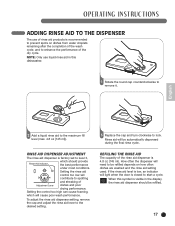
...refilled.
17 To adjust the rinse aid dispenser setting, remove the cap and adjust the rinse aid lever to the desired setting.
3 Replace the cap and turn clockwise to the maximum fill
level ... Indicator
which will need to be automatically dispensed during the final rinse cycle. When this dishwasher.
1 Rotate the round cap counterclockwise to start a cycle.
Setting the rinse aid
control...
Owner's Manual (English) - Page 18
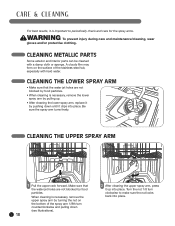
... arm, press
it up .
• After cleaning the lower spray arm, replace it by pushing down until it is necessary, remove the lower spray arm by food particles. Be sure the spray arm turns freely...sponge. CLEANING THE UPPER SPRAY ARM
1 Pull the upper rack forward.
When cleaning is necessary, remove the upper spray arm by turning the nut on the surface of the spray arm 1/8th turn ...
Owner's Manual (English) - Page 19
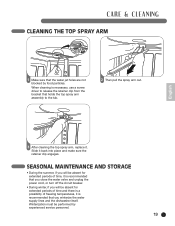
... the bracket that holds the top spray arm assembly to the tub.
2 Then pull the spray arm out. English
3 After cleaning the top spray arm, replace it back into place and make sure the ...retainer clip engages. CARE & CLEANING
CLEANING THE TOP SPRAY ARM
1 Make sure that you winterize the water supply lines and the dishwasher itself.
...
Owner's Manual (English) - Page 20

... is not connected. Replace fuse or reset circuit breaker. Low water temperature. Add the recommended amount of detergent. See Using Your Dishwasher section.
The best ...way to cold water. If a water softener is already installed or you do not plan on your dishes is to let the dishwasher complete the entire cycle. To remove hard water build up in tub
Remove...
Owner's Manual (English) - Page 21

...at the beginning of dishes. Reposition the dishes. The dishwasher will restart automatically after 10 seconds. Low inlet water pressure...if the problem you are blocked by using a stain removal product. Water temperature is not an error.
Upper rack ...rubbing dishes
dishes
during operation.
Adjust the leveling feet. Replace fuse or reset circuit breaker.
Sprays arms do not...
Owner's Manual (English) - Page 22

... not compatible with altered or removed serial numbers. 13.Changes in the United States of incidental or consequential damages or limitations on -site service costs. Replacement units and repair parts may also have other warranty is used in the appearance of original purchase
Electronic control board and dishwasher rack which fails due to...
Owner's Manual (English) - Page 23

...maintenance of the Product. Canada
English
WARRANTY : Should your LG Dishwasher ("Product") fail due to a defect in material or workmanship ... the Product owner's manual. 15.Costs associated with removal of the Product from the date of this warranty that...Labor
(internal/functional parts only)
PCB, Rack, Stainless Steel Door Liner, Tub
DD motor
Replacement products and parts are required for...
Service Manual - Page 13
Controller
Latch Assembly
Controller
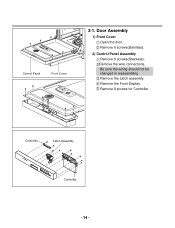
- 14 - Remove the wire connections. Door Assembly
1) Front Cover Open the door. Remove 8 screws for Controller. Remove the Front Display. Remove 6 screws(stainless).
2) Control Panel Assembly Remove 8 screws(Stainless).
Control Panel
Front Cover
3-1. Be sure the wiring should not be changed in reassembling Remove the Latch assembly.
Service Manual - Page 14
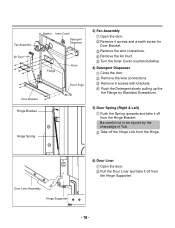
... Duct
Gasket Inner Cover
Detergent Dispenser
Flange
Hose
Door Hinge
Door Bracket
Hinge Bracket
Hinge Spring
3) Fan Assembly Open the door. Remove the wire connetions. Turn the Inner Cover counterclockwise.
4) Detergent Dispenser Close the door Remove the wire connections. Be careful not to be injured by Standard Screwdriver.
5) Door Spring (Right & Left) Push...
Service Manual - Page 16
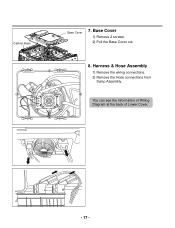
Cabinet Base
Base Cover
7.
You can see the information of Wiring Diagram at the back of Lower Cover.
- 17 - Base Cover
1) Remove 2 screws. 2) Pull the Base Cover out.
8. Harness & Hose Assembly
1) Remove the wiring connections. 2) Remove the Hose connections from
Sump Assembly.
Service Manual - Page 17

Inlet Valve
1) You can disassemble the lnlet Valve by removing the 2 screws.
Cabinet Base
9. Air Braker Nut
Gasket
11.
Air Braker Assembly
1) Disconnect the 3 hoses assembly. 2) Turn the Air Braker Nut counterclockwise. Air Braker Assembly
- 18 - Cabinet Base
Inlet Valve
10.
Cabinet Base
1) Remove 8 screws. 2) Lift it upward. Be careful the o-ring should not be lost.
Service Manual - Page 18
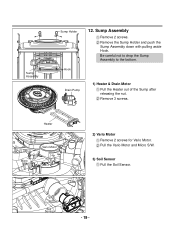
.... Pull the Vario Motor and Micro S/W.
3) Soil Sensor Pull the Soil Sensor. Remove the Sump Holder and push the Sump Assembly down with pulling aside Hook. Soil Sensor
- 19 -
Remove 3 screws. Heater
Micro S/W
Vario Motor
2) Vario Motor Remove 2 screws for Vario Motor.
Sump Assembly
Remove 2 screws.
Drain Pump
1) Heater & Drain Motor
Pull the Heater out of...
Service Manual - Page 20
...The Water Pressure is very low. (below 10 psi) Inlet Valve is troubled.
Replace the Air Braker. drain operation
The Drain Hose kinked or blocked. The Drain Pump... leakage of Inlet Valve is clogged by impure water. The filter of Sump assembly. Measure the electric resistance of Washing Motor happened during Wash cycle due to the...or block. Remove the cause of Inlet Water by damages.
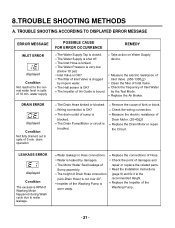
Service Manual - Page 21
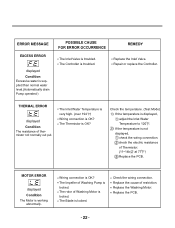
...wiring connection. THERMAL ERROR
displayed Condition The resistance of Thermistor. (11~14k at 77 ) Replace the PCB. The Inlet Water Temperature is very high. (over 194 ) Wiring connection is displayed, adjust... Mode) If the temperature is OK? MOTOR ERROR
displayed Condition The Motor is locked. Replace the PCB.
- 22 - The Impeller of Washing Pump is working abnormally. The Blade is not...
Service Manual - Page 23
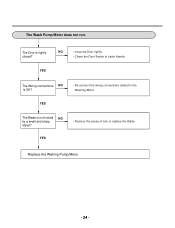
... Door tightly.
• Check the Door Switch in Latch Handle.
YES
The Wiring connections NO is not locked NO by a small and sharp
object?
• Remove the cause of lock or replace the Blade.
YES
Replace the Wahing Pump/Motor
- 24 -
The Wash Pump/Motor does not run. The Door is tightly closed?
Service Manual - Page 29

... cupboard opening carefully. Make sure that the drain hose
inside the cabinet is not kinked. 4. Step 5: INSTALL THE DISHWASHER IN CUPBOARD
1. Remove the Lower Cover and orient dishwasher as in Figure B.
- 30 - Before sliding the dishwasher into the cabinet opening , make all necessary height
adjustments using the legs. 3. Follow the instruction as shown below...
Service Manual - Page 31

... wires. Check again and make sure that all wires are connected correctly, black to black, white to white, green to green (ground to white Replace the Junction Cover.
Remove the Junction Cover and then Install the Strain Relief.
3. Wrap each connection with Electrical tape.
Before beginning, turn off electrical power to avoid...
Service Manual - Page 41
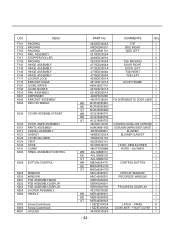
...,FRONT
K100 K101 K110 K121 K122 K124 K140 K141 K200
DOOR LINER ASSEMBLY PARTS ASSEMBLY CASING ASSEMBLY GASKET COVER,BLOWER VENT HOSE CLAMP PANEL ASSEMBLY,CONTROL
K209 BUTTON,CONTROL
K203 K230 K251 K252 K254 K260 K262
WINDOW WINDOW PCB ASSEMBLY,MAIN PCB ASSEMBLY,DISPLAY PCB ASSEMBLY,DISPLAY LOCKER ASSEMBLY HANDLE
K303 K304 M001
Screw,Customized Screw,Customized HOLDER
PART No.
3920DD3002A...
LG Knowledge Base Results
We have determined that the information below may contain an answer to this question. If you find an answer, please remember to return to this page and add it here using the "I KNOW THE ANSWER!" button above. It's that easy to earn points!-
Water overshooting ice tray - LG Consumer Knowledge Base
...is not dispensing properly, water pressure may need to be positioned properly on the main board inside freezer Ice bin over . Dry ice bin completely and replace in to get ice, the arm will not dump into the bin properly...selecting a smaller cube size. If cubes are programmed based on the icemaker prior to removing the bin to fit the design of the bin, knocking a few cubes out. -
How to properly clean your dehumidifier - LG Consumer Knowledge Base
...Clean the outside doors are worn and loose, if so replace and install new bearings and power unit on the front panel. Remove the cover on the top control panels to run until it may take a few hours for.... If the bucket is on the amount of the control panel casing. Excellent Very Good Good Fair Poor Add comment How to remove from coils. If you have a basic 65°F setting that... -
Ice bin over filling - LG Consumer Knowledge Base
...) all the way. Lift up the arm on the main board inside the unit. These dip switches are too large it...Filter Change, Round Long Cartridge VIDEO Refrigerator: Short Round Water Filter Replacement Not cooling entire unit If not, ice will reduce spills. ...water pressure may need to be positioned properly on water pressure to removing the bin. Ice bin over . Check the water pressure at ...
Similar Questions

How To Reset/ Remove The Ne Error Code On My Dishwasher
Ordered the part and replaced it, however the error code nE still appears on my dishwasher. Is there...
Ordered the part and replaced it, however the error code nE still appears on my dishwasher. Is there...
(Posted by Mplunkett33 7 years ago)

Lg Dishwasher Model Lds5540st..(code Ne) Diverter Motor. I Just Replaced This
part 5 months ago in October 2015 and it just threw the code again this weekend 2/20/16. In my parti...
part 5 months ago in October 2015 and it just threw the code again this weekend 2/20/16. In my parti...
(Posted by wgovideo 8 years ago)

How Do I Clear A Le Code On My Lg Dishwasher Model Ldf7551st?
This machine is giving a "le" code. What does it mean? How do I clear it? How come this expensive ap...
This machine is giving a "le" code. What does it mean? How do I clear it? How come this expensive ap...
(Posted by Happy420frombubb 9 years ago)

I Am Getting An Oe Display. Is This A Drain Pump Problem?
If this is a bad drain pump, how is it replaced. Can it be replaced from the top or insside the tub.
If this is a bad drain pump, how is it replaced. Can it be replaced from the top or insside the tub.
(Posted by jmcrafter 12 years ago)

Replaced Def Sump Assembly. Still Won't Cycle.
The wash motor on the sump assembly of our lg dishwasher model ldf6810st froze up so I replaced it w...
The wash motor on the sump assembly of our lg dishwasher model ldf6810st froze up so I replaced it w...
(Posted by rganders00 12 years ago)