Konica Minolta bizhub C360 Support Question
Konica Minolta bizhub C360 Support Question
Find answers below for this question about Konica Minolta bizhub C360.Need a Konica Minolta bizhub C360 manual? We have 19 online manuals for this item!
Question posted by blma on May 25th, 2014
How Do I Make A New Favorite Destination Button For My Bizhub C360
The person who posted this question about this Konica Minolta product did not include a detailed explanation. Please use the "Request More Information" button to the right if more details would help you to answer this question.
Current Answers
Related Konica Minolta bizhub C360 Manual Pages
bizhub C220/C280/C360 Advanced Function Operations User Guide - Page 55
... the Edit Tool area, edit the read a document. Select [Print]. Select [Destination List]
bizhub C360/C280/C220
6-5
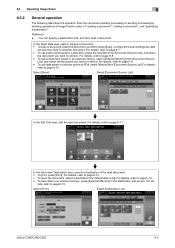
For de- 6.3 Operating Image Panel
6
6.3.2
General operation
The ...read the document. For details, refer to page 6-9. • To use a document saved in the Destination List screen.
Configure the scan settings as need- For details, refer to page 6-7. • To use...
bizhub C220/C280/C360 Box Operations User Guide - Page 72
bizhub C360/C280/C220
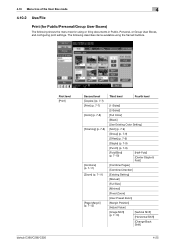
First level [Print]
Second level [Copies:] (p. 7-7) [Print] (p. 7-7) [Color] (p. 7-8) [Finishing] (p. 7-8)
[Combine] (p. 7-11) [Zoom] (p....)
[Vertical Shift] [Horizontal Shift]
[Change Back Shift]
4-25 The following shows the menu tree for using the framed buttons. 4.10 Menu tree of the User Box mode
4
4.10.2 Use/File
Print (for Public/Personal/Group User Boxes)
...
bizhub C220/C280/C360 Box Operations User Guide - Page 78

bizhub C360/C280/C220
4-31
Filing Settings menu tree for public/personal/group User Boxes)
The following describes items available using the framed buttons. 4.10 Menu tree of the User Box mode
4
First level
[Document Details]
Second level [Document Settings]
[Communication Settings]
[Application]
[Preview] (p. 7-65)
Third level
Fourth level
[...
bizhub C220/C280/C360 Box Operations User Guide - Page 138
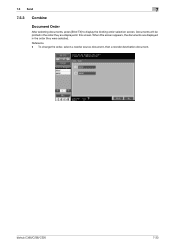
... in the order they are displayed in this screen. Documents will be printed in the order they were selected. bizhub C360/C280/C220
7-33 To change the order, select a reorder source document, then a reorder destination document. Reference -
7.5 Send
7
7.5.3 Combine
Document Order
After selecting documents, press [Bind TX] to display the binding order selection...
bizhub C220/C280/C360 Copy Operations User Guide - Page 132
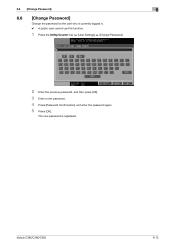
... user who is registered. The new password is currently logged in. 0 A public user cannot use this function.
1 Press the Utility/Counter key ö [User Settings] ö [Change Password].
2 Enter the previous password, and then press [OK]. 3 Enter a new password. 4 Press [Password Confirmation], and enter the password again. 5 Press [OK].
bizhub C360/C280/C220
6-12
bizhub C220/C280/C360 Enlarge Display Operations User Guide - Page 43
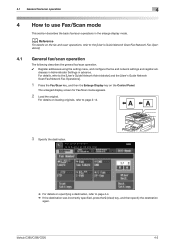
... fax/scan operation
4
4
4.1
How to page 4-4. % If the destination was incorrectly specified, press the C (clear) key, and then specify the destination
again. dresses in Administrator Settings in the enlarge display mode. bizhub C360/C280/C220
4-2
For details on loading originals, refer to page 2-14.
3 Specify the destination.
% For details on the Control Panel. d Reference
For...
bizhub C220/C280/C360 Network Administrator User Guide - Page 227
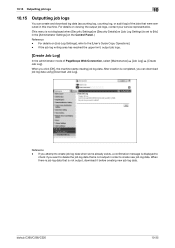
... ö [Create Job Log]. After creation is set to the [User's Guide Copy Operations]. - bizhub C360/C280/C220
10-35 10.15 Outputting job logs
10
10.15
Outputting job logs
You can download job... already exists, a confirmation message is not output, download it before creating new job log data. When you want to create new job log data. For details on [Job Log Settings], refer to [...
bizhub C220/C280/C360 Network Scan/Fax/Network Fax Operations User Guide - Page 48
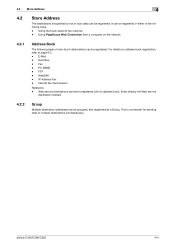
... - Using PageScope Web Connection from a computer on address book registration, refer to multiple destinations simultaneously. IP Address Fax - Web service destinations cannot be registered. bizhub C360/C280/C220
4-4 FTP -
Enter directly the Web service
destination instead.
4.2.2
Group
Multiple destination addresses can be registered with an address book. User Box -
bizhub C220/C280/C360 Network Scan/Fax/Network Fax Operations User Guide - Page 176
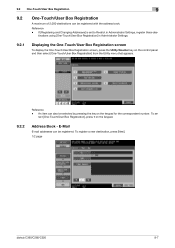
.../User Box Registration screen
To display the One-Touch/User Box Registration screen, press the Utility/Counter key on the keypad.
9.2.2
Address Book - To register a new destination, press [New]. 1/2 page
bizhub C360/C280/C220
9-7 Reference - Reference -
To se-
bizhub C220/C280/C360 Network Scan/Fax/Network Fax Operations User Guide - Page 183
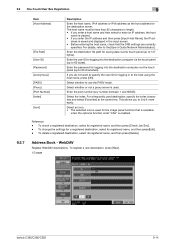
...). Reference - To register a new destination, press [New]. 1/3 page
bizhub C360/C280/C220
9-14 Select whether to the [User's Guide Network Administrator]. To check a registered destination, select its registered name, and..., the host
name is used destination, specify the index characters and select [Favorites] at the same time. WebDAV
Register WebDAV destinations. The host name must be less...
bizhub C220/C280/C360 Print Operations User Guide - Page 198

... screen, press [Printer Settings].
% For details on displaying the User Settings screen, refer to page 13-2.
2 Press [Basic Settings]. 3 Press [Original Direction].
4 Press the desired button. bizhub C360/C280/C220
13-6
13.2 User settings
13
5 Press [OK].
bizhub C220/C280/C360 Print Operations User Guide - Page 199
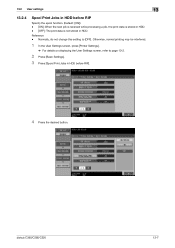
... received while processing a job, the print data is stored in HDD. - [OFF]: The print data is not stored in HDD before RIP].
4 Press the desired button. bizhub C360/C280/C220
13-7 Normally, do not change this setting to page 13-2.
2 Press [Basic Settings].
3 Press [Spool Print Jobs in HDD.
bizhub C220/C280/C360 Print Operations User Guide - Page 200
bizhub C360/C280/C220
13-8
13.2 User settings
13
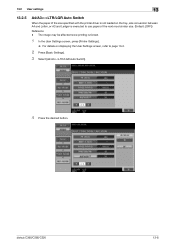
13.2.5
A4/A3LTR/LGR Auto Switch
When the paper of the size specified with the printer driver is ...]) Reference - The image may be affected since printing is executed to page 13-2.
2 Press [Basic Settings]. 3 Select [A4/A3LTR/LGR Auto Switch].
4 Press the desired button.
bizhub C220/C280/C360 Print Operations User Guide - Page 201

... User Settings screen, refer to page 13-2.
2 Press [Basic Settings].
3 Switch the page by pressing [ ] or [ ], and then press [Banner Sheet Setting].
4 Press the desired button. bizhub C360/C280/C220
13-9
bizhub C220/C280/C360 Print Operations User Guide - Page 202
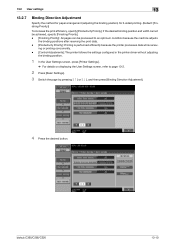
... (Default: [Finishing Priority])
To increase the print efficiency, specify [Productivity Priority].
bizhub C360/C280/C220
13-10 If the desired binding position and width cannot be achieved, ... pressing [ ] or [ ], and then press [Binding Direction Adjustment].
4 Press the desired button. ing or printing concurrently. - [Control Adjustments]: The printer follows the settings configured in the ...
bizhub C220/C280/C360 Print Operations User Guide - Page 203
bizhub C360/C280/C220
13-11
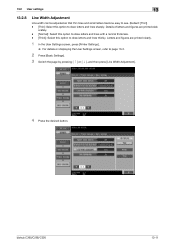
orately. - [Normal]: Select this option to draw letters and lines with a normal thickness. - [Thick]: Select this option to draw letters and ... User Settings screen, refer to page 13-2.
2 Press [Basic Settings].
3 Switch the page by pressing [ ] or [ ], and then press [Line Width Adjustment].
4 Press the desired button.
bizhub C220/C280/C360 Print Operations User Guide - Page 204
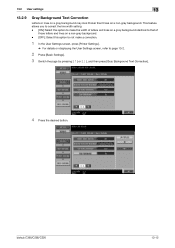
...you to correct the line width setting. - [ON]: Select this option to make a correction.
1 In the User Settings screen, press [Printer Settings].
% ...to not make the width of
those on a gray background identical to page 13-2.
2 Press [Basic Settings].
3 Switch the page by pressing [ ] or [ ], and then press [Gray Background Text Correction].
4 Press the desired button. bizhub C360/C280/C220...
bizhub C220/C280/C360 Print Operations User Guide - Page 207

bizhub C360/C280/C220
13-15
13.2 User settings
13
13.2.12 2-Sided Print
Configure the default 2-sided printing setting. (Default: [OFF])
1 In the User Settings screen, press [Printer Settings].
% For details on displaying the User Settings screen, refer to page 13-2.
2 Press [Paper Setting]. 3 Press [2-Sided Print].
4 Press the desired button.
bizhub C220/C280/C360 Print Operations User Guide - Page 208
13.2 User settings
13
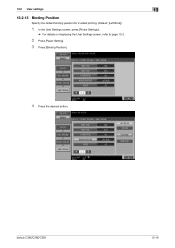
13.2.13 Binding Position
Specify the default binding position for 2-sided printing. (Default: [Left Bind])
1 In the User Settings screen, press [Printer Settings].
% For details on displaying the User Settings screen, refer to page 13-2.
2 Press [Paper Setting]. 3 Press [Binding Position].
4 Press the desired button.
bizhub C360/C280/C220
13-16
bizhub C220/C280/C360 Print Operations User Guide - Page 220
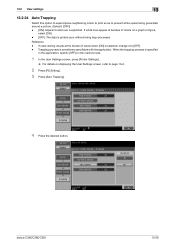
bizhub C360/C280/C220
13-28 Reference - If color-dulling results at borders of colors when [ON] is selected, change it to page 13-2.
2 Press [PS Setting].
3 Press [Auto Trapping].
4 Press the desired button. Trapping process is printed as to prevent white space being trap-processed. When the trapping process is specified
in the...
Similar Questions

How Do I Make An Account For My Bizhub C360
(Posted by vrDY633 9 years ago)

How Do I Add A Favorite On The Bizhub C360
(Posted by winetroutm 9 years ago)

How To Make A Copy With A Bizhub C360 Printer And Save It To A Computer
(Posted by lealliso 10 years ago)


How To Make A Favorite On Bizhub C35 Printer
(Posted by raphher 10 years ago)