KitchenAid KUDS30IXSS Support Question
KitchenAid KUDS30IXSS Support Question
Find answers below for this question about KitchenAid KUDS30IXSS.Need a KitchenAid KUDS30IXSS manual? We have 4 online manuals for this item!
Question posted by EKOAGSoCal on November 4th, 2013
Kitchenaid Kuds30ixbl 2 Dishwasher How To Remove Lower Spray Arm
The person who posted this question about this KitchenAid product did not include a detailed explanation. Please use the "Request More Information" button to the right if more details would help you to answer this question.
Current Answers
Related KitchenAid KUDS30IXSS Manual Pages
Dimension Guide - Page 1

... hose is not recommended).
drain line fittings. Insulation may be needed to connect to house plumbing lower than 20"
Use ¹⁄₂" (1.3 cm) minimum I.D. Instructions packed with the air gap installation instructions. ® Undercounter Dishwasher
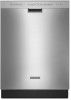
PRODUCT MODEL NUMBERS
KUDC10FX KUDC10IX KUDE20FX KUDE20IX KUDE40FX KUDE50CX KUDE60FX KUDE60HX
KUDE60SX KUDE70FX KUDL15FX KUDS30CX...
Dimension Guide - Page 2
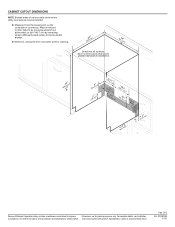
... notice. Specifications subject to change without notice. Page 2 of opening.
(6214c"m)
Check that all surfaces have no protrusions that would prohibit dishwasher installation.
(61E2c4m" )
(86m.344icn"m)
D
(10.42"cm) (7.63"cm)
(17.2 cm) (4.4 cm)
(6.4 cm)
... to 33 " (86 cm) by removing wheels from
E. W10321585 2/7/11 D. Measured from the lowest point on the underside of countertop.
Installation Guide - Page 2

...and Route Water Line 8 Install Drain Hose 10 Install Moisture Barrier 11 Prepare Dishwasher 11 Make Power Supply Cord Connection 12 Determine Cabinet Opening 13
Installation Instructions (cont...Direct Wire Electrical Connection 20 Secure Dishwasher in this dishwasher as specified in serious injury or cuts.
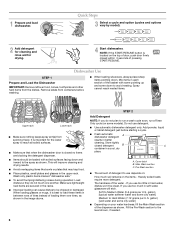
Remove shipping materials, drain hose and lower rack. All safety messages will ...
Installation Guide - Page 12

... floor covering.
Select UL Listed/CSA Approved twist-on its back.
2 Remove panels
Using a ¹⁄₄" hex head socket, nut driver or Phillips screwdriver, remove 2 screws attaching access panel and lower panel to connect your dishwasher. Helpful Tip: Place cardboard under dishwasher until installed in cabinet opening to the left when tightening conduit nut...
Installation Guide - Page 13

...1 Measure cabinet opening from underside of this step. Visit www.kitchenaid.com under FAQ tab. Failure to white, using UL Listed...terminal box cover
Ground wire
Ground wire
Washer
Ground connector Remove the green grounding screw and place through the ring terminal ...point on strain relief
Electrical Shock Hazard Electrically ground dishwasher. Reattach and tighten the green screw.
3 Power Cord-...
Installation Guide - Page 17
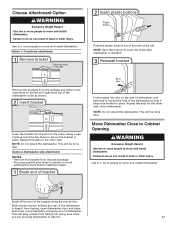
... dishwasher is installed.
3 Reinstall bracket
Remove the brackets from the package and place in the open slots on the left and right-hand top of the dishwasher ...dishwasher so that it from tipping, open dishwasher door and place
towel over pump assembly and spray arm of the dishwasher. NOTE: Save the buttons to move and install dishwasher. Repeat this step for the other side of dishwasher...
Installation Guide - Page 18
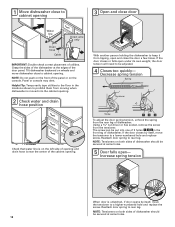
... by itself , move the tensioner to a lower-numbered hole and replace screw. Panel or console may dent. NOTE: Tensioners on both sides of dishwasher should be put into the cabinet opening.
2...floor in the front leg of dishwasher.
NOTE: Do not push on the console.
Reattach door spring to rear leg. Using a nut driver or hex socket, remove the screw from tipping, open ...
Installation Guide - Page 20

...type strain relief. Strain relief is connected, remove towel.
Turn on wire connectors (not included) rated to connect your household wiring to "Secure Dishwasher in drain hose. Connect to Drain
1 Connect...this step. Visit www.kitchenaid.com/drain under FAQ tab. Push the new drain hose into terminal box
Route cable so that it does not touch dishwasher motor or lower part of the drain ...
Installation Guide - Page 21
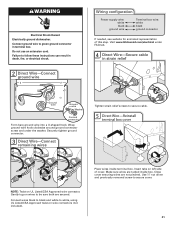
WARNING
Electrical Shock Hazard Electrically ground dishwasher. Do not use an extension cord. Failure to secure cover.
21 Visit www.kitchenaid.com/electrical under the washer. Connect wires ... Gently tug on left side of this step. Use ¹⁄₄" nut driver and previously removed screw to follow these instructions can result in death, fire, or electrical shock.
2 Direct Wire...
Installation Guide - Page 22
... does not contact screws, brackets or countertop. If spacing is opened.
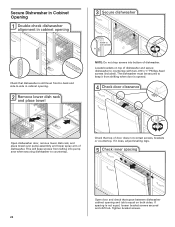
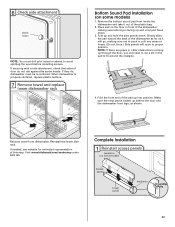
4 Check door clearance
Open dishwasher door, remove lower dish rack, and place towel over pump assembly and lower spray arm of dishwasher. Locate brackets on both sides. Check that space between dishwasher cabinet opening and tub is still level front-to-back and side-to-side in...
Installation Guide - Page 23
...buttons.
7 Remove towel and replace
lower dishwasher rack
Bottom Sound Pad Installation (on some models)
Access panel
Lower panel
Insulation
...Grounding clip
23
If they do not rub against the screw heads. Fold the front end of door do , dishwasher must drill pilot holes in cabinet to avoid splitting the wood before installing screws. Visit www.kitchenaid...
Installation Guide - Page 24

... edge
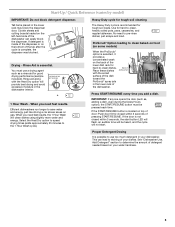
WARNING
Electrical Shock Hazard Plug into
a grounded 3 prong outlet
Check that power supply cord does not touch dishwasher motor or lower part of the lower panel contacts the floor. Check that the lower edge of dishwasher tub. Do not remove ground prong. Tighten access panel screws. 24 Do not use an extension cord.
Position the...
Use & Care Guide - Page 4

... wash system has four stainless steel blades to clean stubborn messes. Lower spray arm
Overfill protection float
Food disposer-based wash system has four stainless steel blades to grind food particles, which are flushed out the drain at the end of the dishwasher to grind food particles, which are flushed out the drain at...
Use & Care Guide - Page 5
... a dish.
Rinse aid along
USE RINSE AID FOR Full
BETTER DRYING
Lock
with the soiled surface of the dish toward the ProScrub® spray jets in the lower rack of dishwasher
Press START/RESUME every time you need fast results, the 1 Hour Wash will
provide best drying and avoid Refill
Add
excessive moisture...
Use & Care Guide - Page 6
...that when the dishwasher door is located on some down . Spray cannot reach nested items.
Upper rack
Lower rack
■ Make sure nothing keeps spray arm(s) from the ...If you use detergent.
■ Use automatic dishwasher detergent only. Remove labels from containers before starting a cycle.
■ Fresh automatic
A
dishwasher detergent
results in the upper rack. This will...
Use & Care Guide - Page 8
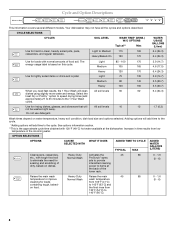
...
45
etc., with tough food soil
Normal Wash
ProScrub® spray
to eliminate the need fast results, the 1 Hour Wash will...20.7)
Heavy
100
160
5.5 (20.7)
When you need for
jets to provide
soaking and scrubbing of the
lower rack.
85
0 - 1.6
(0 - 6)
Raises the main wash
Heavy Duty
Raises the main
45
...dishwasher may not have all the cycles and options described. to items at the...
Use & Care Guide - Page 11

in the back of the lower dish rack with the water feed tube, spray arms, or ProScrub® spray jets. ■ Keep the last tine row in the back of dishwasher
NOTE: You must select the ProScrub® wash option to fit tall items in the 60°
angled position when using the ProScrub® option...
Use & Care Guide - Page 14

... fill with the wash arms. Readjust the dishware and resume the cycle. Run a vinegar rinse through the dishwasher by closing the door ...and pressing START/RESUME.
A thumping sound may be sure the knockout plug has been removed from ...TUB/WILL NOT DRAIN" in the lower rack. See "Will Not Fill" in the "Dishwasher Use" section.
Improper loading can also...
Use & Care Guide - Page 15
... discolor the tub or dishware. To remove spotting, run a vinegar rinse through the dishwasher. ■ Wash and rinse the affected dishware and load into dishwasher.
If etching has occurred, the glassware...glass measuring cup in the lower rack. NOTES:
■ High iron content in the water can discolor the tub. ■ Tomato-based foods can cause the dishwasher to clean.
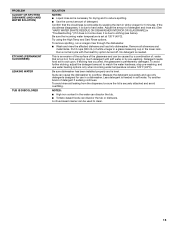
15 PROBLEM...
Use & Care Guide - Page 16

...in materials or workmanship that existed when this major appliance was purchased. The removal and reinstallation of your major appliance if it was purchased: nylon dish racks... 8. Service calls to correct the installation of your authorized KitchenAid dealer to determine if another warranty applies. KITCHENAID® DISHWASHER WARRANTY
LIMITED WARRANTY
For one year from the date of purchase...
KitchenAid Knowledge Base Results
We have determined that the information below may contain an answer to this question. If you find an answer, please remember to return to this page and add it here using the "I KNOW THE ANSWER!" button above. It's that easy to earn points!-
Removing the lower level rack inserts
...dishwasher is shipped with two removable lower level rack inserts. (See illustration below). The double and single removable rack inserts allow you to adjust the rack for smaller plates and bowls to release. To remove... insert tines should be in the open, middle section facing the ProScrub spray jets. When center tab under handle locks under the second wire from the ... -
Food soil left on the dishes in my dishwasher
... the dispenser? Is the detergent caked in a cool, dry place to keep it fresh and effective. Remove any obstructions blocking the wash or spray arms. Make sure the spray arms can turn on the hot-water faucet nearest the dishwasher and let it run ? To check the incoming water temperature, turn freely. Large plates... -
ProScrub® feature
... tine out of items may have removable lower rack inserts or Flexi-Fold Down TM flexible tines. IMPORTANT: Only one or both rows of load you to pans, casserole dishes, etc., with the water feed tube or mid-spray arm. Your dishwasher may face the ProScrub spray jets. Load items so they...
Similar Questions

How To Remove Lower Spray Arm?
How do I remove the spray arm assembly at the bottom of the dishwasher?
How do I remove the spray arm assembly at the bottom of the dishwasher?
(Posted by bmoore6970 2 years ago)

How To Remove Lower Sprayer Arm On Dishwasher
(Posted by panfilconstruction 8 years ago)

Cant Get Kitchen Aid Dishwasher Spray Arm Back On
(Posted by dracCatz 9 years ago)

Cant Get Kitchen Aid Dishwasher Lower Spray Arm Back On
(Posted by mcphibtinda 10 years ago)

Kitchenaid Kuds301xss Spray Arms
Took off bottom spray arm to clean but cannot get it back on. Is there some sort of trick to it?
Took off bottom spray arm to clean but cannot get it back on. Is there some sort of trick to it?
(Posted by loriwilliamson 11 years ago)