KitchenAid KSM7990WH Support Question
KitchenAid KSM7990WH Support Question
Find answers below for this question about KitchenAid KSM7990WH.Need a KitchenAid KSM7990WH manual? We have 1 online manual for this item!
Question posted by tkcasteel on November 12th, 2012
Flawed Design?
Is the new 7qt commercial mixer have the same design flaw that the 6qt mixer has? Is the grove that holds the cir clip that holds the gears down on the planatary shaft just as shallow as the 6 qt. After about 1 year of regular use the grove edges wears out and the clip slips up the shaft causing the gears to jam and break. It also pushes up on the gear housing breaking the gear housing. If the 7qt is made the same way instead of replacing the cir-clip with a roll pin and washer to prevent the clip from sliding up then I would never buy one. Just junk waiting to break. Please send me a parts diagram of the gears so I can see for myself if this mixer will have the same problems.
Tabitha
Current Answers
Related KitchenAid KSM7990WH Manual Pages
Use & Care Guide - Page 1
CCOoMmMmEeRrCcIiAaLl MMiIxXeErR INInSsTtRrUuCcTtIOioNnSs
Batteur sur socle commercial
Instructions
Batidora con base comercial
Instrucciones
1-800-541-6390 Details inside
1-800-541-6390 Details Inside
®
FOR THE WAAY IT'S MADE.™
Use & Care Guide - Page 2
... Free Warranty
We're so confident the quality of our products meets the exacting standards of KitchenAid that, if your Stand Mixer should fail within the first two years of ownership, KitchenAid will arrange to deliver an identical or comparable replacement to your door free of charge and arrange to have your...
Use & Care Guide - Page 3
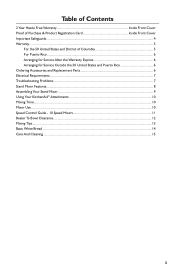
Table of Contents
2 Year Hassle Free Warranty Inside Front Cover Proof of Purchase & Product ...Replacement Parts 6 Electrical Requirements...7 Troubleshooting Problems...7 Stand Mixer Features...8 Assembling Your Stand Mixer...9 Using Your KitchenAid® Attachments 10 Mixing Time...10 Mixer Use...10 Speed Control Guide - 10 Speed Mixers 11 Beater To Bowl Clearance...12 Mixing Tips...13...
Use & Care Guide - Page 4
... table or counter. 10. SAVE THESE INSTRUCTIONS
4 The use the Stand Mixer outdoors. 9.
Return appliance to the Stand Mixer. 6. Do not let the cord hang over edge of injury to persons..., as well as spatulas and
other
liquid. 3. Do not operate Stand Mixer with a damaged cord or plug or after the Stand Mixer malfunctions, or is necessary when any manner. To protect against risk of...
Use & Care Guide - Page 5
... for Puerto Rico on page 6 for details on how to arrange for Stand Mixers operated in materials and workmanship. C.Replacement parts or repair labor costs for service. Length of Warranty:
Two Year Full Warranty from date of incidental or consequential damages, so this exclusion may also have other rights which vary from...
Use & Care Guide - Page 6
... for your local KitchenAid® dealer or the store where you purchased the stand
mixer for information on how to the nearest Authorized Service Center. Joseph, MI 49085-0218.
6 KitchenAid® Stand Mixer Warranty for Puerto Rico
A limited two year warranty extends to you prepaid and insured.
Joseph, MI 49085-0218. Box 218...
Use & Care Guide - Page 7
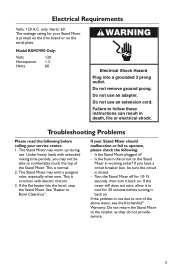
...Mixer may warm up during
use. If your Stand Mixer should malfunction or fail to cool for your service center. 1. Turn the Stand Mixer... Stand Mixer. See "Beater to the retailer, as they do not provide service.
7 Is the Stand Mixer plugged ...Under heavy loads with electric motors. 3. If the mixer still does not start, allow it back on the... Stand
Mixer in working order? If you may not be ...
Use & Care Guide - Page 8
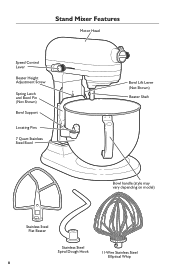
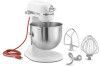
Stand Mixer Features
Motor Head
Speed Control Lever
Beater Height Adjustment Screw
Spring Latch and Bowl Pin (Not Shown)
Bowl Support
Locating Pins
7 Quart Stainless Steel Bowl
Bowl Lift Lever (Not Shown)
Beater Shaft
Bowl handle (style may vary depending on model)
Stainless Steel Flat Beater
Stainless Steel Spiral Dough Hook
11-Wire Stainless Steel Elliptical Whip
8
Use & Care Guide - Page 9
... reconnect power.
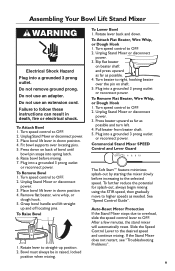
Pull beater from beater shaft. 5. Commercial Stand Mixer SPEED Control and Lever Guard
The Soft Start™ feature minimizes splash-out by starting the..."Speed Control Guide". Fit bowl supports over the pin on beater shaft and press upward as far as possible. 4. To Remove Bowl 1. Unplug Stand Mixer or disconnect power. 3. To Attach Flat Beater, Wire Whip, ...
Use & Care Guide - Page 10
... must
be able to comfortably touch the top of the Stand Mixer.
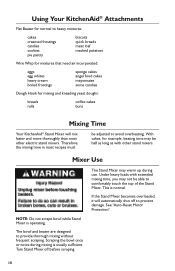
Therefore, the mixing time in most other stand mixers. Turn Stand Mixer off to prevent damage. The bowl and beater are designed to avoid overbeating. NOTE: Do not scrape bowl while Stand Mixer is normal. Using Your KitchenAid® Attachments
Flat Beater for...
Use & Care Guide - Page 11
... MIXING
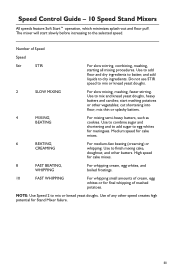
For slow mixing, mashing, faster stirring. Speed Control Guide - 10 Speed Stand Mixers
All speeds feature Soft Start™ operation, which minimizes splash-out and flour puff. ....
4
MIXING,
BEATING
For mixing semi-heavy batters, such as cookies.
The mixer will start mashing potatoes or other batters. Use to add flour and dry ingredients...
Use & Care Guide - Page 12
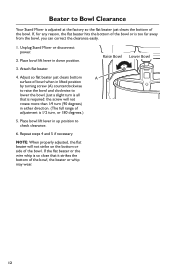
... of the bowl or is 1⁄ 2 turn, or 180 degrees.)
5. Adjust so flat beater just clears bottom surface of bowl when in either direction. (The full range of the bowl. Place bowl... lift lever in down position.
3. Place bowl lift lever in up position to check clearance.
6. Unplug Stand Mixer or disconnect power.
2. If the flat beater or the wire whip is so close that is required: the ...
Use & Care Guide - Page 13
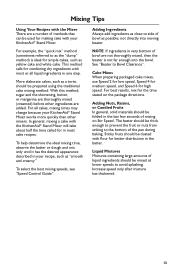
...appearance described in one step.
For all liquid ingredients in your KitchenAid® Stand Mixer.
To select the best mixing speeds, see "Speed Control Guide". NOTE: If ...method, sugar and the shortening, butter, or margarine are thoroughly mixed (creamed) before other mixers.
Adding Ingredients Always add ingredients as close to avoid splashing. Adding Nuts, Raisins, or ...
Use & Care Guide - Page 14
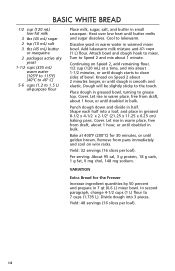
...(105°F to 115°F) [40°C to 46° C]
5-6 cups (1.2 to mixer. Cool to the touch.
Turn to clean sides of bowl. Dough will be slightly sticky to lukewarm. ...to Speed 2 and mix about 1 hour, or until dough is smooth and elastic.
Cover.
Let rise in 7 qt (6.6 L) mixer bowl. Bake at a time, and mix about 2 minutes longer, or until doubled in greased bowl, turning to ...
Use & Care Guide - Page 15
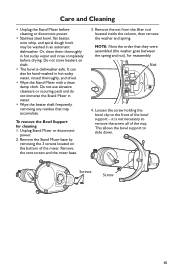
...shaft.
• The bowl is not necessary to remove the screw all of the way. Or, clean them thoroughly in an automatic dishwasher. Nut
4. it is dishwasher-safe. Screws
Screw
15
This allows the bowl support to the front of the mixer... the screw holding the bowl clip to slide down. Do not use abrasive cleansers or scouring pads and do not immerse the Stand Mixer in hot ...
Use & Care Guide - Page 16
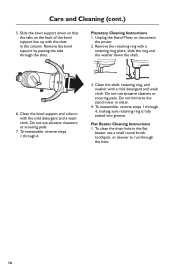
...Clean the shaft, retaining ring, and washer with the mild detergent and a wash cloth. Do not use abrasive cleansers or scouring pads.
7. To clean the drain hole in water.
4. Unplug the Stand Mixer or disconnect
...in the column. Do not use abrasive cleaners or scouring pads. Do not immerse the stand mixer in the flat
beater, use a small round brush, toothpick, or skewer to run through ...
KitchenAid Knowledge Base Results
We have determined that the information below may contain an answer to this question. If you find an answer, please remember to return to this page and add it here using the "I KNOW THE ANSWER!" button above. It's that easy to earn points!-
Stains on tub or dishes in my dishwasher
... be loaded so that they may break down and cause marking. Aluminum markings can be...just beneath the door area. White spots can be seen on cookware with a nonstick finish. This can be caused by using a Rinse Hold cycle will not affect dishwasher performance. Regular use... cookware seasoning. Reseason the cookware after food soil has been removed). Brown stains are... -
Cleaning the Pro Line Coffee Mill
... times. These objects may cause the mill to tighten them clockwise. Remove the coffee bin and bean hopper from falling as the faceplate assembly is used frequently, the cutting burrs need to remove the foreign material. Place the faceplate assembly onto the motor housing. Place a hand under the burr-shaft assembly to the Burr... -
Attaching and removing stand mixer beaters
... the spring (if your model has one) on the assembly, adjustment and use of the beater cavity with instructions on the beater shaft and turn counterclockwise(left). KitchenAid has a wonderful video library, with the pin on attaching and removing a stand mixer beater, go here. Turn the beater clockwise (right), locking the beater...
Similar Questions

Mixer Model Kp26m1xmr
I believe I need to replace the worm gear and I cannot find my model number listed. Mixer became ver...
I believe I need to replace the worm gear and I cannot find my model number listed. Mixer became ver...
(Posted by tolynnek 5 months ago)

New Stand Mixer, Started To Use And It Went For About 20 Sec And Stopped
(Posted by sue03schaf 10 years ago)


My Pound Cake Now Has Airholes In After Using My New 600 Series Kitchenaid Mixer
(Posted by joannesbest 11 years ago)

My Kitchenaid Mixer Head Pin Won't Stay Put...the Vibration Of The Mixing Causes
(Posted by jeo110 11 years ago)