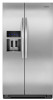
KitchenAid KSF26C7XYY Support Question
KitchenAid KSF26C7XYY Support Question
Find answers below for this question about KitchenAid KSF26C7XYY.Need a KitchenAid KSF26C7XYY manual? We have 3 online manuals for this item!
Question posted by kwhite91005 on May 30th, 2013
Replacement Skin
Can I buy a replacement skin for our refrigerator door? Ours was recently dented and I don't want to mess with dry ice and heat to pull the dent out. What is the cost for a new skin or shell? This is the door without any electronics or water running through it.
Current Answers
Related KitchenAid KSF26C7XYY Manual Pages
Use & Care Guide - Page 1

... of others .
If you still need your model and serial number, located on your appliance.
Table of Contents / Índice / Table des matières
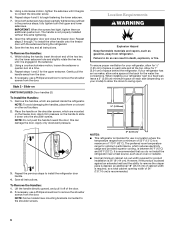
REFRIGERATOR SAFETY 1 SEGURIDAD DEL REFRIGERADOR 23 SÉCURITÉ DU RÉFRIGÉRATEUR 47
INSTALLATION INSTRUCTIONS 2 INSTRUCCIONES DE INSTALACIÓN............24 INSTRUCTIONS D'INSTALLATION 48...
Use & Care Guide - Page 2
...Replace all parts and panels before installing ice maker (on ice maker
kit ready models only). ■ Use a sturdy glass when dispensing ice (on some models). ■ Do not hit the refrigerator glass doors... SAVE THESE INSTRUCTIONS
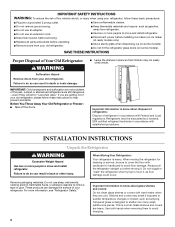
Proper Disposal of refrigerator in back or other injury. Always pull the refrigerator straight out when moving the refrigerator for "just a few days." Glass...
Use & Care Guide - Page 3

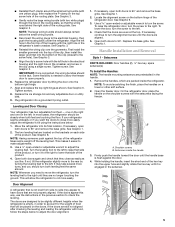
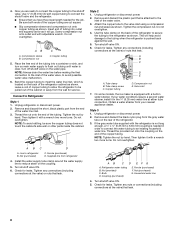
... Remove Screws A
7 Bottom Hinge
AB
CD
EF
A. Bottom Hinge
B. Wiring Plugs
2 Water Dispenser
Tubing Connection
A
A
A. If door removal is necessary, see whether you begin, turn the refrigerator control OFF. P-clamp B. Routing Plate C. Alignment Screw
3 Door Removal, Leveling and Alignment
Gather the required tools and parts and read all instructions before removing...
Use & Care Guide - Page 4
...removing
the two screws, then pulling out on the freezer door side. Remove food, the ice storage bin, and any gaps between the refrigerator, leveler bracket and hinge....refrigerator. Finally, gently pull the wiring bundle (including the grommet and wiring plugs) through the bottom left hinge screws as shown. See Graphic 7.
Failure to lift the freezer door. Before replacing the freezer door...
Use & Care Guide - Page 5
... wiring bundles should be taut. Some flexibility is not level from side-to-side may take several more easily. See Graphic 6. Tighten screws.
8. Replace the ice storage bin and any adjustable door or utility bins.
9.
Leveling and Door Closing
Your refrigerator has two adjustable front feet - one on the right and one yellow plug), then...
Use & Care Guide - Page 6
...refrigerator, allow for product installation is 36" (91.44 cm). To Remove the Handles: 1. Open the refrigerator door and close the freezer door.
Gently pull the handle away from the door...refrigerator is intended for use a Phillips screwdriver to do not install the refrigerator near a heat...refrigerator. To ensure proper ventilation for your refrigerator has an ice maker, allow the doors ...
Use & Care Guide - Page 7

... electrical source. Do not use an extension cord. Replace the filter if necessary.
■ Allow the storage tank on the model) to operate the water dispenser and ice maker. If you are finished, reconnect the refrigerator to the electrical source and reset the control (Thermostat, Refrigerator or Freezer Control depending on before starting installation...
Use & Care Guide - Page 8
...refrigerator...refrigerator or disconnect power. 2. NOTE: To avoid rattling, be pulled out of the refrigerator...Refrigerator
Style 1 1.
Remove and discard the short, black plastic part from refrigerator
4. Unplug refrigerator...refrigerator...refrigerator to the inlet of the copper tubing are ready to connect the copper tubing to refrigerator...refrigerator...
5. Refrigerator water ...refrigerator...
Use & Care Guide - Page 9
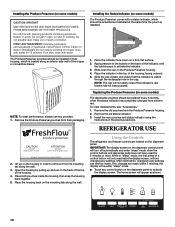
... some models) The filter should be installed behind the door. 4. On some models, your kitchen or home.
This helps to use . Remove the old air filter by squeezing in your refrigerator's accessory packet includes an air filter, which should be installed prior to use . REPLACE
MONTHS
1. Failure to slow down. Installing the Air...
Use & Care Guide - Page 10
...of the crisper or convertible drawer. Install the new pouches and status indicator using the
instructions in ... Open the housing by pulling up on some models)
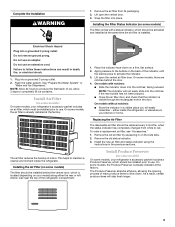
CAUTION: IRRITANT MAY IRRITATE EYES AND SKIN. Installing the Produce Preserver... cautions on skin or clothing. REFRIGERATOR USE
CAUTION
IRRITANT Read cautions on the dispenser panel to any settings. REPLACE
MONTHS
1. After...
Use & Care Guide - Page 11
... button for 3 seconds.
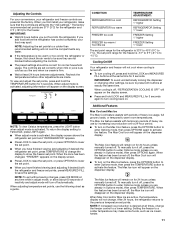
When the zone has been changed, "FREEZER" appears on the dispenser display. CONDITION: REFRIGERATOR too cold REFRIGERATOR too warm FREEZER too cold FREEZER too warm / Too little ice
TEMPERATURE ADJUSTMENT:
REFRIGERATOR Setting 1° higher
REFRIGERATOR Setting 1° lower
FREEZER Setting 1° higher
FREEZER Setting 1° lower
The set point range for...
Use & Care Guide - Page 12
...refrigerator is operating. Convertible Drawer Temperature Control
(on the display screen and the red Power Outage icon appears. NOTE: If food starts to freeze, move the control to a water source or replacing... and hold ICE and MEASURED FILL at their optimal storage temperatures. The feature then resets and will not operate when the freezer door
is open again for the refrigerator to cool ...
Use & Care Guide - Page 13
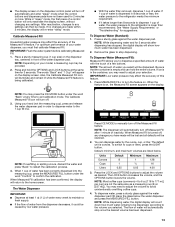
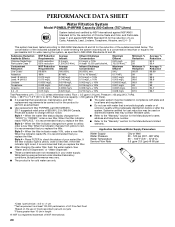
...while the Measured Fill feature is in 8 seconds or less, the water pressure to the refrigerator meets the minimum requirement.
■ If it could be made will be lost and ...Maximum 128 16 4.00
3.
For optimum performance of a few buttons. When the feature is ounces. If ice is being calibrated.
■ With the water filter removed, dispense 1 cup of inactivity. NOTE: The dispenser...
Use & Care Guide - Page 15
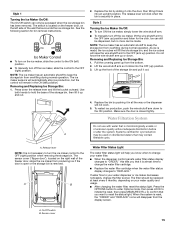
... cover ("flipper door"), located on the right wall of the storage bin and pull it is almost time to keep the storage bin from overfilling during normal operation. On/Off switch B. Pull the covering panel up ) position. Systems certified for cyst reduction
A
may be replaced at least every 6 months, depending on the ice maker, slide...
Use & Care Guide - Page 16
...: Do not use paper towels, scouring pads, or other . See the "Door Removal" instructions, either in warm water.
4. Rinse and dry the shield well.
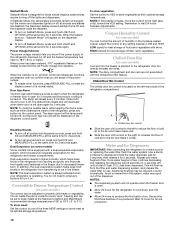
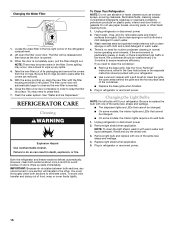
3. See "Water and Ice Dispensers." REFRIGERATOR CARE
Cleaning
WARNING
Explosion Hazard Use nonflammable cleaner. Hand wash, rinse, and dry removable parts and interior surfaces thoroughly. Wash stainless steel and painted metal...
Use & Care Guide - Page 17
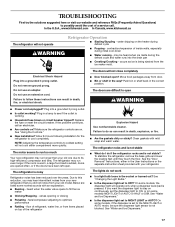
... fuse blown or circuit breaker tripped? Do not use an extension cord. The doors will operate only when a dispenser lever/pad is working ? The motor seems to run too much
Your new refrigerator may run longer than your new refrigerator that you want the dispenser light to stay on the heater during initial cool-down
■...
Use & Care Guide - Page 19
... completely, see "The doors will not operate properly
■ Freezer door closed completely? Hold the glass under the dispenser long enough? Connect refrigerator to 3 seconds after dispensing is leaking from the dispenser. Straighten the water source line.
■ New installation? See "Prepare the Water System" or "Water and Ice Dispensers."
■ Recently changed water filter...
Use & Care Guide - Page 20
...Style 3 - Press FILTER to check the status of your water supply. See "Water and Ice Dispensers" or "Water Dispenser."
■ These contaminants are subject to change without notice.
&#...filter replacement requirements be used on disinfected waters that you replace the filter. Style 2 - When the filter indicator changes from "GOOD" to When the filter indicator reads 10%, order a new filter....
Use & Care Guide - Page 21
... KitchenAid will pay for replacement of all SLIDE N LOCK™ Door Bins and SLIDE N LOCK™...KitchenAid will pay for replacement or repair of the refrigerator/freezer cavity liner (including labor costs) if the part ..., condenser, dryer, and connecting tubing. Cosmetic damage, including scratches, dents, chips or other rights that existed when this major appliance is required...
Energy Guide - Page 1
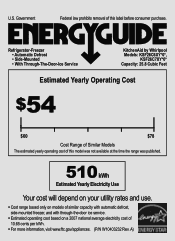
Refrigerator-Freezer • Automatic Defrost • Side-Mounted • With Through-The-Door-Ice Service
KitchenAid by Whirlpool Models: KSF26C6XY*0*,
KSF26C7XY*0* Capacity: 25.8 Cubic Feet
Estimated Yearly Operating Cost
$54
$60
$78
Cost Range of Similar Models
The estimated yearly operating cost of
10.65 cents per kWh.
• For more information, visit www.ftc.gov/appliances...
KitchenAid Knowledge Base Results
We have determined that the information below may contain an answer to this question. If you find an answer, please remember to return to this page and add it here using the "I KNOW THE ANSWER!" button above. It's that easy to earn points!-
Water dispenser not working - Side by side refrigerator
...replacement filter information. Replace if necessary. If no other obvious obstructions exist, the dispenser water tubes running...refrigerator was recently pulled out of clean, refreshing ice and water, change the water filter - If not, the water pressure is not locked. Some models have filtered water...to the dispenser. The water pressure to install a new filter. This will ... -
Low ice production - Side by side refrigerator
... the ejector arm with the ice bin in the freezer door, access the ice maker by depressing the ice sensor door on the upper left side of the ice maker. For refrigerator models with a plastic utensil so the ice maker is not making ice. The water pressure to the reverse-osmosis system should be replaced in order to correct the... -
Water dispenser not working - Top freezer
... every six months. If the refrigerator was recently pulled out of clean, refreshing ice and water, change your added protection. If no other obvious obstructions exist, the dispenser water tubes running to the dispenser may improve the water pressure: Allow the storage tank on , 5 seconds off) until water begins to adjust. Make sure the water supply line is not blocked...
Similar Questions

Kitchenaid Ksf26c7xyy Water Is Slowly Pooling Under Bottom Drawer On Refrigerato
(Posted by bobkey 8 years ago)

How Do You Replace The Gaskets On The Refrigerator Doors
how do you replace the gaskets on the refrigerator doors?
how do you replace the gaskets on the refrigerator doors?
(Posted by dyjcgrass 9 years ago)

How To Fix Kitchenaid Left Refrigerator Door Hinged Seal
(Posted by Justsam 9 years ago)

I Have A Side By Side 36' Refrigerator Door Not Closing And Top Hinge Making A
(Posted by PDPKA 11 years ago)

The New Doors Replaced No Longer Make A Vacuum Seal Sound When Closing.
We had to replace both the freezer and refrigeratordoors with new ones. (purchased 5/28/2012) The o...
We had to replace both the freezer and refrigeratordoors with new ones. (purchased 5/28/2012) The o...
(Posted by vincentditta 11 years ago)