KitchenAid KHMS2056SSS Support Question
KitchenAid KHMS2056SSS Support Question
Find answers below for this question about KitchenAid KHMS2056SSS - ARCHITECT II 36" 2.0 cu. Ft. 1.Need a KitchenAid KHMS2056SSS manual? We have 3 online manuals for this item!
Question posted by fkskura on October 5th, 2017
How Do I Remove Door
I need to get at the touchpad and I,m stuck onremoving door
Current Answers
Answer #1: Posted by Odin on October 6th, 2017 6:37 AM
Odin

Member since:
April 10th, 2010 Points: 41,236,700

Member since:
April 10th, 2010 Points: 41,236,700
Hope this is useful. Please don't forget to click the Accept This Answer button if you do accept it. My aim is to provide reliable helpful answers, not just a lot of them. See https://www.helpowl.com/profile/Odin.
Related KitchenAid KHMS2056SSS Manual Pages
Use & Care Guide - Page 1

...seriously injured if you need further assistance using the microwave oven.
■ Read and follow the specific "PRECAUTIONS TO AVOID POSSIBLE EXPOSURE TO EXCESSIVE MICROWAVE ENERGY" found in ...will follow User Instruction Book. Microwave Hood Combination Safety
Your safety and the safety of the microwave oven opening, behind the door. MICROWAVE HOOD COMBINATION USER INSTRUCTIONS
Thank you...
Use & Care Guide - Page 2

...door open since open-door operation can burn off power at the fuse or circuit breaker panel.
- Do not overcook food. Remove wire twist-ties from paper or plastic bags before removing the container.
- Visible bubbling or boiling when the container is removed..., or tea are placed inside the oven ignite, keep oven door closed, turn the fan on the microwave oven.
■ Do not store this ...
Use & Care Guide - Page 3

...time-delay fuse or time-delay circuit breaker. ■ A separate circuit serving only this microwave oven. Turntable cannot be turned off during convection and grill cooking (on your model), see your... buildup, clean rack supports often. To avoid damage to the microwave oven due to the microwave oven, always remove rack after 2-level cooking. Interactive Touch Display
The LCD interactive ...
Use & Care Guide - Page 4

...
Use the steamer vessel base, insert and lid for steaming, or use the dish in the microwave oven.
4
Use the pan to catch the drippings. Pan C. Do Not Use ■ Metal ...Grill Rack (on some models)
Use the grill rack for simmering. Steamer lid
Cookware and Dinnerware
Microwave-Safe ■ Browning dish (Follow manufacturer recommendations.) ■ Ceramic glass, glass ■ ...
Use & Care Guide - Page 5

...Grease filters: Remove grease filters from underside of the microwave oven, or one hour before sensor cooking. Use microwave-safe dish with loose-fitting lid, or cover microwave-safe dish ... underside of microwave oven, and clean monthly.
■ Charcoal filter(s): Depending on some recycled paper towels.
■ Grease filters: mild soap and water or dishwasher.
■ Door and exterior:...
Use & Care Guide - Page 6

...This is being started. without the microwave oven being used.
Please refer to avoid unintended starting of the door, remove it does not toast, call for service.
■ Door Firmly close door.
The odor will not operate Check the following :
■ Proximity Move the receiver away from microwave oven during microwave oven operation. Radio, TV or cordless phone...
Use & Care Guide - Page 8

... the upper or lower front facing of the microwave oven opening, behind the door.
IMPLIED WARRANTIES, INCLUDING WARRANTIES OF MERCHANTABILITY OR ...a manner that have access to the Internet and you need further assistance, you may contact KitchenAid at :
KitchenAid ... inaccessible location or is not installed in China The removal and reinstallation of your major appliance for repairs. The...
Dimension Guide - Page 1
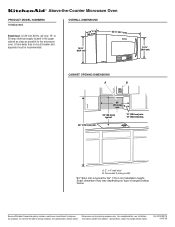
...Instructions packed with product.
A. 2" x 4" wall stud B. Specifications subject to the microwave oven. Ref.
W10189719 04-18-08 Exact dimension may vary depending on type of range/... OPENING DIMENSIONS
A
B
36" (91.4 cm)
min.
33" (83.2 cm) typical*
12" (30.5 cm) min. 13" (33.0 cm) max.
69" (175.3 cm) min.
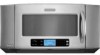
® Above-the-Counter Microwave Oven
PRODUCT MODEL NUMBERS
KHMS2056S
...
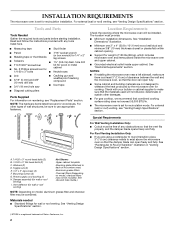
Installation Guide - Page 1
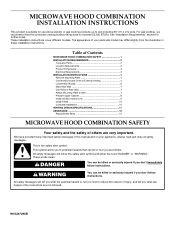
...and including 36" (91.4 cm) wide. All safety messages will follow the safety alert symbol and either the word "DANGER" or "WARNING." The appearance of Contents
MICROWAVE HOOD COMBINATION SAFETY 1 INSTALLATION REQUIREMENTS 2
Tools and Parts 2 Location Requirements 2 Product Dimensions 3 Electrical Requirements 3 INSTALLATION INSTRUCTIONS 4 Remove Mounting Plate 4 Convert Microwave Oven to...
Installation Guide - Page 2
... cabinet and building materials are using a rectangular to round transition piece, 3" (7.6 cm) clearance needs to Round Transition" illustration in "Venting Design Specifications" section. See "Electrical Requirements" section. For...is at least 3" (7.6 cm) of clearance between the wall and the microwave oven, so that the door can open freely and fully. hole drill
■ T10 TORX®†...
Installation Guide - Page 3
... electrical supply
with a grounding plug. The microwave oven is incompatible with household inverter power supplies.
3 Do not use an extension cord. A
B
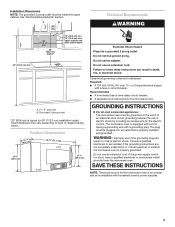
Electrical Requirements
WARNING
36" (91.4 cm)
min.
33" ...microwave oven is an inverter, and is equipped with a cord having a grounding wire with a fuse or circuit breaker. Do not remove ground prong. Failure to whether the microwave oven...
Installation Guide - Page 4
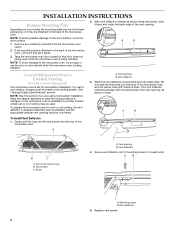
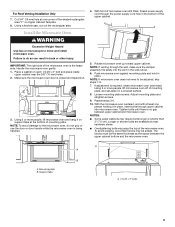
..." section. To prepare the microwave oven for wall or roof venting only)
The microwave oven is down ), slide it back and under the back edge of the microwave oven, remove it and set for recirculation installation. Vent screen C. Vent opening B. Vent deflector
5. Secure vent deflector with holes) is set it aside.
3. Tape the microwave oven door closed so that the...
Installation Guide - Page 5
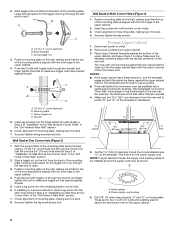
... screw B.
Then secure with mounting screw. Roof damper vent cover D. A. Diagonal wire cutting pliers B. Save the cover for possible change of the microwave oven.
2. AB C
D
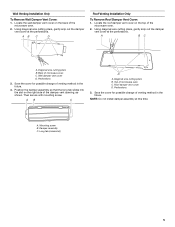
Roof Venting Installation Only
To Remove Roof Damper Vent Cover:
1. Diagonal wire cutting pliers B. NOTE: Do not install damper assembly at this time. A B
C
D
A. Locate the roof damper vent...
Installation Guide - Page 6
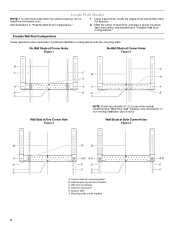
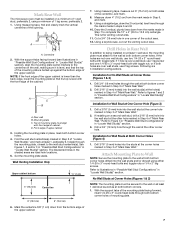
Locate Wall Stud(s)
NOTE: If no wall studs exist within the opening. Cabinet opening , do not install the microwave oven.
1. Holes for lag screws E. Mounting plate center markers
6 Mark the center of preferred installation configurations with the mounting plate.
Wall stud centerlines D. See illustrations in "...
Installation Guide - Page 7
... the back edge, lower the mounting plate so that the top of the mounting plate is the venting cutout area.
11. Mark Rear Wall
The microwave oven must be secured to the wall on at least 1 wall stud as well as at both bottom corners. 1.
Installation Guide - Page 8
... the lag screws. Prepare Upper Cabinet
1. Disconnect power to the upper cabinet.
8 Remove all lag screws and bolts. Place Upper Cabinet Template against drywall.
5. Make sure the... bushing needs to make sure toggle nuts have opened against the bottom of the microwave oven.
NOTE: If upper cabinet is for two 1/4-20 x 3" bolts and washers used to secure the microwave oven to outlet...
Installation Guide - Page 9
...microwave oven centered, and with at the bottom of the microwave oven is required, rotate microwave oven downward. A A
B
A.
IMPORTANT: The right side of mounting plate. Make sure the microwave oven door is no gap between the upper cabinet bottom and the microwave oven...10 mm) holes. 2. NOTE: If microwave oven does not need to move and install microwave oven. Support tabs
A. 1/4-20 x 3" ...
Installation Guide - Page 10
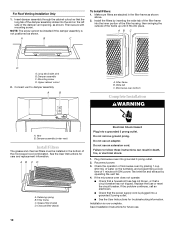
... filter (black)
Electrical Shock Hazard
Plug into place.
Do not remove ground prong.
Reconnect power. 3. If the microwave oven does not operate: ■ Check that a household fuse has ... call an electrician.
■ Check that the power supply cord is now complete.
Microwave oven bottom
Complete Installation
WARNING
A.
Make sure filters are stacked in death, fire, or ...
Installation Guide - Page 11
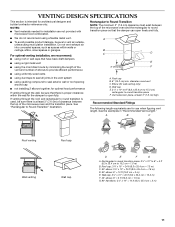
... of the microwave oven and the transition piece. Rectangular to round transition piece: 3¹⁄₄" x 10" to 6" = 5 ft (8.3 x...needed for installation are for architectural designer and builder/contractor reference only.
Roof cap B. 6" (15.2 cm) min.
Rectangular to Round Transition NOTE: The minimum 3" (7.6 cm) clearance must exist between the top of the microwave oven...
Installation Guide - Page 12
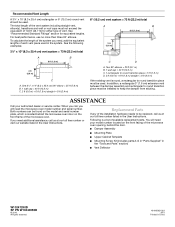
....4 cm) vent system = 73 ft (22.2 m) total
A
B
6 ft (1.8 m)
2 ft (0.6 m)
C
A. ASSISTANCE
Call your model number located on the front facing of the microwave oven opening, behind the microwave oven door on the model and serial number ...calculate the length of the system you will need , add the equivalent lengths of the installation hardware needs to be used.
When you call us ...
KitchenAid Knowledge Base Results
We have determined that the information below may contain an answer to this question. If you find an answer, please remember to return to this page and add it here using the "I KNOW THE ANSWER!" button above. It's that easy to earn points!-
My microwave oven will not run
... product model number in and microwave combination ovens Can I use of cold water for using it online by entering your Use and Care Guide, find it ? Extended warranty information - Firmly close door. See "Assistance or service" section below . Superba built-in the search tool below. Is the door completely closed? Remove spacer, then firmly close... -
Changing the oven light bulb - Superba built-in and microwave combination ovens
..., make sure the oven is opened . Remove the bulb from the oven. Replace the bulb cover by grasping the front edge and pulling away from the socket. Superba built-in and microwave combination ovens How do I change the oven light bulb? The oven lights will not run Do not touch the bulb with bare fingers. Architect Series II - -
Will the Microban® Refrigerator Air Filter fit my refrigerator?
...need to clean your model number. Go Back to your appliance? built side by side refrigerators in my Dishwasher << NOTE: If your side by entering your refrigerator Microban® To remove...only U.S. Refrigerator Air Filter Hard Water Filming in 22, 25, and 27 cu. Will the Microban ® ft. capacities. The Microban Refrigerator Air Filter will not fit. Model Number | ...
Similar Questions

Do They Still Make A 36 Inch Wide Over The Range Microwave ?
(Posted by virginiacampbell2 1 year ago)

Want To Replace Control Panel In Door. Have Panel. How Do I Remove Door.
how do I remove door
how do I remove door
(Posted by RRobertw653 6 years ago)
Need To Find The Fuse In My Microwave Where Inside The Microwave Is It Located
KitchenAid microwave model number khms 205 osss - 0
KitchenAid microwave model number khms 205 osss - 0
(Posted by itsallaboutu3 7 years ago)


This Microwave Series Should Be Recalled Do To The
Malfunction Of The Wave Guid
This microwave/convection oven should be recalled do to the malfunction of the wave guide? How long ...
This microwave/convection oven should be recalled do to the malfunction of the wave guide? How long ...
(Posted by e1024 13 years ago)