Get support for KitchenAid KHMC1857XSP

KitchenAid KHMC1857XSP Support Question

KitchenAid KHMC1857XSP Support Question

Find answers below for this question about KitchenAid KHMC1857XSP.
Need a KitchenAid KHMC1857XSP manual? We have 3 online manuals for this item!
Question posted by achella on June 21st, 2013

Kitchen Aid Microwave Wall Frame No More That 25' Wide

for model - kcms16ssbss

Current Answers

There are currently no answers that have been posted for this question.
Be the first to post an answer!

Remember that you can earn up to 1,100 points for every answer you submit. The better the quality of your answer, the better chance it has to be accepted.

Related KitchenAid KHMC1857XSP Manual Pages

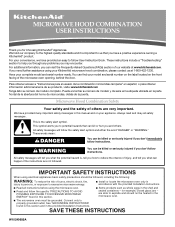
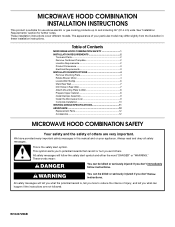
Use & Care Guide - Page 1

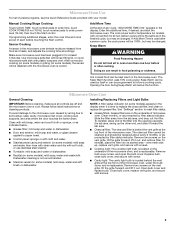
...model and serial number on the label located on your KitchenAid microwave hood combination, please contact us at www.kitchenaid.com. are able to excessive microwave energy: ■ Install or locate the microwave oven...what can visit the Frequently Asked Questions (FAQs) section of the microwave oven opening, behind the door. IMPORTANT SAFETY INSTRUCTIONS When using electrical appliances...
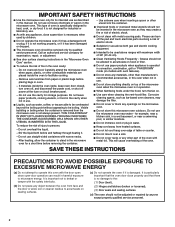
Use & Care Guide - Page 2

... attend the microwave oven when paper, plastic, or other than manufacturer's recommended accessories, in this oven when not in use. ■ Do not store anything directly on models with such ...tea are placed inside the oven ignite, keep oven door closed, turn the fan on the microwave oven. ■ Do not store this oven with narrow necks. - for example, near a kitchen sink, in a wet ...
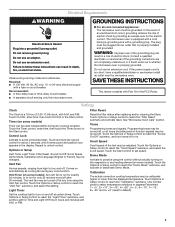
Use & Care Guide - Page 3

... Mode" submenu, and activate or deactivate Demo Mode. Recommended: ■ A time-delay fuse or time-delay circuit breaker. ■ A separate circuit serving only this microwave oven. and P.M. Vent Timer (on some models): Set vent fan to run for exactly 30 minutes, or to run for only 30 minutes more (off or on some...
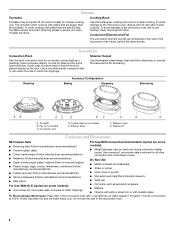
Use & Care Guide - Page 4

....) ■ Wax paper For Use With Grill Cycles (on some models) for steaming, or use the dish in the microwave oven. 4 Features Turntable Turntable may be used only during preset or sensor...silver trim or with metallic glaze To Test Cookware/Dinnerware: Place dish in the wall of the microwave oven cavity, behind the metal screen. This is helpful when cooking with plates that ...
Use & Care Guide - Page 5

...; Cooktop light: The cooktop light bulb is located on some models) or grilling (on the underside of the microwave oven, and is replaceable. wire mesh side up the other end,...microwave oven is time to soil buildup, keep cavity, microwave inlet cover, cooking rack supports, and area where the door touches the frame clean. Use microwave-safe dish with loose-fitting lid, or cover microwave...
Use & Care Guide - Page 6

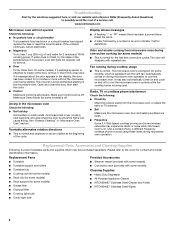
... the frame can cause arcing. Display shows messages ■ A flashing ":" or "PF" means there has been a power failure. Call for some models) ■ Grease filter ■ Charcoal filter ■ Cooktop light bulb ■ Cavity light bulb ■ Steamer vessel (provided with some models) is off. It may experience static or noise while microwave oven is...
Use & Care Guide - Page 7

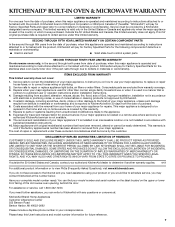
... warranty does not cover: 1. Repairs when your major appliance. Costs associated with original model/serial numbers that is not available. 9. LIMITATION OF REMEDIES CUSTOMER'S SOLE AND EXCLUSIVE REMEDY... ■ Solid state touch control system parts SECOND THROUGH TENTH YEAR LIMITED WARRANTY On microwave ovens only, in the second through tenth years from date of purchase, when this major ...
Dimension Guide - Page 1

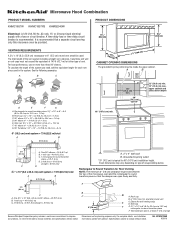
...serving only this microwave oven be provided. 17 " (43.8 cm) 16 " (41.3 cm) VENTING REQUIREMENTS A 3¹⁄₄" x 10" (8.3 x 25.4 cm) ...25.4 cm) 90° elbow = 25 ft (7.6 m) B. 1 wall cap = 40 ft (12.2 m) C. 2 ft (0.6 m) + 6 ft (1.8 m) straight = 8 ft (2.4 m) A. 2" x 4" wall stud B. To calculate the length of range/cooktop below. Microwave Hood Combination PRODUCT MODEL...
Installation Guide - Page 1

... models. This is , tell you how to Wall 8 Prepare Upper Cabinet 8 Install Damper Assembly 9 Install the Microwave Oven ...Wall Stud(s 6 Mark Rear Wall 7 Drill Holes in Rear Wall 7 Attach Mounting Plate to reduce the chance of injury, and tell you don't follow instructions. This symbol alerts you to and including 36" (91.4 cm) wide. All safety messages will follow instructions. MICROWAVE...
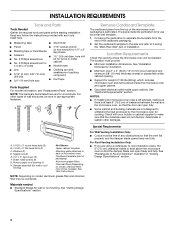
Installation Guide - Page 2

... that the materials used will be free of packaging) Aluminum grease filters Charcoal filters (Depending on model, aluminum grease filter and charcoal filter may not be sure to withstand the heat produced by the microwave oven for wall or roof venting. hole drill ■ No. 2 Phillips screwdriver bit for wood or metal ■ No...
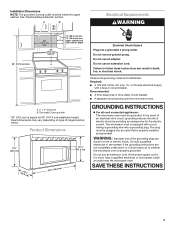
Installation Guide - Page 3

...Plug into an outlet that is typical for the electric current. Failure to whether the microwave oven is properly grounded. Exact dimensions may vary depending on type of electric shock by ... can result in death, fire, or electrical shock. Do not use an extension cord. A. 2" x 4" wall stud B. Product Dimensions 17¹⁄₄" (43.8 cm) 16¹⁄₄" (41.3 cm)...
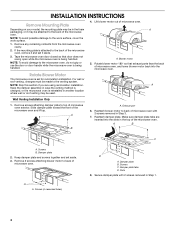
Installation Guide - Page 4

.... Remove 2 screws attaching blower motor to the microwave oven, do not grip or use the door or door handle while the microwave oven is reinstalled in another location where wall or roof venting may be attached to top of microwave oven. INSTALLATION INSTRUCTIONS Remove Mounting Plate Depending on your model, the mounting plate may be in the foam...
Installation Guide - Page 5

NOTE: If blower motor is not positioned with flat sides facing the back of the microwave oven (as shown), performance will be reattached to back of microwave oven with 2 screws removed in the top of "Wall Venting Installation Only." Exhaust port IMPORTANT: If blower motor is not correctly oriented, the 2 screws removed in Step 3 of the...
Installation Guide - Page 6

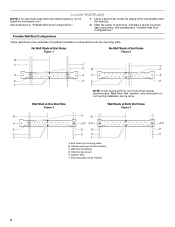
...stud(s) within the opening , do not install the microwave oven. 1. Support tabs F. Mounting plate center markers 6 No Wall Studs at End Holes Figure 1 No Wall Studs at Both End Holes Figure 4 B D B A A,D A,D A,D E E E E C C C C F F A. Wall stud centerlines D. See illustrations in "Possible Wall Stud Configurations." 2. Holes for lag screws E. End holes (on mounting...
Installation Guide - Page 7

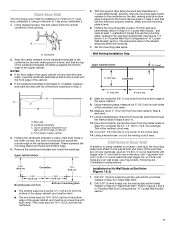
...mounting plate in place, find and clearly mark the vertical centerline of 1 lag screw, preferably 2. 1. Wall Venting Installation Only Upper cabinet bottom ³⁄₈" (1 cm) 4" (10.2 cm) Centerline ...a level line with front edge of the upper cabinet. 9. Centerline 2. Mark Rear Wall The microwave oven must be 14¹⁄₈" (35.9 cm) from the centerline. 5. D ...
Installation Guide - Page 8

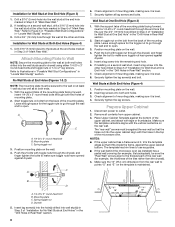
...Make sure the 10" (25.4 cm) dimension from the back of "Installation for No Wall Studs at End Holes" in the "Drill Holes in Rear Wall" section. 2. Spring ...wall. 4. Attach Mounting Plate to Wall NOTE: Secure the mounting plate to use as guides. ■ If the wall behind the microwave oven (as at both end holes. 3. Spring toggle nut 3. NOTES: ■ If the upper cabinet has a frame...
Installation Guide - Page 9

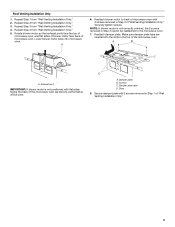
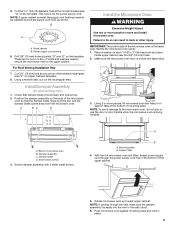
... "G" on each 1/4-20 x 3" flat-head bolt and place inside upper cabinet near the 3/8" (10 mm) holes. 2. Make sure the microwave oven door is being handled. A B A. Push microwave oven against mounting plate and hold in the wall cutout. 6. Position the damper assembly on the back of the shaded rectangular area "F" on Upper Cabinet Template. 8. IMPORTANT: The...
Installation Guide - Page 10

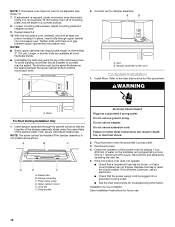
... an electrician. ■ Check that the power supply cord is plugged into microwave oven. Save Installation Instructions for troubleshooting information. Damper assembly (under the raised tabs ... screws. Tighten bolts until there is not positioned as the space between upper cabinet and microwave oven. WARNING A. Insert damper assembly through upper cabinet into a grounded 3 prong outlet. ...
Installation Guide - Page 11

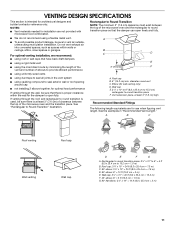
...; flat elbow: 3¹⁄₄" x 10" = 10 ft (8.3 x 25.4 cm = 3 m) 11 Do not vent exhaust air into concealed spaces, such as spaces within the wall for the damper to Round Transition NOTE: The minimum 3" (7.6 cm) clearance must exist between the top of the microwave oven and the rectangular to round transition piece so that...
Installation Guide - Page 12

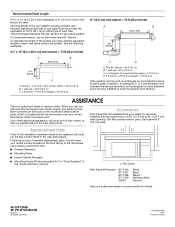
...microwave oven door on the front facing of the vent system including straight vent, elbow(s), transitions and wall... model number located on the front frame of the system you need the microwave oven model ...on the model and serial number plate, which is 3" (7.6 cm) wide. The total length of the microwave oven opening . See the following examples: 3¹⁄₄" x 10" (8.3 x 25.4 cm...

KitchenAid Knowledge Base Results

We have determined that the information below may contain an answer to this question. If you find an answer, please remember to return to this page and add it here using the "I KNOW THE ANSWER!" button above. It's that easy to earn points!

  • Changing the oven light bulb - Superba built-in and microwave combination ovens
    ... bulb? gas and electric ranges My microwave oven will not work during the Self-Cleaning cycle. The lights will come on or off and cool. To replace: Before replacing a bulb, make sure the oven is opened . Using tissue or wearing cotton gloves, replace the bulb. On double oven models, both upper and lower lights...
  • Can I use aluminum foil in my microwave and if so, are there tips for using it?
    ... models), aluminum foil for shielding, and approved meat thermometers may be used with another metal object during cooking. Do not allow aluminum foil or metal to the microwave oven. Metals approved for use Racks and bakeware supplied with the microwave oven (on some metal can occur and cause damage to touch the inside cavity walls...
  • Unable to upload photos to the display, French Door with Ice Bin in the Door
    ... 2.0 standards is not more than 62 characters. NOTE: Some cameras, iPods, cell phones, external hard memory, etc. The USB reads only LPEG (*.jpg, *.jpeg) photos. kitchen.aid.jpg). Uploading photos will be uploaded to the display. If the USB memory device is inadvertently removed during uploading. Side by side refrigerator Photo names...

Similar Questions

Kitchen Aid Microwave Khms1850sss Door Clicking Sound
kitchen aid microwave khms1850sss door clicking sound when opening. Also noticed the door is not eve...
(Posted by cecalara 5 years ago)
Kitchen Aid Microwave Model Khmc1857bsp
My microwave is only 1 1/2 old. It was $729.00 over the range (hood). When I open the door the light...
(Posted by angelaparavati 7 years ago)
How Do You Repair Cook Top Bulbs On Kitchen Aid Microwave Model Khmc1857wss
How do I repair/replace oven top bulbs on my Kitchen Aid Microwave Model KHMC1857WSS?
(Posted by schirm43 9 years ago)
Can I Use The Khmc1857 Kitchen Aid Microwave Without The Charcoal Filter?
I use the mainly for reheating, or items such as tea. I do use it about once a month for baking. As ...
(Posted by faygail 11 years ago)
Kitchen Aid Microwave Quit Working
Can set time however when you press start the display shows door and the microwave does not work.
(Posted by jbaker1 12 years ago)
Ask a New Question
Use the box below to post a new question about this KitchenAid product .
Points & Prizes
  • You can earn points for nearly everything you do on HelpOwl.com
  • You can trade in those points for gift cards at leading retailers such as Amazon.com and Walmart
  • It's that simple!
See How it Works
Create a Free Account

KitchenAid Manuals

Find free KitchenAid KHMC1857XSP manuals and user guides available at ManualOwl.com. Try out our unique manual viewer allowing you to interact with manuals from directly within your browser!

KitchenAid Reviews

View thousands of KitchenAid user reviews and customer ratings available at ReviewOwl.com.

Contact Information

Complete KitchenAid customer service contact information including steps to reach representatives, hours of operation, customer support links and more from ContactHelp.com.

Scoreboard Ratings

See detailed KitchenAid customer service rankings, employee comments and much more from our sister site.

KitchenAid Recalls

Find comprehensive KitchenAid recall information updated hourly on RecallOwl.com.