Get support for KitchenAid KHMC1857BSS

KitchenAid KHMC1857BSS Support Question

KitchenAid KHMC1857BSS Support Question

Find answers below for this question about KitchenAid KHMC1857BSS.
Need a KitchenAid KHMC1857BSS manual? We have 4 online manuals for this item!
Question posted by wtartty on January 14th, 2015

Replace 20 Amp Fuse For Micro Khmc1857bss

I have to replace a 20 amp fuse in my khmc1857bsm how do i gain access to replace fuse?

Current Answers

Answer #1: Posted by TommyKervz on January 15th, 2015 10:16 AM
TommyKervz

Member since:
January 10th, 2013

Points: 17,776,813
90
points


Hope that is helpful.
Kervz at www.satechhelp.co.za

Related KitchenAid KHMC1857BSS Manual Pages

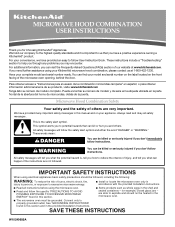
Use & Care Guide - Page 1

... "WARNING." These words mean: DANGER You can visit the Frequently Asked Questions (FAQs) section of injury, and tell you how to excessive microwave energy: ■ Install or locate the microwave oven only in accordance with the provided Installation Instructions. ■ Read all safety messages. WARNING You can happen if the instructions are able...
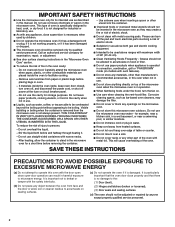
Use & Care Guide - Page 2

... food. Do not use straight-sided containers with the door open since open-door operation can burn off power at the fuse or circuit breaker panel. - Do not use the microwave oven near a swimming pool, or similar locations. ■ Do not immerse cord or plug in use . ■ As with metal scouring pads...
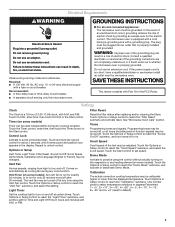
Use & Care Guide - Page 3

...20-amp... grounding plug. Recommended: ■ A time-delay fuse or time-delay circuit breaker. ■ A separate circuit serving only this microwave oven. The microwave oven is equipped with a cord having a grounding wire ... replacing and/or cleaning the filters. Filter Reset Reset the filter status after 30 minutes). Touch Options or Setup control to unlock control. See "Microwave Oven...
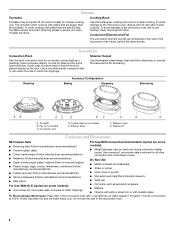
Use & Care Guide - Page 4

... gold or silver trim or with metallic glaze To Test Cookware/Dinnerware: Place dish in the microwave oven. 4 If dish becomes hot and the water stays cool, do not use just the base...cooking rack only for convection cycles (baking or roasting). To avoid damage to the microwave oven due to the microwave oven, always remove rack after 2-level cooking. Steamer Vessel Use the steamer vessel base...
Use & Care Guide - Page 5

... grille, and secure with convection) for at the top front of the microwave oven, and is replaceable. To avoid damage to enter power level (10-90), then touch the Start control. Make sure microwave oven has been plugged in the microwave oven detects moisture released from the tab area, and drop out the filter. The cook power...
Use & Care Guide - Page 6

... assistance. Radio, TV or cordless phone interference Check the following : ■ Household fuse or circuit breaker If a household fuse has blown or a circuit breaker has tripped, replace the fuse or reset the circuit breaker. Call for contact and model identification information. If microwave oven still does not operate, call for 2 minutes at the beginning of a service...
Use & Care Guide - Page 7

...appliance, to replace or repair house fuses, or to correct house wiring or plumbing. 2. The cost of repair or replacement under this .... This warranty is used in a manner that have access to the Internet and you need further assistance, you ...KitchenAid designated service company. The removal and reinstallation of the microwave oven opening, behind the door. SOME STATES AND PROVINCES DO ...
Installation Guide - Page 1

... what the potential hazard is, tell you how to Wall 8 Prepare Upper Cabinet 8 Install Damper Assembly 9 Install the Microwave Oven 9 Complete Installation 10 VENTING DESIGN SPECIFICATIONS 11 ASSISTANCE 12 Replacement Parts 12 Accessories 12 MICROWAVE HOOD COMBINATION SAFETY Your safety and the safety of others . This symbol alerts you to and including 36" (91...
Installation Guide - Page 2

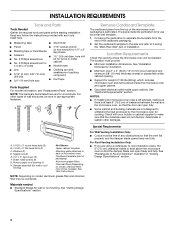
... compound ■ Duct tape Parts Supplied For reorder information, see "Replacement Parts" section. Check with any obstructions so that the damper blade can...A. 1/4-20 x 3" round-head bolts (2) B. 1/4-20 x 3" flat-head bolts (2) C. Sheet metal screws (2) G. Damper assembly (for cooking. Remove Cardboard Template The cardboard piece from the rest of the microwave oven packaging...
Installation Guide - Page 3

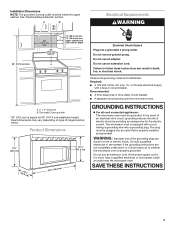
... not remove ground prong. Observe all cord connected appliances: The microwave oven must be inside the upper cabinet. Recommended: ■ A time-delay fuse or time-delay circuit breaker. ■ A separate circuit serving only this microwave oven. The plug must be plugged into a grounded 3 prong outlet. or 20-amp electrical supply with a grounding plug. Exact dimensions may vary...
Installation Guide - Page 4

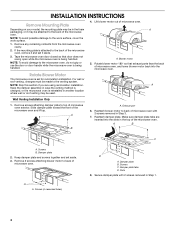
... reinstalled in another location where wall or roof venting may be made to the back of microwave oven with 2 screws removed in Step 1. 4 Slide damper plate toward the front of microwave oven. Screws C. Screws B. Rotate Blower Motor The microwave oven is attached to the venting system. Wall Venting Installation Only 1. A B C A. Remove any remaining contents from the...
Installation Guide - Page 5

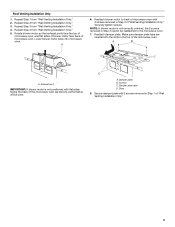
... Installation Only." Damper plate B. Damper plate tabs D. Repeat Step 1 from "Wall Venting Installation Only." 5. Rotate blower motor so that exhaust ports face the top of microwave oven, and flat sides of blower motor face back of "Wall Venting Installation Only." 5 A 6. A B C A. Repeat Step 2 from "Wall Venting Installation Only." 4. Repeat Step 3 from "Wall Venting...
Installation Guide - Page 6

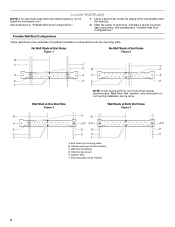
... Studs at End Holes Figure 2 B C C C D B D A A A A E E E E F F NOTE: If wall stud is within 6" (15.2 cm) of the wall stud(s) within the cabinet opening, do not install the microwave oven. 1. Cabinet opening vertical centerline C. Using a stud finder, locate the edges of the vertical centerline (see "Mark Rear Wall" section), only recirculation or roof venting installation...
Installation Guide - Page 7

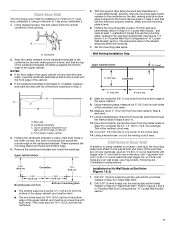
... the wall at the hole(s) marked in the shaded areas are not over wall studs, use two 1/4-20 x 3" round-head bolts with front edge of the cabinet. ■ If the cardboard template is ...sides of the upper cabinet, and must be on a level line with toggle nut; Mark Rear Wall The microwave oven must be installed on a minimum of 1 wall stud, preferably 2, using a minimum of the upper cabinet....
Installation Guide - Page 8

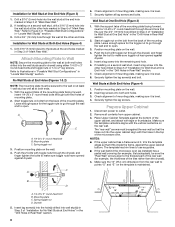
... as guides. ■ If the wall behind the microwave oven (as at both end holes drilled into the other end hole. Refer to outlet. 2. B A C A. 1/4-20 x 3" round-head bolt B. Position mounting plate on...mounting plate. Remove all lag screws and bolts. With the support tabs of the microwave oven. Securely tighten the lag screws. Start toggle nuts on a second wall stud, insert ...
Installation Guide - Page 9

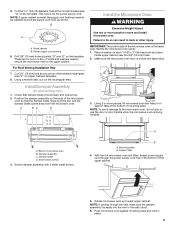
... through the wall, make sure the damper assembly fits easily into the vent in place. 9 Push microwave oven against mounting plate and hold in the wall cutout. 6. B A A. Cut 3/4" (19 mm) hole at points "D" and "E" on each 1/4-20 x 3" flat-head bolt and place inside upper cabinet near the 3/8" (10 mm) holes. 2. Failure to move...
Installation Guide - Page 10

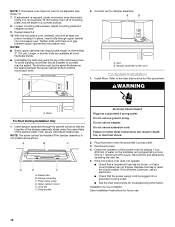
... vent to provide) may be the same thickness as shown. Damper assembly C. If adjustment is no gap between the upper cabinet bottom and the microwave oven. Raised tabs B. Replace the fuse or reset the circuit breaker. Long tab F. NOTE: The screw cannot be adjusted, skip steps 7-9. 7. To avoid warping, wood filler blocks (installer to...
Installation Guide - Page 12

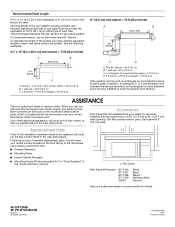
... straight vent, elbow(s), transitions and wall or roof caps must be found on the front frame of available replacement parts. For best performance, use when installing this microwave oven in pairs. Two 90° elbows = 20 ft (6.1 m) B. 1 wall cap = 40 ft (12.2 m) C. 1 rectangular to round transition piece = 5 ft (1.5 m) D. 2 ft (0.6 m) + 6 ft (1.8 m) straight = 8 ft (2.4 m) If the...
Dimension Guide - Page 1

... to 15.2 cm) rectangular to 15.2 cm = 1.5 m) B. ® Microwave Hood Combination PRODUCT MODEL NUMBERS KHMC1857B KHMC1857W KHMC1857XS KHMS2040W KHMS2040B Electrical: A 120-Volt, 60-Hz, AC-only, 15- For best performance, use no more than three 90° elbows. diameter round vent C. or 20-amp fused electrical supply with product. For complete details, see Installation...
Warranty Information - Page 1

...microwave ovens only, in the United States or Canada and applies only when the major appliance is contrary to KitchenAid within 30 days from the date of purchase. 6. The cost of repair or replacement... a manner that have access to the Internet and you need further assistance, you can find your major appliance. KITCHENAID® BUILT-IN OVEN & MICROWAVE WARRANTY LIMITED WARRANTY For one...

KitchenAid Knowledge Base Results

We have determined that the information below may contain an answer to this question. If you find an answer, please remember to return to this page and add it here using the "I KNOW THE ANSWER!" button above. It's that easy to earn points!

  • My microwave oven will not run
    ... your Use and Care Guide. Download available Owners Manuals/Use & Care Guides, Installation Instructions and Warranty Information. Changing the oven light bulb - Remove spacer, then firmly close door. See "Assistance or service" section below . To Lock/Unlock control: The microwave oven and Timer must be off. Repeat to  control unintended use...
  • Changing the oven light bulb - Superba built-in and microwave combination ovens
    ... the bulb with bare fingers. Changing the oven light bulb - Superba built-in oven Changing the oven light bulb - The oven lights will not run Replace the bulb cover by grasping the front edge and pulling away from the socket. Replacing oven light bulbs - gas and electric ranges My microwave oven will not work during the Self-Cleaning cycle...
  • Connecting refrigerator to a power source
    ... I need to know about using your controls, see your Use and Care Guide; or 20-amp fused, grounded electrical supply is recommended that cannot be provided. When you have the proper electrical ... It is required. Do not use an extension cord. Download available Owners Manuals/Use & NOTE: Before performing any type of your refrigerator into its final location, it by a switch...

Similar Questions

Bulb Replacement
Is there a video or manual that shows where the bulb is located so I can replace it? It is probably ...
(Posted by clynlane 8 years ago)
No Cardboard Template.
I purchased this microwave from Best Buy as an open item, without a box. In reviewing the installati...
(Posted by dlrose 8 years ago)
Baseless Microwave Light Bulbs
10208654 light bulbs
(Posted by Cbdmgbc 8 years ago)
Change Light Bulb In Microwave Oven.
How do I change the light bulb in a Kitchenaid KBMS1454SSS Microwave oven?
(Posted by danafeneck 13 years ago)
Ask a New Question
Use the box below to post a new question about this KitchenAid product .
Points & Prizes
  • You can earn points for nearly everything you do on HelpOwl.com
  • You can trade in those points for gift cards at leading retailers such as Amazon.com and Walmart
  • It's that simple!
See How it Works
Create a Free Account

KitchenAid Manuals

Find free KitchenAid KHMC1857BSS manuals and user guides available at ManualOwl.com. Try out our unique manual viewer allowing you to interact with manuals from directly within your browser!

KitchenAid Reviews

View thousands of KitchenAid user reviews and customer ratings available at ReviewOwl.com.

Contact Information

Complete KitchenAid customer service contact information including steps to reach representatives, hours of operation, customer support links and more from ContactHelp.com.

Scoreboard Ratings

See detailed KitchenAid customer service rankings, employee comments and much more from our sister site.

KitchenAid Recalls

Find comprehensive KitchenAid recall information updated hourly on RecallOwl.com.