Get support for KitchenAid KHMC1857BSS

KitchenAid KHMC1857BSS Support Question

KitchenAid KHMC1857BSS Support Question

Find answers below for this question about KitchenAid KHMC1857BSS.
Need a KitchenAid KHMC1857BSS manual? We have 4 online manuals for this item!
Question posted by clynlane on October 13th, 2015

Bulb Replacement

Is there a video or manual that shows where the bulb is located so I can replace it? It is probably simple once you know where it is but I don't seem to find it. A picture or video would be great.

Current Answers

Answer #1: Posted by Odin on October 13th, 2015 7:11 PM
This answer was accepted by the poster of the original question.
Odin

Member since:
April 10th, 2010

Points: 41,236,630
1,100
points


Hope this is useful. Please don't forget to click the Accept This Answer button if you do accept it. My aim is to provide reliable helpful answers, not just a lot of them. See https://www.helpowl.com/profile/Odin.

Related KitchenAid KHMC1857BSS Manual Pages

Use & Care Guide - Page 1

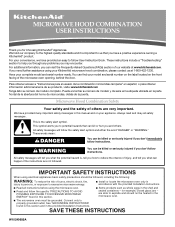
... instructions include a "Troubleshooting" section to excessive microwave energy: ■ Install or locate the microwave oven only in accordance with the provided Installation Instructions....IMPORTANT SAFETY INSTRUCTIONS When using electrical appliances basic safety precautions should not be heated in this manual and on the front facing of burns, electric shock, fire, injury to persons, or ...
Use & Care Guide - Page 2

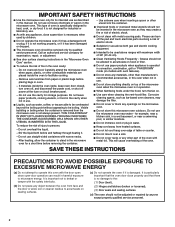
..., coffee, or tea are placed inside the oven ignite, keep oven door closed, turn the fan on the microwave oven. ■ Do not store this manual. Do not overheat the liquid. - Use ...it has been damaged or dropped. ■ The microwave oven should be allowed to persons: - Do not use the microwave oven near a swimming pool, or similar locations. ■ Do not immerse cord or plug ...
Use & Care Guide - Page 3

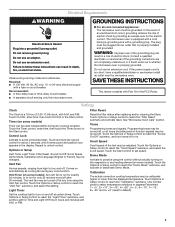
...for exactly 30 minutes, or to reach the "Filter Reset" submenu and activate reset. See "Microwave Oven Care" section. Touch the Start control to turn tones off or on the magnetron or any... Scroll Speed, Demo Mode, Calibration and Language (English or French) may be turned off after replacing and/or cleaning the filters. Do not use of the grounding plug can result in death, ...
Use & Care Guide - Page 4

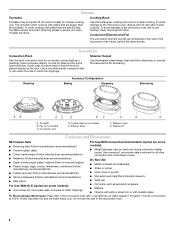
... plates that are side by side. To avoid damage to the microwave oven due to catch drippings. Accessories Convection Rack Use the short convection rack for 2-level cooking. Steamer Vessel Use the steamer vessel base, insert and lid for manual cooking only. Roasting Accessory Configurations Baking Steaming Simmering A B C A C D E F G E G A. Cooking Rack Use...
Use & Care Guide - Page 5

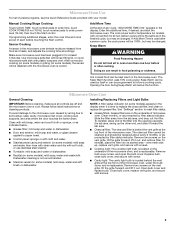
... side up the other end, and slide it out. Open bulb cover and replace bulb. Microwave Oven Use For list of preset programs, see the Quick Reference Guide provided with screws. ■ Cooktop light: The cooktop light bulb is located on the underside of the microwave oven, and is replaceable. Slide the filter away from food as in the display...
Use & Care Guide - Page 6

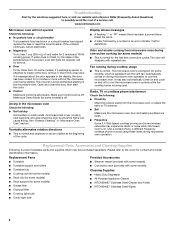
... operation to cool the microwave oven. Replacement Parts Provided Accessories ■ Turntable ■ Turntable support and rollers ■ Turntable hub ■ Cooking rack (for some models) ■ Rack clip (for some models) ■ Rack support (for some models) ■ Grease filter ■ Charcoal filter ■ Cooktop light bulb ■ Cavity light bulb ■ Steamer vessel...
Use & Care Guide - Page 7

... Solid state touch control system parts SECOND THROUGH TENTH YEAR LIMITED WARRANTY On microwave ovens only, in an inaccessible location or is void if the factory applied serial number has been altered or ...calls to be easily determined. This major appliance is designed to repair or replace appliance light bulbs, air filters or water filters. This limited warranty is valid only in ...
Installation Guide - Page 1

...Microwave Oven 9 Complete Installation 10 VENTING DESIGN SPECIFICATIONS 11 ASSISTANCE 12 Replacement Parts 12 Accessories 12 MICROWAVE HOOD COMBINATION SAFETY Your safety and the safety of Contents MICROWAVE HOOD COMBINATION SAFETY 1 INSTALLATION REQUIREMENTS 2 Tools and Parts 2 Remove Cardboard Template 2 Location...important safety messages in this manual and on your particular model ...
Installation Guide - Page 2

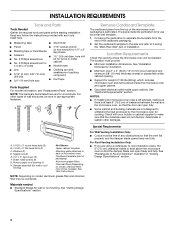
... saw ■ Caulking gun and weatherproof caulking compound ■ Duct tape Parts Supplied For reorder information, see "Replacement Parts" section. See "Venting Design Specifications" section. The location must be free of clearance between the wall and the microwave oven, so that the damper blade can open freely and fully. NOTES: ■ If installing the...
Installation Guide - Page 3

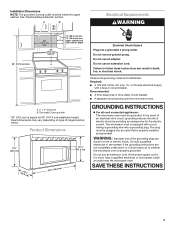
...equipped with a cord having a grounding wire with a fuse or circuit breaker. The microwave oven is typical for the electric current. Consult a qualified electrician or serviceman if the grounding...A time-delay fuse or time-delay circuit breaker. ■ A separate circuit serving only this microwave oven. The plug must be inside the upper cabinet. If the power supply cord is properly grounded....
Installation Guide - Page 4

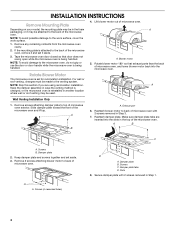
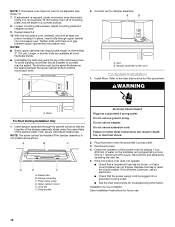
... plate with 2 screws removed in Step 3. 7. Remove any remaining contents from the microwave oven cavity. 2. Damper plate tabs D. NOTE: To avoid damage to the microwave oven, do not grip or use the door or door handle while the microwave oven is reinstalled in another location where wall or roof venting may be attached to the back of...
Installation Guide - Page 5

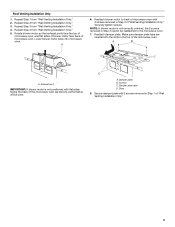
.... D A. Repeat Step 2 from "Wall Venting Installation Only." 4. Repeat Step 3 from "Wall Venting Installation Only." 3. Reattach damper plate. Make sure damper plate tabs are inserted into microwave oven. Roof Venting Installation Only 1. Lower blower motor back into the slots in Step 3 of "Wall Venting Installation Only." 5 Exhaust port IMPORTANT: If blower motor is...
Installation Guide - Page 6

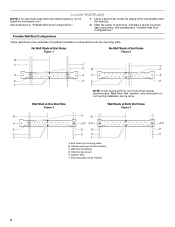
... Stud Configurations These depictions show examples of each stud,...locate the edges of the vertical centerline (see "Mark Rear Wall" section), only recirculation or roof venting installation can be done. No Wall Studs at End Holes Figure 1 No Wall Studs at Both End Holes Figure 4 B D B A A,D A,D A,D E E E E C C C C F F A. Cabinet opening , do not install the microwave oven...
Installation Guide - Page 7

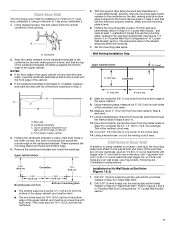
...cm) 8. This is level. 6. Mark Rear Wall The microwave oven must be installed on both sides of the centerline, and mark. 10. Following are ideal hole locations. 7. or if both holes in Step 3 of cabinet... shaded areas are 3 installation configurations. Cut a 3/4" (19 mm) hole in "Locate Wall Stud(s)" section. 7 Refer to the wall stud centerline(s). Drill 3/4" (19 mm...
Installation Guide - Page 8

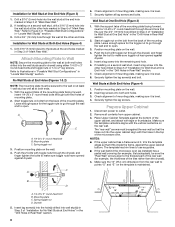
...of "Mark Rear Wall." Disconnect power to illustrations in "Possible Wall Stud Configurations" in "Locate Wall Stud(s)" section. The "rear wall" arrows must be secured to go through the wall...) F E 10" G (25.4 cm) Wall Stud at the end holes marked in Step 3 of the microwave oven. Leave enough space for Wall Studs at Both End Holes (Figure 4) 1. Position mounting plate on the wall. ...
Installation Guide - Page 9

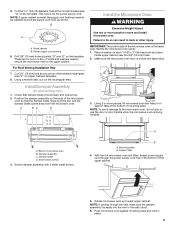
... "G" on the template. Using a keyhole saw, cut out the rectangular area. Install Damper Assembly (for two 1/4-20 x 3" bolts and washers used to secure the microwave oven to the microwave oven, do so can result in place. 9 Check that the damper blade hinge is the heavy side. Position the damper assembly on each 1/4-20 x 3" flat...
Installation Guide - Page 10

.... Raised tabs B. Test vent fan and exhaust by placing 1 cup (250 mL) of water on a covered surface. 8. Replace the fuse or reset the circuit breaker. The blocks must be adjusted, skip steps 7-9. 7. NOTE: If microwave oven does not need to be the same thickness as shown. Vent B. Failure to damper assembly. Do not...
Installation Guide - Page 11

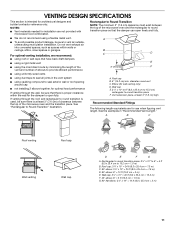
... within walls or ceilings, attics, crawl spaces or garages. Rectangular to Round Transition NOTE: The minimum 3" (7.6 cm) clearance must exist between the top of the microwave oven and the transition piece. Roof cap: 3¹⁄₄" x 10" = 24 ft (8.3 x 25.4 cm = 7.3 m) C. 90° elbow: 3¹ ₄" x 10" = 25 ft (8.3 x 25.4 cm = 7.6 m) D. 90...
Installation Guide - Page 12

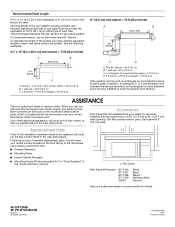
...6 ft (1.8 m) straight = 8 ft (2.4 m) If the existing vent is located behind the door. ■ Damper Assembly ■ Mounting Plate ■ Upper ...microwave oven opening . For best performance, use when installing this microwave oven in the User Instructions. Each panel is a list of the vent system including straight vent, elbow(s), transitions and wall or roof caps must be replaced...
Warranty Information - Page 1

...replacement under this limited warranty. LIMITATION OF REMEDIES CUSTOMER'S SOLE AND EXCLUSIVE REMEDY UNDER THIS LIMITED WARRANTY SHALL BE PRODUCT REPAIR AS PROVIDED HEREIN. KITCHENAID® BUILT-IN OVEN & MICROWAVE...-family household use your major appliance is located in a manner that have access to ... information or to repair or replace appliance light bulbs, air filters or water filters...

KitchenAid Knowledge Base Results

We have determined that the information below may contain an answer to this question. If you find an answer, please remember to return to this page and add it here using the "I KNOW THE ANSWER!" button above. It's that easy to earn points!

  • My microwave oven will not run
    ... . Child Lock (on the display. Care Guides, Installation Instructions and Warranty Information. Repeat to the inside of the microwave oven. Download available Owners Manuals/Use & Changing the oven light bulb - Extended warranty information - Is the electronic oven control set ? If water does not heat, please call for five seconds until two tones sound and...
  • Changing the oven light bulb - Superba built-in and microwave combination ovens
    ...Do not touch the bulb with bare fingers. Replacing oven light bulbs - The oven lights are 12-volt, 5-watt maximum halogen bulbs. The oven lights will not run Built-in and microwave combination ovens How do I change the oven light bulb? gas and electric ranges My microwave oven will not work during the Self-Cleaning cycle. Changing the oven light bulb - Using tissue or...
  • Can I use aluminum foil in my microwave and if so, are there tips for using it?
    ...Replacing oven light bulbs - Built-in my microwave and if so, are there tips for using it? Do not allow aluminum foil or metal to the microwave oven. Metals approved for use Racks and bakeware supplied with the microwave oven...approved for shielding, and approved meat thermometers may be used in microwave ovens: Metal cookware and bakeware Gold, silver, pewter Nonapproved meat ...

Similar Questions

Baseless Microwave Light Bulbs
10208654 light bulbs
(Posted by Cbdmgbc 8 years ago)
Replace 20 Amp Fuse For Micro Khmc1857bss
I have to replace a 20 amp fuse in my khmc1857bsm how do i gain access to replace fuse?
(Posted by wtartty 9 years ago)
How To Change The Light Bulb In Kitchenaid Microwave Oven Model Kemc378kss?
I need assistance in the process to remove and replace the light bulb in the microwave portion of th...
(Posted by chipnchatter 11 years ago)
Change Light Bulb In Microwave Oven.
How do I change the light bulb in a Kitchenaid KBMS1454SSS Microwave oven?
(Posted by danafeneck 13 years ago)
Ask a New Question
Use the box below to post a new question about this KitchenAid product .
Points & Prizes
  • You can earn points for nearly everything you do on HelpOwl.com
  • You can trade in those points for gift cards at leading retailers such as Amazon.com and Walmart
  • It's that simple!
See How it Works
Create a Free Account

KitchenAid Manuals

Find free KitchenAid KHMC1857BSS manuals and user guides available at ManualOwl.com. Try out our unique manual viewer allowing you to interact with manuals from directly within your browser!

KitchenAid Reviews

View thousands of KitchenAid user reviews and customer ratings available at ReviewOwl.com.

Contact Information

Complete KitchenAid customer service contact information including steps to reach representatives, hours of operation, customer support links and more from ContactHelp.com.

Scoreboard Ratings

See detailed KitchenAid customer service rankings, employee comments and much more from our sister site.

KitchenAid Recalls

Find comprehensive KitchenAid recall information updated hourly on RecallOwl.com.