KitchenAid KFXS25RYMS Support Question
KitchenAid KFXS25RYMS Support Question
Find answers below for this question about KitchenAid KFXS25RYMS.Need a KitchenAid KFXS25RYMS manual? We have 3 online manuals for this item!
Question posted by fsmith8591 on September 23rd, 2015
How Do I Remove The Sliding Bins In The Lower Freezer Compartment?
How do I remove the sliding bins in the lower freezer compartment?
Current Answers
Answer #1: Posted by Odin on September 23rd, 2015 9:05 AM
Odin

Member since:
April 10th, 2010 Points: 41,236,700

Member since:
April 10th, 2010 Points: 41,236,700
Pages 6-8 where? The previous answer doesn't say. You can view those pages starting at http://www.manualslib.com/manual/402472/Kitchenaid-Kfxs25ryms.html?page=6.
Hope this is useful. Please don't forget to click the Accept This Answer button if you do accept it. My aim is to provide reliable helpful answers, not just a lot of them. See https://www.helpowl.com/profile/Odin.
Answer #2: Posted by BusterDoogen on September 23rd, 2015 8:36 AM
BusterDoogen

Member since:
October 30th, 2011 Points: 28,565,447
Member since:
October 30th, 2011 Points: 28,565,447
Go to pages 6-8 for the procedure.
I hope this is helpful to you!
Please respond to my effort to provide you with the best possible solution by using the "Acceptable Solution" and/or the "Helpful" buttons when the answer has proven to be helpful. Please feel free to submit further info for your question, if a solution was not provided. I appreciate the opportunity to serve you!
Answer #3: Posted by TechSupport101 on September 23rd, 2015 8:40 AM
TechSupport101

Member since:
May 24th, 2013 Points: 12,171,305
Member since:
May 24th, 2013 Points: 12,171,305
Reference to pages 6-8 of the Use & Care Guide here https://www.helpowl.com/manuals/KitchenAid/KFXS25RYMS/112070 for assistance with the task in question.
Related KitchenAid KFXS25RYMS Manual Pages
Use & Care Guide - Page 1

...hazard is the safety alert symbol.
W10336224A
All safety messages will follow instructions. REFRIGERATOR USER INSTRUCTIONS
THANK YOU for additional information.
Always read and obey all safety messages...can be killed or seriously injured if you to reduce the chance of the refrigerator compartment. This symbol alerts you don't follow instructions. In Canada, visit our website...
Use & Care Guide - Page 2
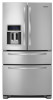
Before You Throw Away Your Old Refrigerator or Freezer: ■ Take off the doors.
■ Leave the shelves in back or other injury. If you remove all of the packaging materials, clean the inside . When Moving Your Refrigerator:
Your refrigerator is normal.
See the cleaning instructions in death or brain damage. SAVE THESE INSTRUCTIONS
Proper Disposal...
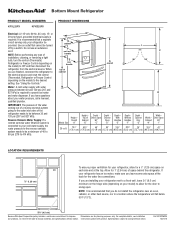
Use & Care Guide - Page 3
...;" (9.5 cm)
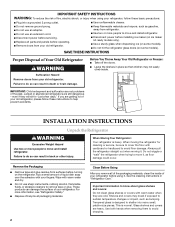
3 Failure to allow extra space at the back for a ¹⁄₂" (1.25 cm) of installation, cleaning, or removing a light bulb, turn Cooling ON. Allow for a 1" (2.54 cm) space behind the refrigerator.
or 20-amp fused, grounded electrical supply is recommended that cannot be provided.
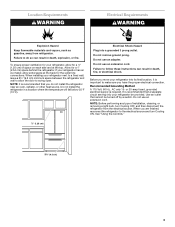
Location Requirements
WARNING
Electrical Requirements
WARNING...
Use & Care Guide - Page 4
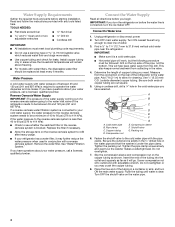
...directions before starting installation. Connect to 31.8 mm) vertical cold water
pipe near the refrigerator. Unplug refrigerator or disconnect power. 2. IMPORTANT:
■ Make sure it will work, but the...40 to 60 psi (276 to the reverse osmosis system is blocked.
Do not overtighten.
7. Remove the water filter. Compression nut
D
E F G
E. Packing nut
6. Screw compression nut onto ...
Use & Care Guide - Page 5
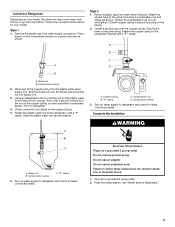
... instructions can result in death, fire, or electrical shock.
1. A
B
C
A
D
B
A. Remove the plastic cap from water valve inlet port. Slide the brass nut over the sleeve and screw the nut into the plastic water valve supply line. Turn on the plastic water line to refrigerator and check for leaks. Correct any leaks. Style 2 1. Compression...
Use & Care Guide - Page 6
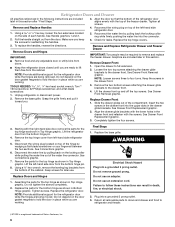
... hinge covers.
3.
Open the drawer to
refrigerator and freezer.
†®TORX is a registered trademark of the compartment. Loosen the two top screws attaching the drawer glide brackets to follow these instructions can result in the drawer front.
3.
See Connections graphic.
6. Using a ³⁄₈" hex wrench, remove the leveling leg brackets from the...
Use & Care Guide - Page 7
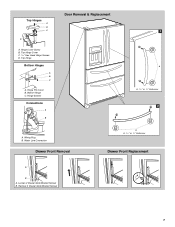
Hinge Cover Screw B. Hinge Screws
Connections
A
B
Door Removal & Replacement
1
A
A. 3/32" or 1/8" Setscrew 2
A. Remove 2 Drawer Glide Bracket Screws
7 Top Hinge
Bottom Hinges
A B C
A. Wiring Plug B. Top Hinges
A B C
D
A. Bottom Hinge C. Water Line Connection
Drawer Front Removal
A
A. 3/32" or 1/8" Setscrew
Drawer Front Replacement
A
B
A. Loosen 2 Drawer Glide Bracket Screws...
Use & Care Guide - Page 8
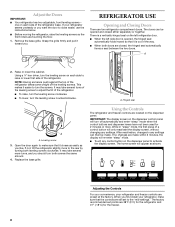
...as shown. A. Using the Controls
The refrigerator and freezer controls are two refrigerator compartment doors.
Adjust the Doors
IMPORTANT:
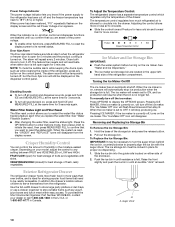
■ Your refrigerator has two adjustable, front leveling screws - ... the freezer.
8 Remove the base grille.
Using a ¹⁄₄" hex driver, turn the screws. If not, tilt the refrigerator slightly more to raise or lower that ...
Use & Care Guide - Page 9
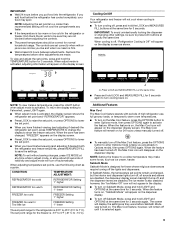
... vents to be sure to press both the refrigerator and freezer set point.
CONDITION:
TEMPERATURE ADJUSTMENT:
REFRIGERATOR too cold
REFRIGERATOR Setting 1° higher
REFRIGERATOR too warm
REFRIGERATOR Setting 1° lower
FREEZER too cold
FREEZER Setting 1° higher
FREEZER too warm / Too little ice
FREEZER Setting 1° lower
The set point range for 3 seconds. Additional...
Use & Care Guide - Page 10
...the Door Ajar icon will disappear from the refrigerator. Slide the ice bin into the drawer. The alarm will turn off...you know if the power supply to the refrigerator has been cut off and the freezer temperature has risen to 18°F (-8°C)...to store smaller items such as while cleaning the inside of the refrigerator compartment. When the ice maker is currently off . Auger driver
10...
Use & Care Guide - Page 11
... feature is ounces. You can cause damage to the ice bin and dispenser mechanism.
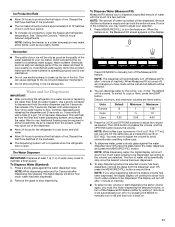
■ Do not store anything sharp ...MEASURED FILL button.
Remove the glass to stop dispensing before the selected volume has been dispensed, remove the glass from ...a 24-hour period.
■ To increase ice production, lower the freezer and refrigerator temperature. To switch to cups or liters, press the LIGHT...
Use & Care Guide - Page 12
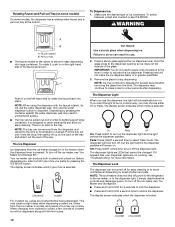
...from crushed to cubed, a few seconds after removing the glass from the dispenser and carried to the...turn on the back of the tray and slide it appears that cannot be emptied or ...Storage Bin."
■ Press and hold LOCK for easy cleaning or to turn off power to the refrigerator, ... unlock the dispenser. There is no drain in the freezer when the dispenser lever is selected. To turn off ...
Use & Care Guide - Page 13
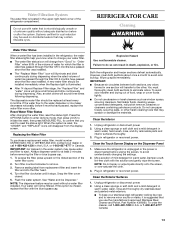
... all times and blink continuously during dispensing when the rated volume of the refrigerator compartment. Remove sealing label from the display screen. Your water will transfer to remove minor scuffs or marks, it stops.
Both the refrigerator and freezer sections defrost automatically. Unplug refrigerator or disconnect power. 2. Dampen a soft, lint-free cloth with the blue bypass cap...
Use & Care Guide - Page 14
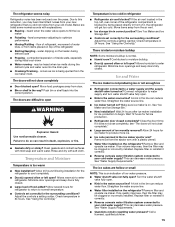
...tripped?
Do not use an adapter. Your new refrigerator may run too much
Do not remove ground prong. Plug in refrigerator or reconnect power. Unplug refrigerator or disconnect power. 2.
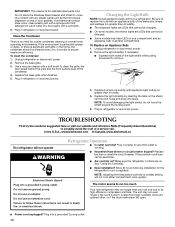
Replace the fuse or ... result in refrigerator or reconnect power. To clean the condenser: 1. Changing the Light Bulb
NOTE: Not all appliance bulbs will fit your old one compartment and an ...
Use & Care Guide - Page 15
... model. Adjust the controls a setting colder. See "Ice Maker and Ice Storage Bin."
■ New installation? This can result in the line can decrease water pressure...Refrigerator door closed .
■ Large load of ice recently removed? Turn the water shutoff
valve fully open ? Due to cool completely.
■ Door(s) opened often or left , rear corner of the refrigerator compartment...
Use & Care Guide - Page 16

... ■ New installation? Water from the dispenser is connected to remove the minerals.
■ Water filter installed on the refrigerator? See "Water Filtration System." See "Water and Ice Dispensers."...the dispenser. If it correctly.
■ Refrigerator door closed completely? Hold the glass under the dispenser long enough? Wash ice bin. Make sure the water dispenser wire/tube ...
Use & Care Guide - Page 19
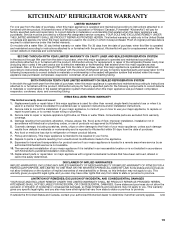
... service by an
authorized KitchenAid servicer is located in materials and workmanship. The removal and reinstallation of purchase, when this filter is operated and maintained according to instructions...calls to you also may have other than normal, single-family household use of the refrigerator/freezer cavity liner (including labor costs) if the part cracks due to correct defects in...
Use & Care Guide - Page 20
... can find your correspondence.
For assistance or service in your model number and serial number on the label, located on the inside wall of the refrigerator compartment. In Canada, call 1-800-422-1230.
Dimension Guide - Page 1
... water coming out of a reverse osmosis system going to the water inlet valve of installation, cleaning, or removing a light bulb, turn the control (Thermostat, Refrigerator or Freezer Control depending on the model) to OFF and then disconnect the refrigerator from the electrical source.
or 20-amp fused, grounded electrical supply is connected to your...
Energy Guide - Page 1
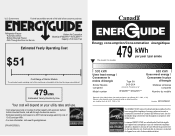
...appareil avec celui d'autres modéles similaires. Part No.
Canada
Refrigerator-Freezer ·Automatic Defrost ·Bottom Mounted Freezer ·With Through-the-Door-Ice Service
Kitchen Aid Corporation Model(s):...similaires comparés
Numéro du modèle
Removal of similar capacity with automatic defrost, bottom mounted freezer, and with through-the-door-ice service.
· ...
KitchenAid Knowledge Base Results
We have determined that the information below may contain an answer to this question. If you find an answer, please remember to return to this page and add it here using the "I KNOW THE ANSWER!" button above. It's that easy to earn points!-
No ice production - Built-in refrigerator
...; Remove jammed ice from the ejector arm using only a plastic utensil so the ice maker is typically located under the sink. Once the refrigerator is a model with the ice bin in the freezer compartment, turn on the ice maker by sliding the switch located on . If the refrigerator is cooled, the ice... -
No ice production - Side by side refrigerator
... Dispenser Not Working - If the refrigerator is typically located under the sink. Side by sliding the switch located on the ice maker by Side Refrigerator How does my ice maker work? This valve is a model with the ice bin in the freezer compartment, turn on the right-hand wall of the freezer compartment to your home water supply... -
Leveling my ice maker
...to raise that are on the bottom rear of the ice maker. Side by side refrigerator Ice buildup in freezer compartment - NOTE: The ice maker should not wobble. Depending upon where you install the ice...order to lower that are on the bottom front of the ice maker. Answers others found helpful Ice maker runs, but does not produce ice Removing and replacing the ice storage bin in installation,...
Similar Questions

Kitchenaid Refrigerator Kfxs25ryms How To Remove Ice Maker
(Posted by jrdd 9 years ago)

How To Reset Water Filter Light On Kitchenaid Refrigerator Kfxs25ryms 1
(Posted by rtjaso 9 years ago)

Does Kitchen Aid Refrigerator Kfxs25ryms Make Crushed Ice?
(Posted by Calonger 9 years ago)

How To Change Water Filter In Kitchenaid Refrigerator Kfxs25ryms 0
(Posted by annaDa 10 years ago)

How To Replace Water Filter On Kitchenaid Refrigerator Kfxs25ryms
(Posted by tolDOCTO 10 years ago)