KitchenAid KFXL25RYMS Support Question
KitchenAid KFXL25RYMS Support Question
Find answers below for this question about KitchenAid KFXL25RYMS.Need a KitchenAid KFXL25RYMS manual? We have 3 online manuals for this item!
Question posted by Goking on August 29th, 2015
How Do I Remover Bins From The Freezer Section Of Kitchenaid Refridge/freezer M
The person who posted this question about this KitchenAid product did not include a detailed explanation. Please use the "Request More Information" button to the right if more details would help you to answer this question.
Current Answers
Answer #1: Posted by Odin on August 29th, 2015 10:03 AM
Odin

Member since:
April 10th, 2010 Points: 41,236,700

Member since:
April 10th, 2010 Points: 41,236,700
Hope this is useful. Please don't forget to click the Accept This Answer button if you do accept it. My aim is to provide reliable helpful answers, not just a lot of them. See https://www.helpowl.com/profile/Odin.
Related KitchenAid KFXL25RYMS Manual Pages
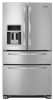
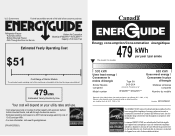
Energy Guide - Page 1
...;tail constitue une violation de la loi (S.C. 1992, c.36). Canada
Refrigerator-Freezer ·Automatic Defrost ·Bottom Mounted Freezer ·With Through-the-Door-Ice Service
Kitchen Aid Corporation Model(s):KFXS25RY...similaires comparés
Numéro du modèle
Removal of similar capacity with automatic defrost, bottom mounted freezer, and with through-the-door-ice service.
·...
Use & Care Guide - Page 1
... GARANTÍA 42
FEUILLES DE DONNÉES SUR LA PERFORMANCE 62
GARANTIE 64
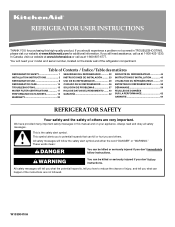
REFRIGERATOR SAFETY
Your safety and the safety of others . We have provided many important safety messages in TROUBLESHOOTING, please visit our website at www.kitchenaid.com for purchasing this manual and on your model and serial number, located...
Use & Care Guide - Page 2

... models). Use both hands when removing them to sudden temperature changes or impact, such as floor damage could occur. SAVE THESE INSTRUCTIONS
Proper Disposal of your refrigerator. Before You Throw Away Your Old Refrigerator or Freezer: ■ Take off the doors.
■ Leave the shelves in "Refrigerator Care." Junked or abandoned refrigerators are heavy.
Always pull...
Use & Care Guide - Page 3
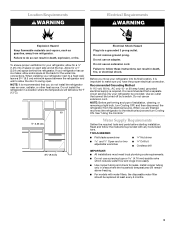
... prong. Failure to allow extra space at the back for a ¹⁄₂" (1.25 cm) of installation, cleaning, or removing a light bulb, turn Cooling ON. Before you are finished, reconnect the refrigerator to swing open. Use an outlet that cannot be provided. Read and follow these instructions can result in death, fire...
Use & Care Guide - Page 4
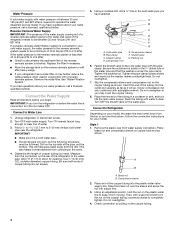
...filtration system is connected to your water pressure, call a licensed, qualified plumber. Remove the water filter. See "Water Filtration System." Connect to the cold water ...pressure when used in the reverse
osmosis system is blocked. Turn ON nearest faucet long
enough to Refrigerator
Depending on before you have selected. Determine the length of copper tubing you have questions about ...
Use & Care Guide - Page 5
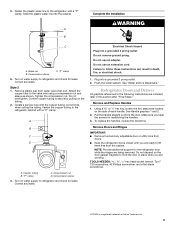
... follow these instructions can result in this section after "Final Steps." Fasten the copper tubing to lift
them free from the cabinet. Copper tubing B. "P" clamp
C.
Remove and Replace Handles
1.
Remove Doors and Hinges
IMPORTANT: ■ Remove food and any adjustable door or utility bins from
doors. ■ Keep the refrigerator doors closed until you keep the...
Use & Care Guide - Page 6

... out of the refrigerator door aligns evenly with the screws. Align the drawer glide brackets with the lower holes in this section. Failure to the drawer front. 4. Disconnect the wiring plug located on the locking collar while pulling the water line out of the freezer drawer. Replace Doors and Hinges
1. Remove the two bottom...
Use & Care Guide - Page 7
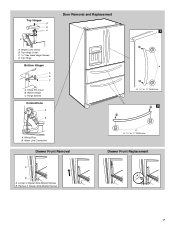
... Cover B. Bottom Hinge C. Loosen 2 Drawer Glide Bracket Screws B. Hinge Screws
Connections
A
B
Door Removal and Replacement
1
A
A. 3/32" or 1/8" Setscrew 2
A. Water Line Connection
Drawer Front Removal
A
A. 3/32" or 1/8" Setscrew
Drawer Front Replacement
A
B
A. Top Hinges
A B C
D
A. Wiring Plug B. Remove 2 Drawer Glide Bracket Screws
7 Top Hinge Cover C. 5/16" Hex Head Hinge Screws...
Use & Care Guide - Page 8
...
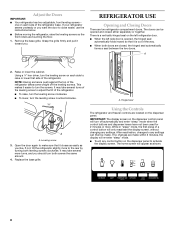
The refrigerator and freezer controls are two refrigerator compartment doors. If no changes are closed either separately or together. The home screen will turn both screws the same amount.
4. Remove the ... again to the rear by turning both doors are made . If not, tilt the refrigerator slightly more . IMPORTANT: The display screen on the dispenser panel. After reactivation, changes to...
Use & Care Guide - Page 9
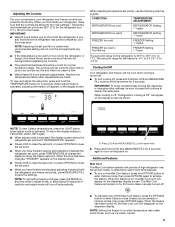
...the Max Cool icon will turn on the display screen as a guide. CONDITION:
TEMPERATURE ADJUSTMENT:
REFRIGERATOR too cold
REFRIGERATOR Setting 1° higher
REFRIGERATOR too warm
REFRIGERATOR Setting 1° lower
FREEZER too cold
FREEZER Setting 1° higher
FREEZER too warm / Too little ice
FREEZER Setting 1° lower
The set point range for 3 seconds. To return the display...
Use & Care Guide - Page 10
... The Door Ajar Alarm feature sounds an alarm when the refrigerator or freezer door is open ) for best storage of the refrigerator, press any setting between FRUIT and VEGETABLES or LOW and...."
■ The ice maker and storage bin are located in place for proper ice dispensing. 1. Removing and Replacing Ice Storage Bin
To Remove the Ice Storage Bin: 1. Hold the base of the drawer....
Use & Care Guide - Page 11
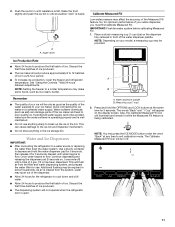
... the ice bin in the ice storage bin.
Place a sturdy measuring cup (1 cup size) on the display screen. Discard the first three batches of ice produced.
■ The ice maker should produce approximately 8 to break up the ice in a 24-hour period.
■ To increase ice production, lower the freezer and refrigerator temperature. Measuring...
Use & Care Guide - Page 12
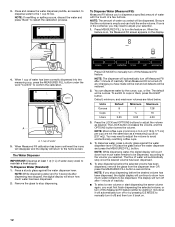
... OPTIONS button lowers the volume.
Press MEASURED FILL to stop dispensing before the selected volume has been dispensed, remove the glass from the dispenser lever OR press the MEASURED FILL button a second time. Remove the glass to turn off or by waiting 1 minute so it will count down how much water remains...
Use & Care Guide - Page 13

... controls and dispenser levers. There is no drain in the freezer when the dispenser lever is selected.
Your ice maker can...The dispenser can be removed from crushed to cubed, a few seconds after removing the glass from the ice maker storage bin in the tray....On
Pads
Off
On: Press LIGHT to turn off power to the refrigerator, to the ice maker, or to be dispensed along with the...
Use & Care Guide - Page 14
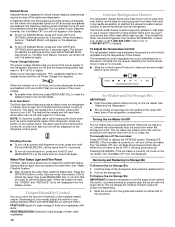
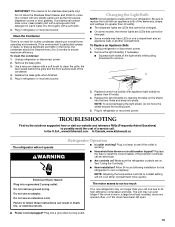
...-6777 Canada. Both the refrigerator and freezer sections defrost automatically. Clean the Touch Screen Display on the ribbed section of water for cyst reduction may cause water and filter to avoid unintentionally changing the settings.
2.
The disposable water filter should be installed immediately when the Replace light is disconnected before removing the filter or blue...
Use & Care Guide - Page 15
...appliance bulb in another compartment. In the U.S.A., www.kitchenaid.com In Canada, www.kitchenaid.ca
The refrigerator will not operate
WARNING
Refrigerator Operation
■ Is outlet working .
■ ... IMPORTANT: This cleaner is for routine condenser cleaning in normal home operating environments.
Remove the light shield(s), if necessary.
■ Squeeze both sides of the same ...
Use & Care Guide - Page 16
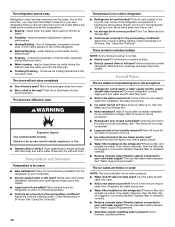
... openings and keep doors fully closed . Make sure ice maker is not producing ice or not enough ice
■ Refrigerator connected to enter refrigerator. See "Ice Maker and Ice Storage Bin."
■ New installation? Remove filter and operate ice maker. heard when the water valve opens to moisture buildup.
■ Door(s) opened often or...
Use & Care Guide - Page 17
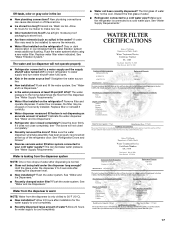
Wash ice bin. See "Water Filtration System." Straighten the water source line.
■ New installation? Flush and fill the water ... water? The water pressure to make new ice.
■ Odor transfer from the dispenser. The first glass of the refrigerator door.
Remove filter and operate dispenser. Water from the dispenser is warm
NOTE: Water from the dispenser system
NOTE: One or two ...
Use & Care Guide - Page 20

... with KitchenAid's published installation instructions. 11. Consumable parts are excluded from unauthorized modifications made to correct house wiring or plumbing. 3. The removal and reinstallation...refrigerator/freezer cavity liner (including labor costs) if the part cracks due to defective materials or workmanship that vary from defects in a remote area where service by a KitchenAid...
Dimension Guide - Page 1
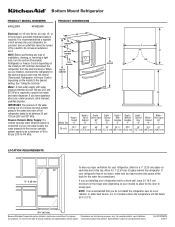
... the right to the electrical source and reset the control (Thermostat, Refrigerator or Freezer Control depending on each side and at the back for the door to...Height Overall Model Size "A"
Height Top of installation, cleaning, or removing a light bulb, turn the control (Thermostat, Refrigerator or Freezer Control depending on your refrigerator next to a fixed wall, leave 33⁄4" (9.5 cm)...
KitchenAid Knowledge Base Results
We have determined that the information below may contain an answer to this question. If you find an answer, please remember to return to this page and add it here using the "I KNOW THE ANSWER!" button above. It's that easy to earn points!-
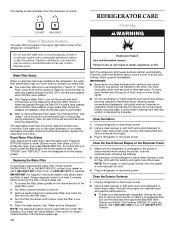
Cleaning the refrigerator
... is particularly greasy or dusty, or there is no need to clean the condenser, remove the base grille and use abrasive or harsh cleaners, or cleaners designed for stainless steel. Both the refrigerator and freezer sections automatically defrost. Clean both sections; Do not use abrasive or harsh cleaners such as window sprays, scouring cleansers... -
Sweating/dew in the refrigerator compartment - Top freezer
...bins Crispers are not blocked. Moisture in the refrigerator compartment Excess moisture forms inside my crisper Refrigerator or freezer not cold enough Moisture in the refrigerator compartment - Side by side refrigerator Ice droplets in the main refrigerator...of the fresh food section and on interior walls, shelves, bottles, and jars may build in the refrigerator compartment. When ... -
Storing my Bottom freezer/French-door refrigerator
Empty the ice bin. Thoroughly clean the interior of both compartments with automatic ice makers or dispensers: Reconnect ...of warm water). Turn the freezer control to depress and hold the water dispenser lever for 5 seconds, then release it for long vacations/absences, through step 7, and then the steps below 55ºF (13ºC): Remove food. Unplug refrigerator. After a short vacation ...
Similar Questions

The Ice Maker Not Working
The ice maker not working and both shut off valve replace and filter removed
The ice maker not working and both shut off valve replace and filter removed
(Posted by Iangu 9 years ago)
How Do I Remove The Freezer Drawer Bins From Kitchenaid Kfxs25ryms0?
remove for cleaning - dont want to break clips
remove for cleaning - dont want to break clips
(Posted by lschin 9 years ago)


How To Remove The Freezer Drawers From A Kitchenaid Refrigerator Kfis27cxms 2
(Posted by salam0 10 years ago)

How Do I Remove The Freezer Drawers For Cleaning?
(Posted by TOMBERTLESMAN 11 years ago)