
KitchenAid KESS907SSS Support Question
KitchenAid KESS907SSS Support Question
Find answers below for this question about KitchenAid KESS907SSS - 30" Electric Range.Need a KitchenAid KESS907SSS manual? We have 3 online manuals for this item!
Question posted by Florencebodokh on April 13th, 2014
10: Message On Screen
Hi, my oven doesn't work. I have the message 10: on my screen. How can I get it to work?
Current Answers
Related KitchenAid KESS907SSS Manual Pages
Dimension Guide - Page 1

...Range Rating chart below). 30" (76.2 cm) Freestanding and Slide-In Electric Range
PRODUCT MODEL NUMBERS
OVERALL DIMENSIONS
KERS807S KERS807X
KESK901S KESS907S
KESS908S KESS907X
Freestanding Range
Slide-in Range
ELECTRICAL REQUIREMENTS
B
q This range is not level, range...When installed in range fit over the cutout edge of oven door protrudes 1" (2.5 cm) beyond 24" (61.0 cm) base cabinet....
Installation Guide - Page 2

... potential hazards that can kill or hurt you what can tip the range and be killed. Always read and obey all safety messages.
TABLE OF CONTENTS
RANGE SAFETY 2
INSTALLATION REQUIREMENTS 3 Tools and Parts 3 Location Requirements 3 Electrical Requirements - We have provided many important safety messages in death or serious burns to reduce the chance of others...
Installation Guide - Page 3

...179;⁄₈" (3.5 cm) diameter connection opening dimensions that all electrical connections be used. Anti-tip bracket B. Plastic anchors (2) C. #10 x ¹⁄₂" screws (2)
■ Anti-tip bracket... open-end spade terminals with the range, see "Install Anti-Tip Bracket" section.
■ Grounded electrical supply is located inside the oven door on the model/serial rating ...
Installation Guide - Page 4

... 1" (2.5 cm) by adjusting the leveling legs.
**When installed in *
E. 30" (76.2 cm)
F. 27¹⁄₄" (69.2 cm) max. Mobile Home - See "Electrical Connection" section.
front of oven door protrudes 1" (2.5 cm) beyond 24" (61.0 cm) base cabinet.
4 In Canada, the installation of this range is not applicable, use the Standard for Mobile Home Construction...
Installation Guide - Page 5

...-hand side oven door trim. If it will be installed next to the top of electric shock.
Slide...ranges.
5 IMPORTANT: If installing a range hood or microwave hood combination above code standards can result in Range
A
C
B
D
A
C
B
D
F E
E F
G H
A. 13" (33.0 cm) upper cabinet depth
B. 30" (76.2 cm) min. A. 13" (33.0 cm) upper cabinet depth
B. 30" (76.2 cm) min. Electrical...
Installation Guide - Page 6

... or open -end spade terminals with upturned ends, terminating in a NEMA Type 14-50P plug on the supply end.
A copy of NEMA Type 10-50R.
3-wire receptacle (10-50R)
Electrical Requirements - Range Rating*
Specified Rating of Power Supply Cord Kit and Circuit Protection
120/240 Volts
8.8 - 16.5 KW 16.6 - 22.5 KW
120/208 Volts...
Installation Guide - Page 7

...you have a square finish (flat) countertop and the opening width is 30" (76.2 cm), no countertop preparation is greater than 30" (76.2 cm), adjust the ³⁄₈" (1.0 cm) ...Proper Height
Slide-In Ranges:
1.
■ This range is within reach of range's final location. Place level on the cardboard corners. Remove oven racks and parts package from inside oven.
2. Be sure ...
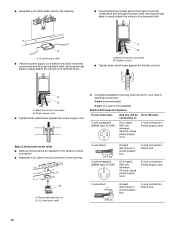
Installation Guide - Page 9

... these instructions can result in death, fire, or electrical shock.
1. Pull cover down screws B. Make electrical connections as described in floor. Continue installing your local hardware store.
10. Use 8 gauge copper or 6 gauge aluminum wire. Remove plastic tag holding three 10-32 hex nuts from under range.
8. Align anti-tip bracket holes with screws provided...
Installation Guide - Page 10
...8328;" (1.0 cm)
3" (7.6 cm)
A fused disconnect or circuit breaker box
3-wire connection: Direct wire
10 ■ Assemble a UL listed strain relief in the opening .
■ Feed the flexible conduit behind...)
Electrical Connection Options
If your home has:
And you will be Go to Section: connecting to:
4-wire receptacle (NEMA type 14-50R)
A UL listed, 250-volt minimum, 40-amp, range power...
Installation Guide - Page 11
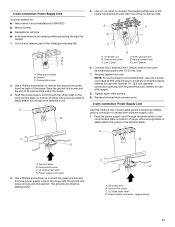
...Use a Phillips screwdriver to remove the ground-link screw from the power supply cord to the range with ranges.
8. Line 1 (black)
6. Tighten strain relief screws.
9. Replace terminal block access ... ground link under the screw.
3. A
B
A. 10-32 hex nut B. Allow enough slack to easily attach the wiring to the terminal block.
large opening , with 10-32 hex nuts.
7.
A
C
B
D
A. ...
Installation Guide - Page 12

... wire to the center terminal block post with ranges.
5.
Ground-link screw
D. Depending on your type of electrical supply (4-wire or 3-wire connection).
4-wire Connection...red) wire F. Line 1 (black) wire
4. Attach terminal lugs to the outer terminal block posts with 10-32 hex nuts.
4. 2. A
E
A B
C
D B
C
A. 10-32 hex nut B. Line 1 (black)
3. Connect line 2 (red) and line 1 (black) ...
Installation Guide - Page 13

...Use a hex or Phillips screwdriver to connect the bare (green) ground wire to the range with 10-32 hex nuts. Use ³⁄₈" nut driver to connect the neutral (white... wire.
1. Connect line 2 (red) and line 1 (black) wires to the center terminal block post with one of range. Line 2 (red) wire E. Attach terminal lugs to torque as shown in . (4.0 N-m)
5. Securely tighten setscrew to ...
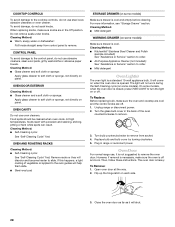
Use & Care Guide - Page 1

ELECTRIC RANGE
ARCHITECT® SERIES II
Use & Care Guide
For questions about features, operation/performance, parts, accessories or service, call: 1-800-422-1230 or visit our website ...
Use & Care Guide - Page 2
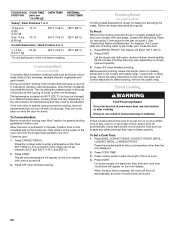
... Glass 9 Cookware 9 Home Canning 10 Cooktop Controls - Option 7 18
OVEN USE 19 Aluminum Foil 19 Bakeware 19 Meat Thermometer 19 Temperature Probe 19 Oven Vent 20 Positioning Racks and Bakeware 20...RANGE CARE 26 Self-Cleaning Cycle 26 General Cleaning 27 Oven Light(s 28 Oven Door 28 Storage Drawer 29 Warming Drawer 29
TROUBLESHOOTING 29
ASSISTANCE OR SERVICE 30 In the U.S.A 30...
Use & Care Guide - Page 10

... a guide when setting heat levels. Touch the "+" or "-" pad to a boil. On electric cooktops, canners should not extend more than ½" (1.3 cm) beyond the surface cooking area ... food. Dual size
A B
A.
MED-
LO-3 [SIMMER]
■ Simmer (range of food. ■ Home canning. HI [8-10]
■ Hold a rapid boil. ■ Quickly brown or sear food.
Failure to...
Use & Care Guide - Page 17
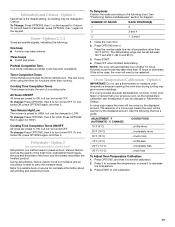
...means the oven will be...The oven will...completed. Oven Temperature ...oven provides accurate temperatures;
Close the oven... ...much less
To Adjust Oven Temperature Calibration: 1. All ...10°F (5°C)
...a little more
20°F (10°C) 30°F (15°C) -10°F (-5°C) -20°F (-10°C) -30°F (-15°C)
...moderately more ...much more than your previous oven...oven...
Use & Care Guide - Page 24
...
13 lbs and under (5.85 kg)
Over 13 lbs (5.85 kg)
10-15 10-12
300°F (149°C) 180°F (82°C) 300°... side parallel to turn off after 30 seconds. Timed Cooking allows the oven to enter a temperature other than 500...454 g])
OVEN TEMP. The circulating air creates a seal on the oven display. Cooking times will shut off automatically. The convection broil range can result...
Use & Care Guide - Page 28
...Cleaning Method: ■ Mild detergent
WARMING DRAWER (on some models). The light will not work during the Self-Cleaning cycle (on or off. Plug in the back of vegetable oil... PANEL
To avoid damage to remove.
3. Unplug range or disconnect power. 2.
However, if removal is necessary, make sure the oven is closed, press OVEN LIGHT to the rack guides will come on panel...
Use & Care Guide - Page 30

...shows messages
...30 See "Control
Lock" section. ■ On some models, reset the clock, if needed. Oven...range. See "Positioning Racks and Bakeware" section.
■ Is the batter evenly distributed in longer cooking times.
■ Are baked items too brown on our full line of a service call for assistance or service, please check "Troubleshooting."
This information will fit right and work...
Use & Care Guide - Page 31
...MI 49022-2692
Please include a daytime phone number in materials or workmanship. KITCHENAID® ELECTRIC RANGE WARRANTY
LIMITED WARRANTY
For one year from the date of appliances.
■ Use and ... Ontario L5N 3A7
Please include a daytime phone number in materials or workmanship:
■ Electric element
■ Solid state touch control system parts
■ Any cracking of the rubber...
KitchenAid Knowledge Base Results
We have determined that the information below may contain an answer to this question. If you find an answer, please remember to return to this page and add it here using the "I KNOW THE ANSWER!" button above. It's that easy to earn points!-
Water dispenser not working - Top freezer
...that the sediment filter in the Review Order screen when you do not have become kinked. ... Warranty Information. Top freezer Uneven cooking/browning - Ranges and built-in 5 seconds. Top freezer Why...6 characters of water in ovens Door is my water dispenser not working - Saddle Valve ...it . To purchase replacement filters and receive a 10% discount on , 5 seconds off) until water ... -
Cleaning the refrigerator
...or soft cloth and a mild detergent in the Review Order screen when you check out. Was this answer more useful. Electric Ranges and Cooktops << Most removable parts and interior surfaces...month to the other harsh cleaning tools. To purchase appliance polish and cleaner and receive a 10% discount on plastic parts, interior and door liners, or gaskets. Turn refrigerator on cleaning ... -
Cleaning ceramic glass cooktop - Electric Ranges and Cooktops
...Electric Ranges and Cooktops Electric Ranges and Cooktops How can I clean and care for stubborn spots. Always follow the recommended instructions on the cooktop surface. See the information below to order cleaning products and receive 10% off your ceramic glass cooktop. Light to condition the cooktop. This will aid you in the Review Order screen... to wear oven mitts while ...
Similar Questions

How Do I Replace A Front Right Burner Element When The Knobs Are In Front?
Right front burner element "burned out". How do I open flat-glass cooktop to expose the burner eleme...
Right front burner element "burned out". How do I open flat-glass cooktop to expose the burner eleme...
(Posted by Yazmin50 7 years ago)

My Kitchenaid Kers205tss Electric Range Is Randomly Not Holding Tempurature.
My oven is not holding temps, but not all the time. It has happened twice in the last day. Would it ...
My oven is not holding temps, but not all the time. It has happened twice in the last day. Would it ...
(Posted by ritastrang 8 years ago)

Dual Burner Switch Replacement For The Model #kess907 Electric Range
How do i replace the left side dual burner switch and what is the part number ?
How do i replace the left side dual burner switch and what is the part number ?
(Posted by woodsv 9 years ago)

Slid In Electrical Range
i have to install an electrical slidin range but it come with a metal below cooktop glass that separ...
i have to install an electrical slidin range but it come with a metal below cooktop glass that separ...
(Posted by arqfalves 12 years ago)

First: What Price Do You Charge For Your Answers? Second:
KitchenAid electric range, Mod. YKESH307HS0 presents F5:E3 in place of time in the clock display. W...
KitchenAid electric range, Mod. YKESH307HS0 presents F5:E3 in place of time in the clock display. W...
(Posted by ve3auw 14 years ago)