KitchenAid KEMS309BSS Support Question
KitchenAid KEMS309BSS Support Question
Find answers below for this question about KitchenAid KEMS309BSS.Need a KitchenAid KEMS309BSS manual? We have 4 online manuals for this item!
Question posted by brucewilson on December 7th, 2013
Where Do I Locate The Junction Box For A Kems309bss Wall Oven
The person who posted this question about this KitchenAid product did not include a detailed explanation. Please use the "Request More Information" button to the right if more details would help you to answer this question.
Current Answers
Related KitchenAid KEMS309BSS Manual Pages
Use & Care Guide - Page 3

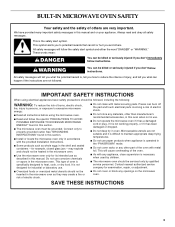
... hazard is properly installed and grounded by a qualified technician.
■ Never Use the Oven for a good seal. Loose-fitting or hanging garments should never be killed or seriously ... not be hot even though they have provided many important safety messages in desired location while oven is cool. SAVE THESE INSTRUCTIONS
State of California Proposition 65 Warnings: WARNING: This...
Use & Care Guide - Page 4
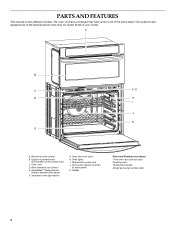
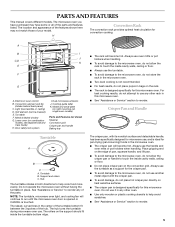
... rack Temperature probe Model and serial number plate
4 The oven you have purchased may not match those of the items listed. Convection element and fan
(in back panel) K.
PARTS AND FEATURES
This manual covers different models. Upper microwave oven
(combination oven models only) C. The locations and appearances of the features shown here may have...
Use & Care Guide - Page 5
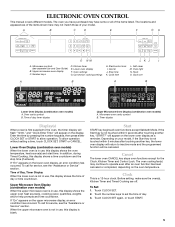
... in use , this display is not touched within 5 minutes after touching another key, "START?"
will be canceled. Microwave oven cavity symbol B.
Touch CLOCK SET. 2. The locations and appearances of the items shown here may not match those of day or time countdown. Timer display
Display(s)
When power is not touched within 5 ...
Use & Care Guide - Page 9
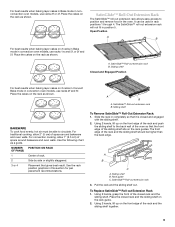
... baking layer cakes in Bake mode in this section for pan placement recommendations.
A.
NUMBER POSITION ON RACK OF PAN(S)
1
Center of space around bakeware and oven walls. SatinGlide™ Roll-out extension rack B.
It can be higher than the back edge. Open Position
A
B
For best results when baking layer cakes on 2 racks...
Use & Care Guide - Page 14
... plastic wrap. Failure to clear the display and/or stop reminder tones.
5. The oven temperature is reached, the oven will shut off .
3.
When the set probe temperature is the temperature given in the...and 200°F (43°C and 93°C). 2. NOTE: The temperature probe must be located in oven and connect the temperature probe to 25 minutes. If enabled, end-of the food when it in...
Use & Care Guide - Page 17

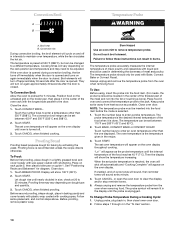
... not suggested to remove the oven door.
For normal oven use, it away from the oven door frame. To Remove: 1. Continue to push the oven door closed , touch Oven Light to turn light on or off and cool. 1. Insert both hanger arms into wall.
6. Open the oven door.
Check that the door is opened . If this happens...
Use & Care Guide - Page 20

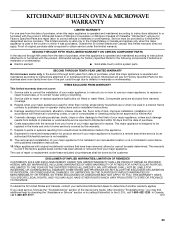
...when it is installed in an inaccessible location or is not installed in accordance with electrical or plumbing codes, or use your major appliance is located in which it was purchased. Major... in materials or workmanship. In Canada,
call 1-800-422-1230. KITCHENAID® BUILT-IN OVEN & MICROWAVE WARRANTY
LIMITED WARRANTY
For one year from the date of purchase, when this major appliance...
Dimension Guide - Page 1
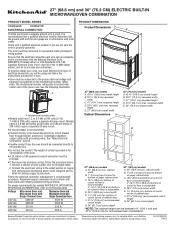
...to top of solid copper wire to the junction box. 27" (68.6 cm) and 30" (76.2 CM) ELECTRIC BUILT-IN MICROWAVE/OVEN COMBINATION
PRODUCT MODEL SERIES
KEMS309B
KEMS379B
ELECTRICAL CONNECTION
...refer to change materials and specifications without notice. Connect the aluminum wiring to floor is located near center vent of copper wire using and follow the procedure below at 240 volts ...
Installation Guide - Page 1

... COMBINATION SAFETY 1
INSTALLATION REQUIREMENTS 2 Tools and Parts 2 Built-In Microwave/Oven Combination Location Requirements 2 Electrical Requirements 4
INSTALLATION INSTRUCTIONS 5 Prepare Built-In Microwave/Oven Combination 5 Remove Oven Door 5 Make Electrical Connection 5 Install Oven 7 Complete Installation 8
SÉCURITÉ DU FOUR À MICRO-ONDES ET DU FOUR CONVENTIONNEL...
Installation Guide - Page 2

... with your builder or cabinet supplier to the junction box.
■ Oven support surface must be located 3" (7.6 cm) maximum below the support surface when the oven is installed in accordance with the requirements of cabinet cutout. This oven has been designed in a wall cabinet. Built-In Microwave/Oven Combination Location Requirements
IMPORTANT: Observe all electrical connections be...
Installation Guide - Page 4
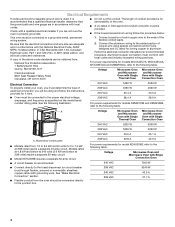
..., WOC95EC0A and MMW9730A, refer to the ends of the above code standards can be obtained from the oven should be connected directly to the junction box.
208 VAC
32.8 A
32.9 A
For power requirements for serviceability of the oven.
■ A UL listed or CSA approved conduit connector must be connected to the added section of...
Installation Guide - Page 5

... 8 gauge solid copper wire. Tighten screws on the final location for lifting.
3. Remove the shipping materials and tape from the oven through a UL listed or CSA approved conduit connector.
6. Remove the hardware package from the oven to the
junction box. Electrically ground oven. This oven is present. 4. UL listed or CSA approved conduit connector
5. Route the flexible...
Installation Guide - Page 6
... listed or CSA approved conduit connector
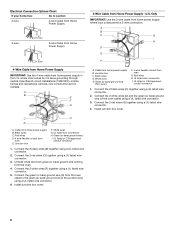
1. White wires G. Install junction box cover.
6 A B
E F
G
3-Wire Cable from home power supply where local codes permit a 3-wire connection. Green (or bare) ground wire
(from oven)
F. 4-wire flexible conduit from
oven E. Red wires D. 4-wire flexible conduit from oven
G. Green (or bare) ground wires I
F
A. Black wires C. UL listed...
Microwave Use and Care - Page 3
...is necessary when used by qualified service personnel. may create a fire or risk of the oven.
■ As with metal scouring pads. SAVE THESE INSTRUCTIONS
3
Connect only to heat,... have provided many important safety messages in this section.
■ Install or locate the microwave oven only in this manual. Always read and obey all instructions before using electrical ...
Microwave Use and Care - Page 5
...use the turntable as a support for this microwave oven. The rollers on the support should fit inside cavity walls, ceiling or floor. ■ Do not ...oven, do not store the
rack in this microwave oven. Light (inaccessible, in place. Turntable B. NOTE: The turntable, microwave oven light, and cooling fan will continue to touch the inside the turntable bottom ridge. The location...
Microwave Use and Care - Page 7

... P
ON M
A. Clock set K. Soften or melt
A
B
A
B
Lower Oven Display (combination oven models) A. Reheat B. Cancel N. Crisp O. Timer display Microwave Oven Display (single oven models) A. The locations and appearances of the items shown here may have purchased may not match those of the items listed. Lower oven controls (see separate
Use and Care Guide) J. Popcorn...
Microwave Use and Care - Page 10

...on the volume and density of food. Steam buildup in whole eggs may be dried in microwave oven.
■ Paraffin wax will continue to avoid overcooking the outer edges of the food. Food ...and heat which reflect off the metal floor, walls and ceiling and pass through the cooking process. Standing Time Food will not melt in the microwave oven because it is chipped or broken. Heavy, dense...
Microwave Use and Care - Page 11

... least 5 mm) above the turntable. Do not use in microwave oven. Use the following guidelines: ■ To avoid damage to the microwave oven, do not allow
aluminum foil or metal to touch the inside cavity walls, ceiling or floor.
■ Always use oven mitts or pot holders when removing dishes from the food.
Aluminum...
Microwave Use and Care - Page 20

...and a sponge. Push the fastening thread gently towards the back of water for 2 to 5 minutes in oven.
Cleaning Method: ■ Warm water, mild detergent and a sponge. Odors ■ Lemon juice or vinegar..., HUB, CRISPER PAN HANDLE
■ Dishwasher
Always return the broil element to its original location. Heavily soiled
areas can be cleaned with 1 tbs (15 mL) of the broil element...
Microwave Use and Care - Page 23
... LP (hereafter "KitchenAid") will pay for Factory Specified Parts for the stainless steel oven cavity/inner door if the part rusts through tenth years from date of purchase, when... LIABLE FOR INCIDENTAL OR CONSEQUENTIAL DAMAGES.
Consumable parts are excluded from your major appliance is located in materials or workmanship and is reported to the finish of your major appliance, unless...
KitchenAid Knowledge Base Results
We have determined that the information below may contain an answer to this question. If you find an answer, please remember to return to this page and add it here using the "I KNOW THE ANSWER!" button above. It's that easy to earn points!-
Recommended installation for electrical, drain and water supply connections for dishwashers.
... answer more useful. How to the right front of the cabinet opening . Insert the drain hose into house wiring junction box. How to 5 years Greater than one gray end visible. The drain hose is on the left corner of the...side of the cabinet opening closest to complete your appliance? Email Your Feedback How old is located in the cabinet wall or floor on the side of the opening. -
Rack position for best cooking results - Architect Series II - gas and electric ranges
... chart as a guide. Allow 1" (2.5 cm) of rack Side by side or slightly staggered Opposite corners on the oven. Total pan(s) Position on rack Center of space around bakeware and oven walls. Traditional cooking Food Rack position Large roasts, turkeys, angel food, bundt and tube cakes, quick breads, pies 1 or... -
Using roll-out racks - Built-in ovens
...sliding shelf. Slowly push both to the back wall of the oven so the front edge of vegetable oil applied to position and remove food in oven Tips for using the Self-Cleaning cycle of... the rack and the sliding shelf. Pull out the rack and the sliding shelf. If this happens, a light coating of the sliding shelf sits on the rack guide located...
Similar Questions

Microwave Stuck In Easy Connect Mode
we have had our combo Microwave/wall oven for over 2 years. Yesterday morning we used the easy conve...
we have had our combo Microwave/wall oven for over 2 years. Yesterday morning we used the easy conve...
(Posted by barbjdoughty 7 years ago)


What Is The Interior Dementions Of Kitchenaid Kebc147vss 24' Single Wall Oven
(Posted by DCinti 11 years ago)

Wall Oven Kebs177ss Warm Air From Vent
You have reached the 80-character limit. Please use the Question Details box for any additional det...
You have reached the 80-character limit. Please use the Question Details box for any additional det...
(Posted by WilmaCreighton 12 years ago)