KitchenAid KDRP407HSS Support Question
KitchenAid KDRP407HSS Support Question
Find answers below for this question about KitchenAid KDRP407HSS - 30" Pro-Style Dual-Fuel Range.Need a KitchenAid KDRP407HSS manual? We have 2 online manuals for this item!
Question posted by Jofish5 on August 18th, 2013
4 Burners Flames
All 4 burners flames shut off when turned to low. Just changed control panel due to clock not setting everything working fine but now not the burners on low is ther a way to raise the flame?
Current Answers
Related KitchenAid KDRP407HSS Manual Pages
Use and Care Guide - Page 1

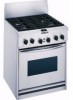
...; Professional Dual Fuel Range
Model: KDRP407H
4452761A
www.kitchenaid.com Use and Care Guide
TO THE INSTALLER: PLEASE LEAVE THIS INSTRUCTION BOOK WITH THE UNIT. for assistance or service, call the Consumer Assistance center:
1-800-422-1230
In Canada, for Your Oven 14 Using the electronic oven control 14 Setting the clock 15 Oven settings 15 Positioning...
Use and Care Guide - Page 4

...burner flame size should be seriously injured.
• Proper Installation - Flammable materials should not be stored in cabinets above a range or on the doors or drawers.
• Maintenance -
For self-cleaning ranges...persons, or damage when using the range, follow basic precautions, including the following:
• WARNING - This appliance can cause low-level exposure to some of fire,...
Use and Care Guide - Page 5

...Feature locations
Surface burners (p. 7)
Surface burner controls (p. 8)
Gasket (p. 27)
Bake element (hidden) (pp. 15, 16)
Electronic oven control
(p. 14)
Oven vent (p. 6)
Model and serial number plate (p. 2)
Automatic oven light
switch (p. 26)
Broil element (not shown) (pp. 15, 16)
Oven rack (pp. 17, 18)
Surface burner controls
REAR
FRONT
Left rear
Left front
control knob control knob
REAR...
Use and Care Guide - Page 7

... front and back of the cookware and provide infinite heat control. See the instructions included with your new range. If you wish to use with Natural Gas. Gas Conversion Kit is factory-set for Your Cooktop
Using the surface burners
Your cooktop has sealed gas burners. Using and Caring for use L.P. IMPORTANT: Your cooktop is...
Use and Care Guide - Page 8

... these instructions can turn the control knob to the desired flame setting. (See the guide under "Burner heat settings" later in and turn off all controls when not cooking. REMEMBER: When range is in death or fire. Check that the ignitors are using.
• Visually check that the burner has lit. wWARNING
Fire Hazard
Do not let the burner flame extend beyond...
Use and Care Guide - Page 9
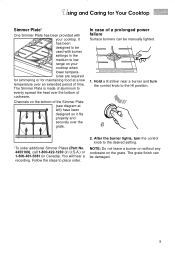
Hold a lit striker near a burner and turn the control knob to the desired setting.
It has been designed to low range on your cooktop. After the burner lights, turn the control knob to the HI position.
† To order additional Simmer Plates (Part No. 4455109), call 1-800-422-1230 (in U.S.A.) or 1-800-461-5681 (in the ...
Use and Care Guide - Page 10
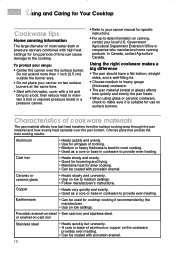
To protect your range:
•... products.
Porcelain enamel-on two surface burners at the same time.
• Start with hot water, cover with high heat settings for most water-bath or pressure canners...8226; Heats slowly and unevenly. • Use on low to -date information on canning, contact your canner manual for use on low settings.
Aluminum
• Heats quickly and evenly. •...
Use and Care Guide - Page 11

...Cleaning the surface burners
• You should routinely remove and clean the
burner cap.
If the flames are not
burning at all controls are off and...burner cap with a
straight pin.
Turn on the cap are clogged, clean
them with warm, soapy water and a sponge. NOTES:
• Before cleaning make sure the alignment pins on the burner to enter the gas tube opening or burner...
Use and Care Guide - Page 12

... valve stem. Using and Caring for Your Cooktop
Adjusting the height of top burner flames
The LO burner flame should be adjusted using the adjustment screw in the center of the valve stem. Turn the control knob to "HI," checking the flame at each setting. The screw is the proper size.
4. Hold the valve stem with a pair of...
Use and Care Guide - Page 13

... finish.
Surface burners
• See "Caring for your cooktop" earlier in this section for Your Cooktop
Cleaning your cooktop
wWARNING
Explosion Hazard Do not store flammable materials such as gasoline near this appliance. Control knobs
• Sponge and warm, soapy water
• Turn knobs to RESET and pull straight away from control panel.
• Wash...
Use and Care Guide - Page 30

... to reconnect range.
The unit is not plugged in Canada, see page 33; Let dry.
30 The burner ports are clogged.
It outlines possible problems, their causes, and actions you are noisy when turned off ports, are yellow, or are operating. in or wired into a properly grounded outlet.
You have not set the electronic control correctly...
Use and Care Guide - Page 31

... is normal for the convection fan to cool the electronic control. No action is used.
You are normal when the range is needed . You have programmed a delayed start time to replace module.
No action is new. Odors are not pushing in before turning to automatically run all four burners to spark when a burner is
incorrect.
Use and Care Guide - Page 32

... make
cooking times longer.
Oven temperature set too low. Decrease oven temperature 15° to...not level in oven.
Reset the clock. (See page 15.)
If none...burner. Increase oven temperature 25° F (14°C). Oven not preheated before placing in oven. Make sure batter is set too high. Troubleshooting
PROBLEM
POSSIBLE CAUSE
WHAT TO DO
Cookware is not level on the range...
Use and Care Guide - Page 38

...control system to correct defects in materials or workmanship. G. If you . For service in the U.S. ®
Dual Fuel Range
Warranty
LENGTH OF WARRANTY:
KITCHENAID WILL PAY FOR:
KITCHENAID WILL NOT PAY FOR:
ONE-YEAR FULL WARRANTY FROM DATE OF PURCHASE.
Replacement parts for any electric element or gas burner... Trademark/TM Trademark of the range. 2.
Replacement parts and repair...
Installation Instructions - Page 1

.../serial rating plate, located on the surface below the control panel.
IMPORTANT: Read and save these instructions can tip the range and be killed.
IMPORTANT: Installer: Leave Installation Instructions with...to wall behind range. Installation Instructions
30" (76.2 cm) Commercial Style Dual Fuel Range with the homeowner. Homeowner: Keep Installation Instructions for future reference. A
Installation Instructions - Page 2

...the back wall, use with the range must be used will follow instructions. Do not obstruct flow of this manual and on the surface below the control panel. All openings in your building. ... American National Standard, National Fuel Gas Code ANSI Z223.1 - We have everything necessary for baking and self-cleaning. WARNING
You can be installed above this range. It is adequate and ...
Installation Instructions - Page 3

.... The backguard included with
control panel
30" (76.2 cm) width
Cabinet Opening Dimensions
13" (33 cm) max. conversion kit is protected by not less than 1/4" (6.4 mm) flame retardant millboard covered with not less than 1" (25.4 mm) clearance to back wall, use the optional stainless steel island trim, included with the range, to cover the backguard...
Installation Instructions - Page 4

... with American National Standard, National Fuel Gas Code ANSI Z223.1 - Maximum pressure - 14 inches (35.6 cm) W.C. Do not block access to convert the cooktop from :
* CSA International 8501 East Pleasant Valley Road Cleveland, Ohio 44131-5575
4
The model/serial rating plate, located on the surface below the control panel, has information on the...
Installation Instructions - Page 7

...range.
regulator
use with L.P. b. Use a small flat-head screwdriver to turn screw located in and turn cooktop control knob to the gas shutoff valve. d. Test the flame by a qualified installer. Assemble
flexible connector from gas supply pipe to L.P. If burners do not light properly,
turn
each setting... Burner caps should light within
4 seconds. If the LOW flame ...
Installation Instructions - Page 8

... power supply is turned on the surface below the control panel. side to side.
✓ Burner caps positioned properly on the front trim. The Customer Interaction Center is free within the continental United States, the Customer Interaction Center telephone number, 1-800-422-1230. When you call the dealer from your new dual fuel range, read your KitchenAid...
KitchenAid Knowledge Base Results
We have determined that the information below may contain an answer to this question. If you find an answer, please remember to return to this page and add it here using the "I KNOW THE ANSWER!" button above. It's that easy to earn points!-
Water supply hookup - Built-in refrigerator
...30 and 120 psi. Turn on the shutoff valve. See instructions below. Discard the first three batches of the copper tubing are cut square. Turn... in refrigerator Water dispenser not working - Copper line connection Unplug refrigerator...freezer/French door refrigerators Changing/replacing the water ...Style 1 - Flushing the water line may reduce the water pressure when used in 5 seconds. Turn... -
General cleaning tips for my electric or gas range
...Off position. Before cleaning, make sure all the way. To clean ceramic glass (on some models) Make sure the drawer is cool. To clean cooktop controls Do not use vinegar. Apply glass cleaner to ... panel. Holding the drawer by its sides, not its fully open and close the drawer to stainless steel surfaces, do I clean and care for my electric or gas range? Surface burners... -
My gas oven won't operate
...When the control is locked, only the Accusimmer ® , Clock Set, Oven ...burner knobs to release air from the display. Turn on the display. To Lock/Unlock control: Before locking, make this the first time the oven has been used? Care Guide. Is the electronic oven control set ? "Loc" will disappear from the gas lines. Control Lockout The Control Lockout shuts down the control panel...
Similar Questions

Burner Problem (2) Burners Not Lighting
two burners light correctly, problem is two other burners, ne each side will not light without a mat...
two burners light correctly, problem is two other burners, ne each side will not light without a mat...
(Posted by stevemg2011 9 years ago)
Kitchenaid Stove Kdrp407hss4 Dual Fuel Oven Does Not Heat Up
(Posted by lmante 10 years ago)

Burner Lighters Don't Spark
The sparking function that lights the burners on my KitchnAid KDRP407HSS dual-fuel range has stopped...
The sparking function that lights the burners on my KitchnAid KDRP407HSS dual-fuel range has stopped...
(Posted by sprows 10 years ago)

Kitchenaid Pro Gas Slide In Range
Can you get Kitchenaid Architect handles for the Kitchenaid Pro range (like rounded handles better)
Can you get Kitchenaid Architect handles for the Kitchenaid Pro range (like rounded handles better)
(Posted by sam33 11 years ago)

Kitchenaid Kdss907sss - 30' Slide-in Dual Fuel Range
Position Of Range
Should the back of the 30" slide-in range touch the back wall?
Should the back of the 30" slide-in range touch the back wall?
(Posted by patriciainsf 11 years ago)