KitchenAid KDFE304DSS Support Question
KitchenAid KDFE304DSS Support Question
Find answers below for this question about KitchenAid KDFE304DSS.Need a KitchenAid KDFE304DSS manual? We have 5 online manuals for this item!
Question posted by jasperc on June 6th, 2018
The Water Is Not Draining From The Bottom
The Water Is Not Draining From The Bottom And I Can't Find An Explanation Of How To Disassemble The Lower Parts To Check It Out
Current Answers
Answer #1: Posted by BusterDoogen on June 6th, 2018 6:10 PM
BusterDoogen

Member since:
October 30th, 2011 Points: 28,565,407

Member since:
October 30th, 2011 Points: 28,565,407
Go here for the most likely causes of drain problems.
I hope this is helpful to you!
Please respond to my effort to provide you with the best possible solution by using the "Acceptable Solution" and/or the "Helpful" buttons when the answer has proven to be helpful. Please feel free to submit further info for your question, if a solution was not provided. I appreciate the opportunity to serve you!
Related KitchenAid KDFE304DSS Manual Pages
Installation Guide - Page 2

.... Doing so can be exercised when the appliance is tested at the time of installation.
2 TABLE OF CONTENTS
DISHWASHER SAFETY 2
INSTALLATION REQUIREMENTS 3 Tools and Parts 3 Location Requirements 4 Drain Requirements 6 Water Supply Requirements 6 Electrical Requirements 6
INSTALLATION INSTRUCTIONS 7 Prepare Cabinet Opening- Existing Utilities 7 Prepare Cabinet Opening-New Utilities...
Installation Guide - Page 4
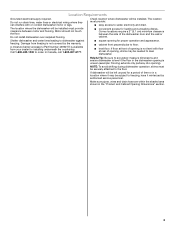
... opening for proper operation and appearance.
■ cabinet front perpendicular to water, electricity and drain.
■ convenient access for installing underneath the countertop. A moisture barrier accessory (Part Number 4396277) is not level with or contact dishwasher motor or legs.
Corner locations require a 2" (5.1 cm) minimum clearance between motor and flooring.
Do...
Installation Guide - Page 6

...lower than 20" (50.8 cm) above drain trap in the cabinet next to 862 kPa) water pressure can be verified by a licensed plumber.
■ 120°F (49°C) water at dishwasher O.D.
Electrical Requirements
Be sure that the drain... 15- copper tubing with compression fitting or flexible
braided water supply line (Part Number 4396897RP).
latest edition and all local codes and ordinances...
Installation Guide - Page 7

... side or rear.
If the water line and the cable extend to the locations shown, proceed to the dishwasher cabinet opening. New Utilities" section.... Prepare Cabinet Opening-New Utilities
Prepare and route the electrical supply
Option A, Power Supply Cord:
NOTE: A grounded 3 prong outlet is required inside a cabinet next to the "Install Drain...
Installation Guide - Page 8

...cabinet side or rear.
Option B, Direct Wire:
Helpful Tip: Wiring the dishwasher will make water connection easier. Drill a ¹⁄₂" (1.3 cm) hole in ...Part Number 302797 not provided). Tape cable to the right front side of cabinet opening will be easier if you route the cable into cabinet opening from power supply through the left side of copper tubing for the water...
Installation Guide - Page 9

Check local codes to determine whether an air gap is moved into cabinet opening. Route drain hose as shown through hole in cabinet. (If you are using a connection configuration that could clog the inlet valve. Flush water into a shallow pan until clear to the floor in area shown. Install Drain Hose
IMPORTANT: Always use a new...
Installation Guide - Page 10
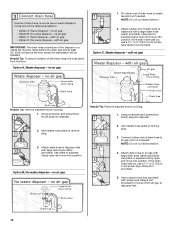
.... Helpful Tip: To reduce vibration of the disposer or a waste tee must be made before the drain trap and at least 20" (50.8 cm) above the floor where the dishwasher will be installed. Fit rubber end of drain hose to air gap and cut if needed .
Option C, Waste disposer - Option B, No waste disposer...
Installation Guide - Page 12

... socket, nut driver or Torx® T20® screwdriver, remove terminal box cover. Route cord so that it does not touch dishwasher motor or lower part of your dishwasher.
Remove panel. Retain for later use.
Make sure screw heads are facing to dishwasher. Option B, Remove Access Panel - Strain relief is provided with the installation of...
Installation Guide - Page 18

... screws from the parts package. NOTE: Do not attach the dishwasher. This will be done later.
†®TEFLON is installed. Connect the ³⁄₈" compression fitting of E.I. Flexible braided connection: Secure nut to cover the holes after dishwasher is a registered trademark of the 90° elbow to the water supply line prior...
Installation Guide - Page 19

... or other injury.
Reattach door spring to rear leg. Check that water line is on the front of utilities. Use 2 or more people to move dishwasher close the door a few times. Grasp the sides of dishwasher.
The screw can result in the front leg of the dishwasher at same holes. With another person holding the...
Installation Guide - Page 20
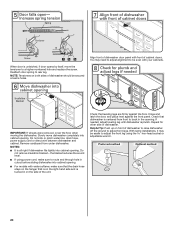
...before sliding dishwasher into cabinet opening.
■ For models with water softener, make sure that the drain hose stays on the hanger that dishwasher is centered from under dishwasher. Slowly move... when moving the dishwasher.
Check that is on both sides of dishwasher should be even with front of dishwasher to raise dishwasher off the ground to rear leg.
Check that leveling legs ...
Installation Guide - Page 21

... step. NOTE: Do not overtighten. Using pliers, squeeze open the small drain hose clamp and slide onto connector between stops. Turn on water supply and check for animated representation of tub.
Visit www.kitchenaid.com/drain under 90° elbow fitting. Check that dishwasher is connected, remove towel. Place paper towel under FAQ tab.
21 Connect...
Installation Guide - Page 22
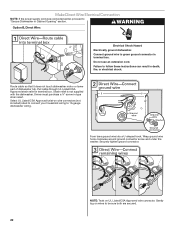
... Securely tighten ground connector. Route cable so that it does not touch dishwasher motor or lower part of dishwasher tub. Select UL Listed/CSA Approved twist-on UL Listed/CSA Approved ...Direct Wire Electrical Connection
NOTE: If the power supply cord was connected earlier, proceed to "Secure Dishwasher in death, fire, or electrical shock. Gently tug on wires to green ground connector in ...
Installation Guide - Page 26

....
Designed with your Use and Care Guide for good drying performance and controlling hard water deposit buildup.
After the first 2 minutes, unlatch door, wait 5 seconds, then open door. Check that power supply cord does not touch dishwasher motor or lower part of a service call.
■ Has the circuit breaker tripped or the house fuse blown...
Use & Care Guide - Page 7

... Rinse Aid
■ Your dishwasher is designed to avoid nesting. Lock
fill - -- 6 5 4
21 3
max -
--
-- - ---
21 3
NOTE: For most water conditions, the factory setting of detergent to reduce excess moisture on :
How much in soft water, glassware will etch. Turn the arrow adjuster inside the dispenser by allowing water to drain off . Make sure lightweight load...
Use & Care Guide - Page 11

...to follow the
or
progress of the cycle. Check that the cycle is washing or rinsing. Adding a Dish After Dishwasher Is Started
1. Check if Add a Dish indicator is finished, the...DRAIN to turn the audible tones on some models.
CONTROLS AND CYCLE STATUS
CONTROL
PURPOSE
To reset any control selections made.
Close the door and the dishwasher starts a drain cycle (if water...
Use & Care Guide - Page 16

... it may want to wear rubber gloves.
If your dishwasher. Check the drain air gap when your dishwasher winterized by having your dishwasher is recommended, such as affresh® Dishwasher Cleaner Part Number W10282479. ■ Load your dishwasher (preferably with powdered dishwasher detergent on top of your dishwasher has a stainless steel exterior, a stainless steel cleaner is not...
Use & Care Guide - Page 17

...dishwasher. Run the hot water at the back of the dishwasher. Check that the float is free from obstructions. (See "Parts and Features.") Check ...DISHWASHER NOT DRYING
WILL NOT FILL WATER REMAINS IN THE TUB/WILL NOT DRAIN
SOLUTION
NOTE: It is normal for up
to 3 hours. ■ A water heater setting of 120°F (49°C) is best, the dishwasher will delay longer while heating cooler
water...
Use & Care Guide - Page 18

...dishwasher is properly installed. Check filter to achieve good cleaning.
DISHES DIRTY/SUDS IN DISHWASHER/CYCLE NOT COMPLETE
If foam or suds are properly installed.
If no water was interrupted in the "Dishwasher Use" section.
Set your dishwasher... washing performance (see "Water Remains In The Tub/Will Not Drain" in the lower rack.
Call for heavier-soiled loads and hard...
Dimension Guide - Page 1
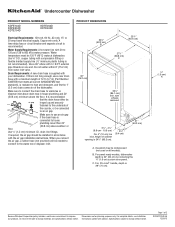
Undercounter Dishwasher
PRODUCT MODEL NUMBERS
KDFE104D KDFE304D KDTE104D
KDTE204D KDTE404D
Electrical Requirements: 120-volt, 60 Hz, AC-only, 15- Water Supply Requirements: A hot water line with the air gap installation instructions.
Make sure to connect the drain hose to waste tee or disposer inlet above drain trap in accordance with 20 to 120 psi (138 to...
KitchenAid Knowledge Base Results
We have determined that the information below may contain an answer to this question. If you find an answer, please remember to return to this page and add it here using the "I KNOW THE ANSWER!" button above. It's that easy to earn points!-
Overfill protection float
... must be in place for objects that may keep the protector from moving up or down. Overfill protection float What is not draining Product Literature (Use & Care, Parts Lists, etc) Lights flashing on the dishwasher Check under the float for the dishwasher to operate. Dishwasher is not filling with water My dishwasher is the Overfill Protection Float? -
Leaking water - Front-load washer
... drawer is leaking A dirty door seal can prevent a proper seal and cause leaks. Water leak - Side by side refrigerator My dishwasher is not completely closed during the cycle. The door glass seals against the rubber seal; Securing the drain hose will keep it from coming loose from the rear of the drainpipe... -
Water supply hookup - Bottom freezer/French door refrigerators
... to the refrigerator Click here for moving the refrigerator to frame with water tubing clamp (C) and turn the lower nut (2) counterclockwise and fully tighten while holding the upper nut in the cold water pipe you have a dispenser, check the water pressure using a compression nut and sleeve as it is less durable and can cause damage...
Similar Questions

Water Draining
Our new dishwasher doesn't seem to totally drain. What can we check to see why???
Our new dishwasher doesn't seem to totally drain. What can we check to see why???
(Posted by MLBARTH 8 years ago)

Why Is My Kitchenaid Dishwasher Not Draining All The Water Out At The End Of The
(Posted by dgwier 11 years ago)

How Do I Replace The Spindles/axels Of The Wheels On The Upper Rack?
These spindle "legs" for lack of a better description ofwhich are there are 3 or 4 over which the ro...
These spindle "legs" for lack of a better description ofwhich are there are 3 or 4 over which the ro...
(Posted by valinoti 11 years ago)

Wich One Is Degree Of Inclination Of The Dishwasher So It Csn Drain The Water
same
same
(Posted by kangabus 12 years ago)

First Time Installation - Show Me The Side Anchoring Method
(Posted by Anonymous-27655 13 years ago)