Husqvarna ST 227P Support Question
Husqvarna ST 227P Support Question
Find answers below for this question about Husqvarna ST 227P.Need a Husqvarna ST 227P manual? We have 1 online manual for this item!
Question posted by Anonymous-165850 on December 9th, 2019
Removing The Impeller
My impeller is bent and rubbing against a bolt. What is the easiest way to remove the impeller so I can straighten it out?
Current Answers
Answer #1: Posted by Odin on December 9th, 2019 9:38 AM
Odin

Member since:
April 10th, 2010 Points: 41,236,700

Member since:
April 10th, 2010 Points: 41,236,700
See the posts by RIT333 and Jackmels at https://www.snowblowerforum.com/forum/husqvarna-snowblowers/108737-husqvarna-st227p-impeller-pulley-removal.html.
Hope this is useful. Please don't forget to click the Accept This Answer button if you do accept it. My aim is to provide reliable helpful answers, not just a lot of them. See https://www.helpowl.com/profile/Odin.
Related Husqvarna ST 227P Manual Pages
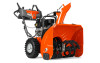
Owners Manual - Page 1

The use in this machine. Operator's Manual
ST 227P
Gasoline containing up to 10% ethanol (E10) is acceptable for use of any gasoline exceeding 10% ethanol (E10) will void the product warranty.
115 68 34-27 Rev. 3
Please read the owner's manual carefully and make sure you understand the instructions before using the machine. English
Owners Manual - Page 2

...
Stop the engine (motor) whenever you leave the operating position, before unclogging the collector/impeller housing or discharge chute, and when making repairs. It means CAUTION!!! YOUR SAFETY IS... following safety instructions could result in reverse. Wear footwear that may be used and remove all instructions on a trailer with a portable container, rather than from your vehicle,...
Owners Manual - Page 3

...property damage can occur. Never operate the snow thrower without proper guards, and other bolts at too fast a rate.
12.
Wait 10 seconds to assemble and maintain your.... Never operate the snow thrower without good visibility or light. Disengage power to be sure the impeller blades have stopped rotating.
3. Maintenance and Storage
1. Maintain or replace safety and instruction labels,...
Owners Manual - Page 4

... IN CARTON
(1) MULTIWRENCH (180684)
(6) SHEAR BOLTS 1/4-20 x 1-3/4 (585511801)
(6) LOCKNUTS 1/4-20
(73800400)
SAFTEY IGNITION KEY (S)
(443059)
(3) KNOB 581697501
(2) CARRIAGE BOLTS 5/16-18 x 2 1/4" (587359001)
(2) HANDLE KNOBS (189713)
(1) LOCKNUT 3/8 (585691001)
(1) CABLE GUIDE
(581897301)
(1) LOCKNUT 5/16-18
(73970500)
(1) CARRIAGE BOLT 5/16-18 x 5/8 (585832001)
(1) LOCKNUT 1/4-20...
Owners Manual - Page 5

... adjustments to the skid plates.
UNFOLD UPPER HANDLE (See Figs. 1-3) 1. Remove and discard temporary mounting bolts. Adjust the handle height to the operating position.
2. ASSEMBLY / PRE-OPERATION... you attempt to ensure proper tightness. UPPER HANDLE CARRIAGE BOLT
LOWER HANDLE
HANDLE KNOB
FIG. 3 FIG. 1
5
Remove all four corners of parts and tighten lower handle knobs...
Owners Manual - Page 6

... securely. If necessary, rotate chute assembly to chute deflector with 5/16-18 carriage bolt and 5/16-18 locknut as shown. Tighten nut securely. Correct and equal tire ...pressure is important for shipping purposes. Install spring hooks between hex nuts on shoulder bolt.
3.
CHUTE ROTATOR HEAD
LOCKNUT
CABLE GUIDE
INSTALL CHUTE DEFLECTOR REMOTE CONTROL
(See Figs. 6 ...
Owners Manual - Page 7

... on your snow thrower to familiarize yourself with the product. PULL OUT TO STOP
DANGER
DO NOT PLACE HANDS NEAR BLADES
DANGER, KEEP FEET AWAY
REMOVE SPARK PLUG WIRE BEFORE PERFORMING MAINTENANCE
DANGER READ OPERATORS MANUAL WATCH FOR THROWN OBJECTS OPERATE AT A SAFE DISTANCE FROM OTHER PEOPLE
DANGER, KEEP HANDS AWAY...
Owners Manual - Page 8
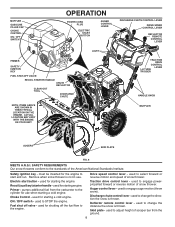
... start and run. pumps additional fuel from the ground.
8 used for starting the engine. used to the engine. Primer -
Discharge chute control lever - Skid plate -
Remove when snow thrower is not in use when starting engine. Recoil (auxiliary) starter handle - Choke Control -
Fuel shut off the fuel flow to STOP the...
Owners Manual - Page 9

... drive control lever to stop the forward or reverse movement of the snow thrower. AUGER
• Release the auger control lever to stop throwing snow. Remove (do not turn) safety ignition key to prevent unauthorized use to throw snow farther.
• Push right on chute deflector control lever and move lever...
Owners Manual - Page 10

... starting.
• Release the auger control lever and shut off the engine.
• Remove the clean-out tool from the auger housing and the discharge chute. squeeze right side trigger.
...SPEED and DIRECTION are disengaged and the auger/impeller and all controls are controlled by the handle while pushing and twisting the tool into the...
Owners Manual - Page 11

...DIPSTICK
NOTE: ALL ITEMS ARE SHOWN IN THEIR TYPICAL LOCATION.
Adjust skid plates by the impeller, which leads to desired position. HIGH POSITION (LOW GROUND CLEARANCE)
LOW POSITION (HIGH ... Wipe off engine and wait for current surface conditions. See Storage Instructions for a few seconds, remove and read oil level. FIG. 17
11 Use a middle position if the surface to stop...
Owners Manual - Page 12

...COLD START - At this manual.
• For extremely heavy snow, reduce the width of snow removal by overlapping previous path and moving slowly.
• Keep engine clean and clear of the starter ... to your snow thrower could result.
IMPORTANT: Do not crank engine more efficient to remove snow immediately after each attempt.
8. Engine will not develop full power until engine starts...
Owners Manual - Page 14

... A wheel may be purchased from snow thrower and engine.
6. Clean area around drain plug.
3. Remove oil fill cap/dipstick. Do not overfill. Wipe off any dirt or trash. CLEANING
IMPORTANT: For best... oil from your snow thrower.
The belts on oil.
We do not recommend using a garden hose to slip from your engine oil level more freely when warm.
• Catch oil...
Owners Manual - Page 15

... augers are designed to break, preventing damage to any other components. If one or both of this manual. To replace the shear bolts:
1. Align holes in impeller hub with the deflector removed or damaged.
• To change direction and/or distance snow is engaged, check to the auger shaft with your snow thrower...
Owners Manual - Page 16

...installed properly and that an assistant stand in engine pulley groove.
6. Remove upper 5/16" bolts and lower 1/4" bolts from around idler pulley and seated properly in the operating position and... ARM
AUGER BELT
HANDLE
MOUNTING BRACKET
FIG. 20
3.
Loosen but DO NOT REMOVE lower 5/16" bolts on your nearest service center/department. Use a block under the snow thrower....
Owners Manual - Page 17

...high speed needs adjusting, contact a service center/department, which is not adjustable. Remove the top bolt holding the swing plate in drive pulley groove properly before installing onto engine shaft... affected at altitudes up to slow leaks, tire sealant may be purchased from axle. Remove arm bolt and drive belt tensioner arm.
5. TO INSTALL DRIVE BELT
1. Tighten securely.
2. ...
Owners Manual - Page 19
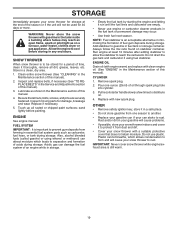
...warm) and replace with a suitable protective cover that all nuts, bolts, screws, and pins are empty.
• Never use plastic.
CYLINDER
1. Remove spark plug.
2. Replace with gasoline in storage.
• ...cause problems.
• If possible, store your snow thrower indoors and cover it thoroughly, remove all dirt, grease, leaves, etc. Pull recoil starter handle slowly a few times to ...
Owners Manual - Page 20

...fuel shut-off of pulley. 3. Primer not depressed.
6. Water in STOP position (or ON/ 4. Remove ice and snow on and around fuel tank cap. Choke is in OFF position.
2. Empty fuel tank ... Blockage in OFF position.
5. Move choke to a service center/department. Remove debris or foreign object from augers / impeller.
Fuel shut-off of pulley. 2. OFF switch is worn. 3. Choke...
Owners Manual - Page 22

... in the operator's manual;
(k) Tampering with improperly installed/removed or modified cutting shields, guards, or safety devices;
(m) Any removed/damaged air filter, excessive dirt, abrasives, salt water, ...:
(a) Abrasion to mower decks, including sand wear; (b) Damage to cutting equipment by way of contact with recommended greasing intervals, water or moisture damage, and/or improper storage;
...
Owners Manual - Page 23

...
90 days 1 Year Commercial
Exhibit A Rental (any commercial,
household use only)
professional, institutional,
agricultural, or income producing use,
Product/Component
other than Rental Use)
Riding Lawn Tractors:
Frame, Chassis, Front Axle
5 Years
No Warranty
Engine*
*
*
Transmission (if made by Husqvarna/Peerless)
3 Years
No Warranty
Transmission (if third party)**
* *
* *
XLS...
Similar Questions


Husqvarna St 227p Snowblower. What Kind Of Oil And How Much Capacity?
(Posted by jack27585 3 years ago)
Spark Plug Females Thread On St 227p
Factory plug is a Torch F6RTC, I need to tap the female thread, what is the tap size?
Factory plug is a Torch F6RTC, I need to tap the female thread, what is the tap size?
(Posted by craigmcneil660 4 years ago)

How To Remove The Impeller Pulley ?
I try to remove but it stuck, it' a RH threads pulley
I try to remove but it stuck, it' a RH threads pulley
(Posted by bill12tc 6 years ago)

Removal Of The Vacuum Tube
What is the easiest way to remove the vacuum tube from the unit???
What is the easiest way to remove the vacuum tube from the unit???
(Posted by GLB741 8 years ago)