
Husqvarna HU775H Support Question
Husqvarna HU775H Support Question
Find answers below for this question about Husqvarna HU775H.Need a Husqvarna HU775H manual? We have 2 online manuals for this item!
Current Answers
Answer #1: Posted by TechSupport101 on April 18th, 2015 11:01 AM
TechSupport101

Member since:
May 24th, 2013 Points: 12,171,305

Member since:
May 24th, 2013 Points: 12,171,305
The YouTube video here www.youtube.com/watch?v=v9_JFn9A-r4 will be able to assist with the blade removal procedure as the Husqavarna has not made the manual specific for the 775ex model available online.
Related Husqvarna HU775H Manual Pages
Owners Manual - Page 2
...
Husqvarna ...blade(s) when crossing gravel drives, walks, or roads.
Look for holes, ruts, or bumps.
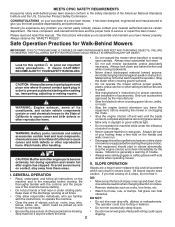
Please read and retain this manual. Always look down . Avoid discharging material against a wall or obstruction. WARNING: Battery posts, terminals and related accessories contain lead and lead compounds, chemicals known to the safety standards of a new lawn mower...
Owners Manual - Page 3
...approved container.
• Never remove gas cap or add fuel with manufacturer's recommended parts, when necessary.
• Mower blade is sharp and can occur if the operator is available through your vehicle before filling.
• Remove gas-powered ...If fuel is running . CHILDREN
Tragic accidents can cut. If this operator's manual. WARNING: This lawn mower is complete.
III.
Owners Manual - Page 4

... 6
OPERATION 7-12 MAINTENANCE 13-17 SERVICE AND ADJUSTMENTS 18-19 STORAGE 20-21 TROUBLESHOOTING 22 WARRANTY 23-26
KNOW YOUR LAWN MOWER
READ THIS OPERATOR'S MANUAL AND SAFETY RULES BEFORE OPERATING YOUR LAWN MOWER. Setup
LOOSE PARTS
Use the chart below to verify that all parts and hardware you attempt to complete the assembly have...
Owners Manual - Page 5
... bracket and secure with one of this manual. Remove protective padding, raise upper handle section into place on lower handle and tighten both handle knobs.
5. Remove any packing material from around control bar.
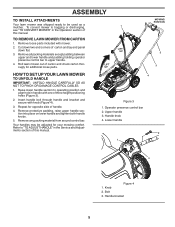
Upper handle 3. TO REMOVE LAWN MOWER FROM CARTON
1. Remove loose parts included with mower.
2. Your handles may be used as a mulcher...
Owners Manual - Page 7
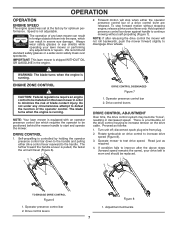
... OIL OR GASOLINE in order to be installed on the drive cable. IMPORTANT: This lawn mower is not adjustable.
Operate mower to defeat the function of blade contact injury. If condition fails to improve after releasing the drive control the mower will stop forward motion without self-propelling (Figure 7). Drive control levers
Figure 8 1. Always wear...
Owners Manual - Page 8
... desired position.
Grass catcher frame hook 2. Figure 10
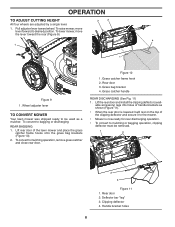
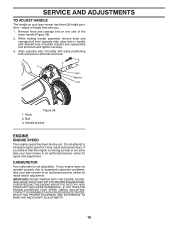
1. Grass bag bracket 4. Rear door 2. Clipping deflector 4. Deflector bar "leg" 3. To raise mower, move the lever toward wheel. Wheel adjuster lever
TO CONVERT MOWER
Your lawn mower was shipped ready to bagging or discharging:
REAR BAGGING 1. To convert to be removed.
1
4
2
3
Figure 11 1. Handle bracket holes...
Owners Manual - Page 9
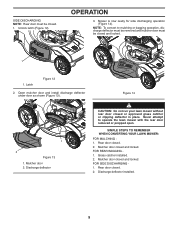
... (Figure 12). Latch
Figure 12
2.
Figure 14
1
2
Figure 13 1. Rear door closed . 2. Discharge deflector
CAUTION: Do not run your lawn mower without rear door closed and locked.
1
1. FOR REAR BAGGING 1. Grass catcher installed. 2. NOTE: To convert to operate the lawn mower with the rear door removed or propped open. Mulcher door closed and locked.
Owners Manual - Page 11
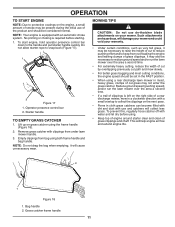
...not drag the bag when emptying; It may also be necessary to reduce ground speed and/or run the lawn mower over the area a second time.
• For extremely heavy cutting, reduce the width of cut by ... on the engine, a small amount of smoke may be present during the initial use de-thatcher blade attachments on your warranty.
• Under certain conditions, such as very tall grass, it may be...
Owners Manual - Page 12
... area be mulched a second time to provide nutrients for the lawn. OPERATION
MULCHING MOWING TIPS
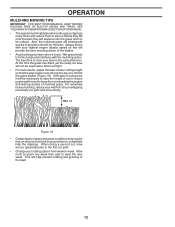
IMPORTANT: FOR BEST PERFORMANCE, KEEP MOWER HOUSING FREE OF BUILT-UP GRASS AND TRASH. SEE "CLEANING" IN THE MAINTENANCE SECTION OF THIS MANUAL. • The special mulching blade will help prevent matting and graining of mulched grass. For extremely...
Owners Manual - Page 13
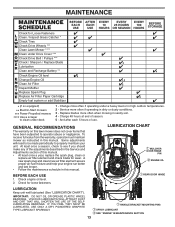
...this lawn mower does not cover items that have been subjected to properly maintain your engine run better and last longer. • Follow the maintenance schedule in this manual.... Catcher * Check Tires Check Drive Wheels *** Clean Lawn Mower **** Clean under Drive Cover *** Check Drive Belt / Pulleys *** Check / Sharpen / Replace Blade Lubrication Clean and Recharge Battery **
Check Engine Oil ...
Owners Manual - Page 14
... debris shield using screw.
3. Key 3.
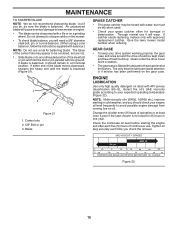
The wheels not turning freely means trash, grass cuttings, etc., may cause tire damage. TO REMOVE BLADE 1. Turn lawn mower on its side. Remove blade bolt by the manufacturer of your mower is inside hub of the belt retainer (Figure 20).
2. lbs. Make sure air filter and carburetor are aligned...
Owners Manual - Page 15
... may be hosed with water, but must be dry when used for 25 hours in one year. An unbalanced blade will cause eventual damage to lawn mower or engine. • The blade can be sure the blade is balanced, it will need a 5/8" diameter
steel bolt, pin, or a cone balancer. (When using a cone balancer, follow the...
Owners Manual - Page 17
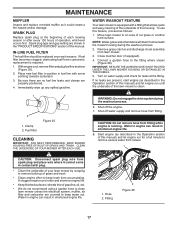
Place new fuel filter in position in fuel line with plug.
• Clean the underside of the lawn mower is required.
1.
To use this manual) and let engine run until the underside of your lawn mower by scraping to carburetor, replacement is clean.
1
1
2
1. Close mulcher door (if equipped).
4. If no fuel line leaks and clamps are...
Owners Manual - Page 18
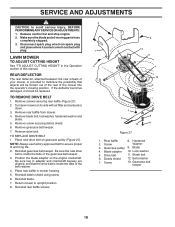
... belt keeper.
3. Reinstall blade.
7. Debris shield 12. Screw
13. REAR DEFLECTOR
The rear deflector, attached between the rear wheels of your mower, is inside the tabs of this manual.
Reinstall rear baffle screws.
2
1
3
2
2 13
5
4 12
6
7
8 9
10
11
Figure 27
1. Drive belt
11. Release control bar and stop engine. 2.
Turn lawn mower on its side with...
Owners Manual - Page 19
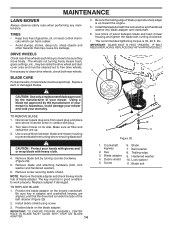
...suits you. 1. If your engine does not operate properly due to suspected carburetor problems, take your lawn mower has three (3) height positions - IF YOU THINK THE ENGINE-GOVERNED HIGH SPEED NEEDS ...NECESSARY ADJUSTMENTS.
19 CARBURETOR
Your carburetor is running too fast or too slow, take your lawn mower to height that the engine is not adjustable. IMPORTANT: NEVER TAMPER WITH THE ...
Owners Manual - Page 20
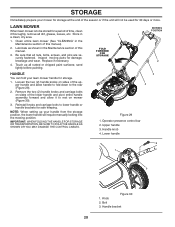
... for storage.
1. Loosen the two (2) handle knobs on sides of this manual).
2. NOTE: When setting up all nuts, bolts, screws, and pins are securely fastened. Handle knob 4. Knob 2.
LAWN MOWER
When lawn mower is to be used for 30 days or more. Lubricate as shown in the Maintenance section of the upper handle and allow...
Owners Manual - Page 21
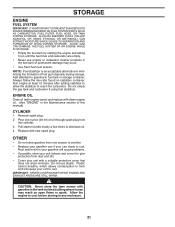
...not empty the gas tank and carburetor if using fuel stabilizer.
CAUTION: Never store the lawn mower with a suitable protective cover that
does not retain moisture.
Do not use engine or carburetor... the engine and letting
it to give
protection from one ounce (29 ml) of this manual). Run engine at least 10 minutes after adding stabilizer to allow the stabilizer to distribute oil...
Owners Manual - Page 22
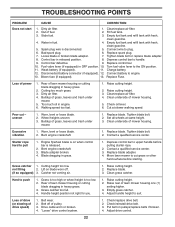
... oil level. 6. not filling
2.
Handle height position not right for you.
1.
Belt off .
(if so equipped) 3. Fill fuel tank.
3. Replace Fuse. Rear of lawn mower housing or cutting blade dragging in grass.
1. Raise cutting height.
2. Excessive vibration
1.
Cutting height too low.
Grass is too high or wheel height is disconnected.
5. Empty grass catcher...
Parts List - Page 3
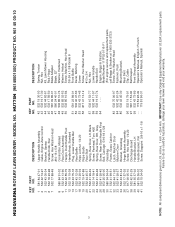
... Nut, Hex Kit, Lawn Mower Housing Rod, Hinge Blade Adapter Blade, 22" Washer, Hardened...Manual, English / French Operator's Manual, Spanish
3
NOTE: All component dimensions given in U.S. HU775H (96145001000) PRODUCT NO. 961 45 00-10
KEY PART NO. inches. 1 inch = 25.4 mm. MODEL NO. IMPORTANT: Use only Original Equipment Manufacturer (O.E.M.) replacement parts. HUSQVARNA ROTARY LAWN MOWER...
Parts List - Page 5
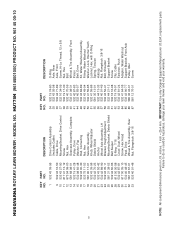
HUSQVARNA ROTARY LAWN MOWER - NO.
1 532 43 09-95
9 532 43 16-50 10 532 43 27-90 11 817 41 13-...Head Pawl, Drive Wheel & Tire Assembly, Rear Nut, Flangelock 3/8-16
KEY PART NO. Failure to do so could be hazardous, damage your lawn mower and void your warranty. HU775H (96145001000) PRODUCT NO. 961 45 00-10
KEY PART NO. inches. 1 inch = 25.4 mm. IMPORTANT: Use only Original Equipment Manufacturer...
Similar Questions

Husqvarna Riding Lawn Mower Starts, Blade Spins, Won't Go Forward Nor Reverse
(Posted by shywolfalways82 3 years ago)


How To Adjust The Speed Of A Husqvarna Lawn Mower Model Hu775h
(Posted by Bdbi 9 years ago)

I Got A Husqvarna Walk Behind Mower #hu775h It Wont Start Tryed Verything Any He
(Posted by lozanovicky1960 9 years ago)