Hunter 23298 Support Question
Hunter 23298 Support Question
Find answers below for this question about Hunter 23298.Need a Hunter 23298 manual? We have 4 online manuals for this item!
Question posted by Glennhutson on July 4th, 2017
Our Hunter Model 23298 Fan Was Working Now Is Not. Have Change Batteries In Th
Hunter model 23298 as mentioned the remote with new batteries seems to try to work but nothing on the fan works not the lights nor the blades. Have made sure there is power going to the fan so that is not the problem. Questioning could this be the receiver that has gone bad. Please advise. Glenn
Current Answers
Answer #1: Posted by techyagent on July 6th, 2017 1:56 AM
techyagent

Member since:
June 17th, 2014 Points: 4,799,790

Member since:
June 17th, 2014 Points: 4,799,790
Is it powered thru a light switch? Sometimes those do just quit. You can remove the old switch & replace it. Go to Lowe's/Home Depot, the switch itself is fairly inexpensive (probably less than $5). Remember to turn off the breaker to that room/switch before you do anything. The installation itself is simple - just wire + to + and ground it. Did you notice any kind of noise/smell before it stopped working? If the motor is burnt out - just replace the whole fan (unless you feel like tinkering with breaking it down & finding a replacement motor). Sometimes the lite switch on the fan itself will go out - parts for that can be found at about any larger hardware store, but sometimes that's not an easy repair (depends on what type of lite kit is on the fan). However, if that were the problem -it would not cause the blades not to turn, it would only keep the lights from coming on. Try replacing the light switch that turns the fan on/off first (the one on the wall, not on the fan itself) - hopefully that'll solve it for you. Good Luck.
Thanks
Techygirl
Related Hunter 23298 Manual Pages
Installation Guide - Page 1

...is suitable, go to the fan supply line leads and associated wall switch location are unfamiliar with the joist or support brace.
4-3. For instructions to install your fan manual and continue with the rotating fan blades during normal operation.
• e fan blades are at least 8 feet high.
• e fan blades have now successfully prepared your new Hunter fan. Tools and...
Owner's Manual - Page 1
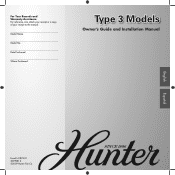
Date Purchased
Where Purchased
Type 3 Models
Owner's Guide and Installation Manual
English
Español
Form# 41874-01 20090813 ©2009 Hunter Fan Co. Model Name
Model No. For Your Records and Warranty Assistance For reference, also attach your receipt or a copy of your receipt to the manual.
Owner's Manual - Page 2
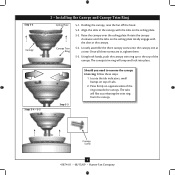
...; Installing the Canopy and Canopy Trim
Ring 8 6 • Assembling the Blades 9 7 • Installing the Light Kit 10 8 • Assembling the Remote Control and
Mounting the Cradle 12 9 • Operating and Cleaning Your Ceiling
Fan 14 10 • Troubleshooting 16
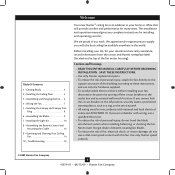
Welcome
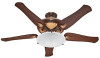
Your new Hunter® ceiling fan is an addition to your home or office that
will provide...
Owner's Manual - Page 3
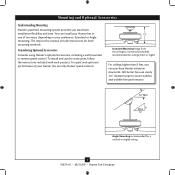
... stability and wobble-free performance. Angle Mounting recommended for a vaulted or angled ceiling
3 41874-01 • 08/13/09 • Hunter Fan Company Considering Optional Accessories
Consider using Hunter's optional accessories, including a wall-mounted or remote speed control. All Hunter fans use the accessories, follow the instructions included with each product.
You can purchase...
Owner's Manual - Page 4
... help installing the fan, your Hunter fan dealer can do the following tools for and install wood screws. • Identify and connect electrical wires. • Lift 40 pounds.
If you to the fan parts. If one fan, keep the fan blades in sets, as they were shipped.
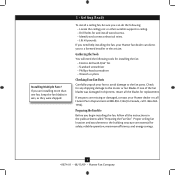
1 • Getting Ready
To install a ceiling fan, be sure you can direct...
Owner's Manual - Page 5
... plate are pointing towards the ceiling peak.
5 41874-01 • 08/13/09 • Hunter Fan Company
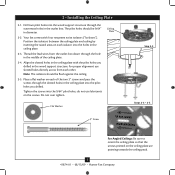
2 • Installing the Ceiling Plate
2-1. For proper alignment use lubricants on each isolator into...box. Ceiling Plate
Flat Washer
3" Screw
Step 2-2 Steps 2-3 - 2-5
For Angled Ceilings: Be sure to orient the ceiling plate so that the arrows printed on each of the ceiling plate.
2-4. ...
Owner's Manual - Page 6
...U-shaped Hole
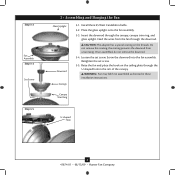
6 41874-01 • 08/13/09 • Hunter Fan Company Do not remove this coating;
Place the glass uplight onto the fan assembly.
3-3. Insert the downrod through the U-shaped hole in these installation..., canopy trim ring, and glass uplight. Loosen the set screw.
3-5. WARNING: Fan may fall if not assembled as directed in the rim of the canopy. Feed the wires from...
Owner's Manual - Page 7
...
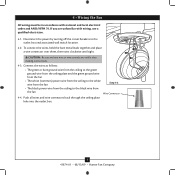
from the fan
• The white (common) power wire from the ceiling to the white wire from the fan
Step 4-3
• The black power wire from ...sure no bare wire or wire strands are unfamiliar with national and local electrical codes and ANSI/NFPA 70. Push all wires and wire connectors back through the ceiling plate hole into the outlet box.
7 41874-01 • 08/13/09 • Hunter Fan...
Owner's Manual - Page 8
... of tabs.
2. The canopy trim ring will flex out releasing the trim ring from the canopy
Canopy Screw
8 41874-01 • 08/13/09 • Hunter Fan Company The tabs will snap and lock into the canopy one at a time. Holding the canopy, raise the...
Owner's Manual - Page 9
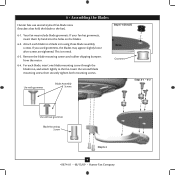
... hand into the holes on the blades.
6-2. If you used grommets, the blades may include blade grommets. 6 • Assembling the Blades
Hunter fans use several styles of fan blade irons (brackets that hold the blade to the fan. Attach each blade, insert one blade mounting screw through the blade iron, and attach lightly to the fan). Remove the blade mounting screws and rubber shipping bumpers...
Owner's Manual - Page 10
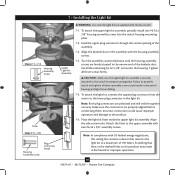
... together one way. Note: In compliance with this fan model.
7-1. Turn the assembly counterclockwise until the housing assembly screws are firmly situated in the narrow end of the assembly.
7-3. Install the remaining #6-32 x 3/8" screw into the switch housing mounting plate.
7-2. CAUTION: Make sure the upper light kit assembly is securely attached to the lower...
Owner's Manual - Page 11
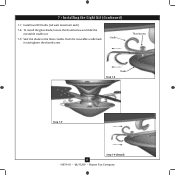
... shade, loosen the thumbscrew and slide the moveable cradle out.
7-9. Cradle
Thumbscrew
Step 7-8
Shade
Step 7-9
Step 7-9 (Detail)
11 41874-01 • 08/13/09 • Hunter Fan Company 7 • Installing the Light Kit (Continued)
7-7.
Owner's Manual - Page 12
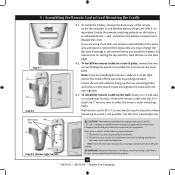
...Light Switch)
CAUTION: The remote control device complies with part 15 of the remote. This device may cause undesired operation. This device must change the dip switch settings in the remote before you are using more than one remote controlled fan in the battery...; Hunter Fan Company Note: If you install the battery. Orient the remote cradle over tighten).
8-3. WARNING: Maximum fan load...
Owner's Manual - Page 13
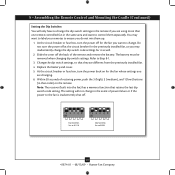
...
3
13 41874-01 • 08/13/09 • Hunter Fan Company At the circuit breaker or fuse box, turn the power back on the remote. The battery must be removed when changing dip switch settings. The setting will only have to change the dip switch settings in the remote if you do not mix them separately. You may...
Owner's Manual - Page 14
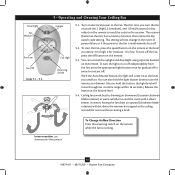
... time you hold the button, the light level will not change in the event of power failure or if the power to the fan is running.
14 41874-01 • 08/13/09 • Hunter Fan Company To turn off the fan, press the off .
9-2. Ceiling fans work best by blowing air downward (counterclockwise blade rotation) in that retains the dip...
Owner's Manual - Page 15
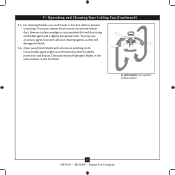
...gloss blades in the same manner as they will damage the finish.
9-6.
Occasionally, apply a light ...blades with a furniture polishing cloth. In cold weather, use an artistic agent, but never abrasive cleaning agents, as the fan finish. 9 • Operating and Cleaning Your Ceiling Fan (Continued)
9-5. You may use upward air flow pattern
15 41874-01 • 08/13/09 • Hunter Fan...
Owner's Manual - Page 16
... when operating, use the enclosed balancing kit and instructions to the fan.
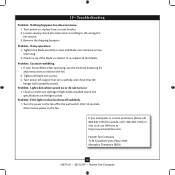
10 • Troubleshooting
Problem: Nothing happens; Remove the shipping bumpers. Problem: If the light on the light socket. Loosen canopy, check all blade iron screws. 3. Turn power off, support fan very carefully, and check that the hanger ball is cracked.
Tighten all connections according...
Parts Guide - Page 1
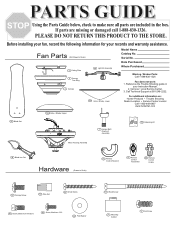
... on: Hunter Products Trouble Shooting Dealer Location Service Center Locator
Call 1-800-448-6837 www.hunterfan.com
150a Gobe / Shade, Upper
46 Blade Set
7 Hanger Ball / Downrod
Assembly
75 Balancing Kit
Motor Housing Assembly
44 Blade Iron Set
Hardware (Drawn to Scale)
2 Ceiling Plate 4 Canopy
Trim Ring 3 Canopy
49 Light Kit Assembly
Model Name Catalog...
Parts Guide - Page 2

... Assembly Setscrew Blade Iron Set Blade Set Screw, Blade Iron Armature Light Kit Assembly * Hardware Kit Blade Grommet Blade Assembly Screw Screw, Machine, 6-32 Wire Nut Balancing Kit Remote Control Receiver Remote Control Transmitter Remote Control Cradle Globe / Shade, Lower Globe / Shade, Upper
Model # Asm. Dwg. #
Finish
Qnty 1 1 1 1 4 2 2 4 4 1 1 1 1 10 1 1 15 15 3 4 1 1 1 1 1 1
23298 95142...
Similar Questions


Where Can I Buy A Receiver For My Hunter Ceiling Fan Model# 23298-380
(Posted by Akyles 3 years ago)

Fan Works Ok, Lights Blink, 2 Different Fans.
fan works OK, lights blink, 2 different fans.
fan works OK, lights blink, 2 different fans.
(Posted by Andrew7285 4 years ago)

Im Trying To Troubleshoot My Fan Its Not Working There Was Power But The Fan Wil
(Posted by Vbroward 8 years ago)

Where I Can Get A Receiver For My Hunter Model 23298-380
(Posted by ntalvarez 10 years ago)