Hoover UH70120 Support Question
Hoover UH70120 Support Question
Find answers below for this question about Hoover UH70120 - WindTunnel T-Series Rewind Bagless Upright.Need a Hoover UH70120 manual? We have 1 online manual for this item!
Question posted by mo7gyr on January 29th, 2014
Hoover Windtunnel Uh70120 Rewind Cord Won't Pull Out
The person who posted this question about this Hoover product did not include a detailed explanation. Please use the "Request More Information" button to the right if more details would help you to answer this question.
Current Answers
Related Hoover UH70120 Manual Pages
Manual - Page 1
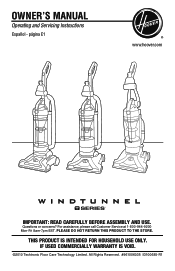
página E1
www.hoover.com
IMPORTANT: READ CAREFULLY BEFORE ASSEMBLY AND USE. PLEASE DO NOT RETURN THIS PRODUCT TO THE STORE. Owner's Manual
Operating and Servicing Instructions
Españ...
Manual - Page 2
...vacuum)
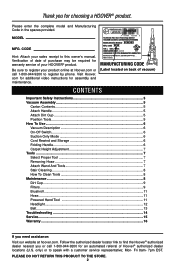
Contents
Important Safety Instructions 3 Vacuum Assembly 5
Carton Contents 5 Attach Handle 5 Attach Dirt Cup 5 Position Tools 5 How To Use...6 Vacuum Description 6 On-Off Switch 6 Suction Only Mode 6 Cord Rewind.... Visit Hoover. com for additional video instructions for warranty service of Hoover® authorized dealer locations (U.S. CODE
Hint: Attach your HOOVER® ...
Manual - Page 3
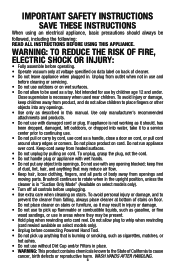
... and all controls before operating. • Operate vacuum only at bottom of cleaner. • Do ...on cord. Keep cord away from heated surfaces. • Do not unplug by pulling on cord....upright position, unless the cleaner is burning or smoking, such as described in place. • WARNING: This product contains chemicals known to the State of California to whip when rewinding (cord rewind...
Manual - Page 4

... damage. IMPORTANT: READ CAREFULLY BEFORE ASSEMBLY AND USE. PLEASE DO NOT RETURN THIS PRODUCT TO THE STORE.
4 Questions or concerns? Always put the cleaner in upright
position. If the plug does not fit fully in any way. This plug will fit in a polarized outlet only one blade is in "Suction Only...
Manual - Page 5
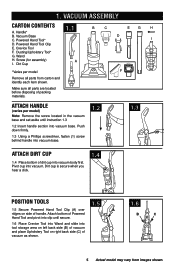
... until instruction 1.3
1.2 Insert handle section into tool storage area on left back side (B) of vacuum and place Upholstery Tool on side of dirt cup into vacuum. Vacuum Base C. Push down firmly.
1.3 Using a Phillips screwdriver, fasten (1) screw behind handle into vacuum base.
1.2
1.3
Attach dirt cup
1.4 Place bottom of handle. Crevice Tool F. Dusting/Upholstery Tool* G.
Handle...
Manual - Page 6
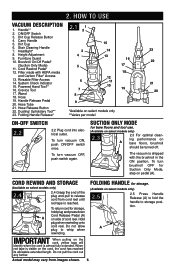
... Handle 5. Cord Rewind Pedal* 12.
Cord Rewind AND STORAGE
(Available on side of the plug and pull to whip when rewinding. Brushroll On/Off Pedal*
(Suction Only Mode) 11. Do not allow plug to release cord from images shown. 6 Wand 18. Hose Release Button 22.
When red tape is reached. Handle** 2. System Check Indicator 15. The vacuum is...
Manual - Page 7
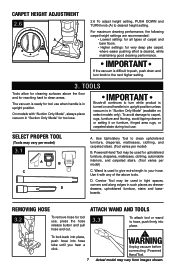
...; Higher settings: for tool use , press the hose release button and pull hose end out. WARNING
Unplug vacuum before connecting Powered Hand Tool. For maximum cleaning performance, the following carpet ... to push, push down and turn while product is turned on and handle is in upright position unless vacuum is in "Suction Only Mode" (available on furniture, fringed area rugs, or carpeted ...
Manual - Page 8
...Suction Only Mode" pedal (available on select models only) as follows:
1.
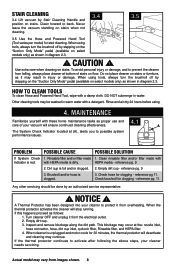
Never leave the vacuum standing on stairs when not cleaning.
3.4
3.5
3.5 Use the Hose and Powered Hand Tool... made with
Indicator is unplugged and motor cools for clogging - Stair Cleaning
3.4 Lift vacuum by Stair Cleaning Handle and position on floor. MAINTENANCE
4.1 Familiarize yourself with a detergent...
Manual - Page 9
...Hoover® Part No.303173001.
9 Actual model may vary from moving parts, unplug vacuum before servicing.
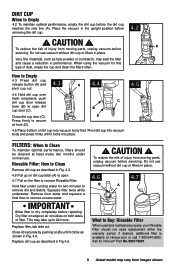
Hold filter under normal use vacuum without dirt cup or filters in the upright...cup door release lever (B) to open .
4.7 Pull on dirt cup latch (A) to remove dirt and debris. Remove from moving parts, unplug vacuum before servicing.
Ask for two minutes to open ...
Manual - Page 10
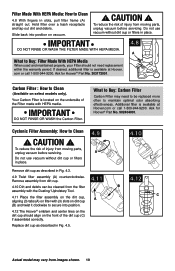
... secure into position on the front of injury from moving parts, unplug vacuum before servicing. Ask for Hoover® Part No. 303172001. To reduce the risk of the dirt cup (C) if assembled correctly. Replace dirt cup as described in slots, pull filter frame (A) straight out.
Actual model may need replacement
within the warranty...
Manual - Page 11
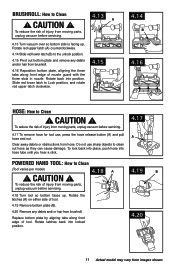
...model may vary from brushroll. Do not use , press the hose release button (A) and pull hose end out. Replace bottom plate by aligning tabs along front edge of nozzle guard with... tool.
4.19 Remove bottom plate (B).
4.20 Remove any debris and/or hair from moving parts, unplug vacuum before servicing.
4.18 Turn tool so bottom faces up . Rotate red upper latch (A) counterclockwise.
4.14 Slide...
Manual - Page 12
...
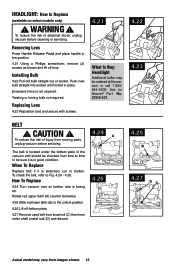
4.22 Pull old bulb straight out of electrical shock, unplug vacuum before servicing.
4.24 A
The belt is located under the bottom plate of the vacuum and should be checked from images shown. 12 Ask for Hoover® ... to buy: headlight
Additional bulbs may vary from time to time to replace
4.24 Turn vacuum over so bottom side is not required. To check the belt, refer to replace
(available...
Manual - Page 13
...No. 38528058 or AH20080.
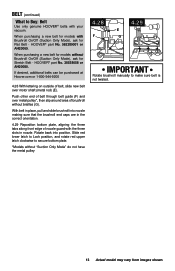
Belt (continued)
What to Buy: Belt
Use only genuine HOOVER® belts with Brushroll On/Off (Suction Only Mode), ask for Flat Belt -...in place, pull and slide brushroll into position. When purchasing a new belt for models without Brushroll On/Off (Suction Only Mode), ask for models with your vacuum.
If desired, additional belts can be purchased at Hoover.com or ...
Manual - Page 14
...below. Pg. 11. 5.
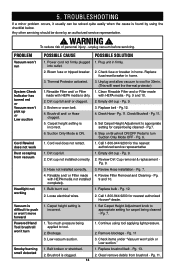
PROBLEM
Vacuum won't run
System Check Indicator has turned red or Vacuum won't pick up or Low suction
Cord Rewind does not work Dust escaping from brushroll... Hoover® dealer.
1. Review Dirt Cup removal & replacement Pg. 9.
3. completely.
1. Carpet height setting is incorrect.
5. Pg. 13. 2. Review Filter Removal and Cleaning - Blockage. 3. unplug vacuum ...
Manual - Page 15

... service representative call 1-800-944-9200. Do not send your vacuum by :
• Checking the Yellow Pages under "Vacuum Cleaners" or "Household". • Visit our website at hoover.com (U.S. Service
To obtain approved Hoover® service and genuine Hoover® parts, locate the nearest Authorized Hoover® Warranty Service Dealer (Depot) by the complete model number...
Manual - Page 16

...automated referral to authorized service outlets in the United States, U.S.
IN NO EVENT WILL HOOVER BE LIABLE FOR ANY SPECIAL, INDIRECT, INCIDENTAL OR CONSEQUENTIAL DAMAGES OF ANY KIND OR NATURE... and in a commercial operation (such as warranted, take or send the product to a Hoover® Authorized Warranty
Service Dealer, cost of shipping will not be governed and construed under this...
Similar Questions

Hoover Windtunnel T-series Rewind Upright Vacuum Bagless Uh70120 Motor Wont
work
work
(Posted by rexadria 9 years ago)

Hoover Windtunnel T Series Cord Won't Retract
(Posted by ragrph 10 years ago)

Wont Turn On Hoover Windtunnel T-series Pet Rewind Plus Upright Vacuum Bagless
uh70210
uh70210
(Posted by rerecjrot 10 years ago)

Hoover Windtunnel T Series Rewind, Cord Wont Pull Out
(Posted by paulstaba 10 years ago)
My Hoover Windtunnel T-series Pet Rewind Bagless Upright Vacuum Wont Turn On.
I cleaned out underneath and emptied it and it won't turn on. Plugged into different plugs and still...
I cleaned out underneath and emptied it and it won't turn on. Plugged into different plugs and still...
(Posted by megancorgan 11 years ago)