Hoover UH70107 Support Question
Hoover UH70107 Support Question
Find answers below for this question about Hoover UH70107.Need a Hoover UH70107 manual? We have 1 online manual for this item!
Question posted by lvladybug1 on October 21st, 2012
How Do I Change The Belt?
I can not find my instructions and want to put a new belt on.
Current Answers
Related Hoover UH70107 Manual Pages
Manual - Page 1
... Techtronic Floor Care Technology Limited. For assistance, please call Customer Service at 1-800-944-9200 Mon-Fri 8am-7pm EST.
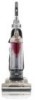
Owner's Manual
Operating and Servicing Instructions
Español - PLEASE DO NOT RETURN THIS PRODUCT TO THE STORE. página E1
www.hoover.com
IMPORTANT: READ CAREFULLY BEFORE ASSEMBLY AND USE...
Manual - Page 2
... do not return this owner's manual. Verification of date of purchase may be required for warranty service of vacuum)
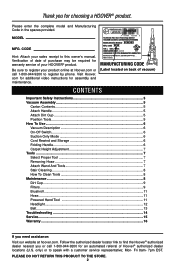
Contents
Important Safety Instructions 3 Vacuum Assembly 5
Carton Contents 5 Attach Handle 5 Attach Dirt Cup 5 Position Tools 5 How To Use...6 Vacuum Description 6 On-Off Switch 6 Suction Only Mode 6 Cord Rewind and Storage 6 Folding Handle 6 Carpet Height Adjustment...
Manual - Page 3
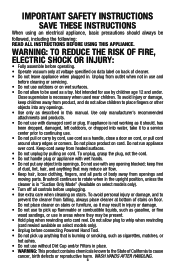
...injury or damage, and to cause cancer, birth defects or reproductive harm. IMPORTANT SAFETY INSTRUCTIONS
SAVE THESE INSTRUCTIONS
When using an electrical appliance, basic precautions should , has been dropped, damaged, ... FIRE, ELECTRIC SHOCK OR INJURY:
• Fully assemble before operating. • Operate vacuum only at bottom of cleaner. • Do not leave appliance when plugged in use ...
Manual - Page 4

... damage. • Store in "Suction Only Mode" (Available on furniture, fringed area rugs, or carpeted stairs during tool use. • Do not use . Do not change the plug in the outlet, reverse the plug.
If it on select models only) during tool use sharp objects to turn while product is turned...
Manual - Page 5
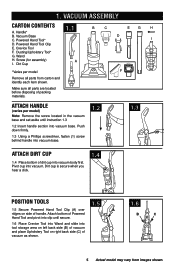
... handle
(varies per model
Remove all parts are located before disposing of handle. B
C
EG
H
D I . Handle* B. Powered Hand Tool Clip E. Wand H.
Crevice Tool F. Dusting/Upholstery Tool* G. Vacuum Base C. Attach bottom of Powered
Hand Tool and pivot into clip until instruction 1.3
1.2 Insert handle section into tool storage area on left back side (B) of...
Manual - Page 6
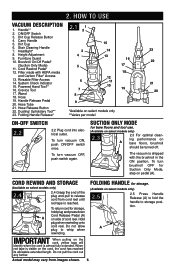
... in the ON position. Powered Hand Tool** 16. Handle Release Pedal 20.
To turn vacuum OFF, push switch again. To turn brushroll OFF for bare floors and tool use.
(... When red tape is shipped with HEPA media
and Carbon Filter* Access 13. 2. HOW TO USE
Vacuum Description
1. Handle** 2. ON/OFF Switch 3. Carry Handle 5. Height Adjustment 9. Furniture Guard 10. Brushroll...
Manual - Page 7
... (Tool varies per model)
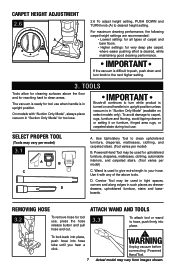
C. TOOLS
Tools allow for cleaning surfaces above tools. The vacuum is desired, while maintaining good cleaning performance. Removing Hose
Attach Wand and Tools
3.2
To...may be used in tight spaces, corners and along edges in upright position. WARNING
Unplug vacuum before connecting Powered Hand Tool. CARPET HEIGHT ADJUSTMENT
2.6
A
2.6 To adjust height setting...
Manual - Page 8
... or damage. Actual model may result in warm water with a damp cloth. How to protect it from falling, always place cleaner at bottom of your vacuum will ensure continued cleaning effectiveness.
reference pg 11.
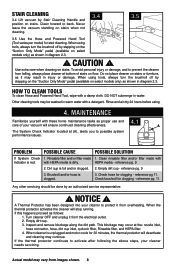
Clean forward to activate after following the above steps, your cleaner to Clean Tools
To clean Hose...
Manual - Page 9
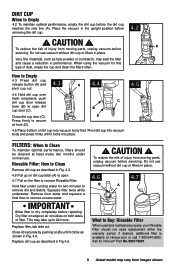
...When to Empty
4.2 To maintain optimal performance, empty the dirt cup before replacing. Do not use vacuum without dirt cup or filters in place.
4.6
4.7
B
A
What to Clean
Remove dirt cup... Filter should not need replacement within the warranty period.
Hold filter under normal use vacuum without dirt cup or filters in performance. IMPORTANT
Allow filter to remove excess water....
Manual - Page 10
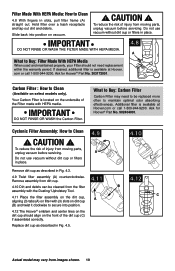
... be replaced more often to secure into position on the underside of injury from moving parts, unplug vacuum before servicing. C
4.11 Place the filter assembly on the dirt cup,
A
aligning (3) tabs... and center lines on the front of injury from moving parts, unplug vacuum before servicing. Do not use vacuum without dirt cup or filters in slots, pull filter frame (A) straight out...
Manual - Page 11
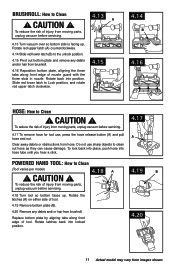
...plate and remove any debris and/ or hair from moving parts, unplug vacuum before servicing.
4.13 A
4.13 Turn vacuum over so bottom side is facing up .
Rotate latches back into ...Reposition bottom plate, aligning the three tabs along front edge of injury from moving parts, unplug vacuum before servicing.
4.18 Turn tool so bottom faces up .
Rotate red upper latch (A) ...
Manual - Page 12
... parts, unplug vacuum before cleaning or servicing.
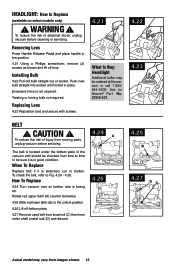
removing lens
Press Handle Release Pedal and place handle in place.
Twisting or turning bulb not required.
Push new bulb straight into...is stretched, cut or broken.
com or call 1-800944-9200. To check the belt, refer to replace
4.24 Turn vacuum over so bottom side is facing up.
Excessive force is not required.
CAUTION ! ...
Manual - Page 13
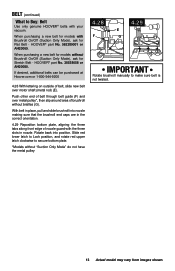
... back into nozzle making sure that the brushroll end caps are in nozzle. Push other end of nozzle guard with your vacuum.
When purchasing a new belt for models with Brushroll On/Off (Suction Only Mode), ask for models without "Suction Only Mode" do not have the metal pulley
4.28
F
4.29
E G
IMPORTANT
...
Manual - Page 14
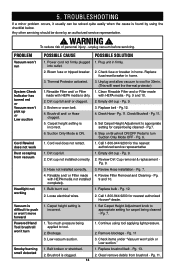
...for carpet being cleaned - Dirt cup full.
1. Pg. 9.
2. completely.
1. Carpet height setting is clogged.
14
1. Pg. 7.
1. Low vacuum suction.
1. Brushroll is incorrect.
2. Remove blockage - Replace brushroll belt - WARNING !
unplug vacuum before servicing. Check fuse or breaker in firmly. Thermal Protector activated.
3. Empty dirt cup - Pg.12.
4. Check Brushroll...
Manual - Page 15
... outlet nearest you need further assistance: To speak with a customer service representative call 1-800-944-9200. If you . • For an automated referral of the vacuum.) PLEASE DO NOT RETURN THIS PRODUCT TO THE STORE.
15 6. Customers) or hoover.ca (Canadian customers). Follow the service center link to Hoover®, Inc...
Manual - Page 16

... WARRANTY AND REMEDY PROVIDED BY HOOVER®. you specific rights;
7. OTHER IMPORTANT TERMS This Warranty is not as maid, janitorial and equipment rental services), brushroll, belt, improper maintenance of the product, damage due to misuse, acts of God, nature, vandalism or other acts beyond the control of Hoover®, owner's acts...
Similar Questions

How To Change Belt For Power Nozzle?
How to change belt for power nozzle?
How to change belt for power nozzle?
(Posted by Missionnews777 1 year ago)

I Need To Change Belt On My Fh52000. Help!
My smartwash started to smell like a burning smell and then stopped. It won't turn on. I am getting ...
My smartwash started to smell like a burning smell and then stopped. It won't turn on. I am getting ...
(Posted by chooselove67 2 years ago)


For Model U8187950 There Are No Instructions To Change Belt That I Can Find...
(Posted by tim38339 10 years ago)

I Just Purchase Hoover Uh70107 Are There Any Problems With This Vacumn
(Posted by Anonymous-100009 11 years ago)