
Hoover BH53210 Support Question
Hoover BH53210 Support Question
Find answers below for this question about Hoover BH53210.Need a Hoover BH53210 manual? We have 1 online manual for this item!
Question posted by zerena31 on June 26th, 2022
My Hoover Bh53120 Mode Button Is Not Working. Please Advise
The person who posted this question about this Hoover product did not include a detailed explanation. Please use the "Request More Information" button to the right if more details would help you to answer this question.
Current Answers
Answer #1: Posted by Odin on June 26th, 2022 12:58 PM
Odin

Member since:
April 10th, 2010 Points: 41,236,640

Member since:
April 10th, 2010 Points: 41,236,640
How do you know it's not working? Review the instructions at https://www.manualslib.com/manual/1333163/Hoover-React-Bh53200-Ca.html?page=12&term=mode&selected=6#manual.
If the issue persists or if you require further advice, you may want to consult the company: use the contact information at https://www.contacthelp.com/hoover.
If the issue persists or if you require further advice, you may want to consult the company: use the contact information at https://www.contacthelp.com/hoover.
Hope this is useful. Please don't forget to click the Accept This Answer button if you do accept it. My aim is to provide reliable helpful answers, not just a lot of them. See https://www.helpowl.com/profile/Odin.
Answer #2: Posted by SonuKumar on June 26th, 2022 9:59 PM
SonuKumar

Member since:
May 9th, 2021 Points: 16,641,160
Member since:
May 9th, 2021 Points: 16,641,160
you have to replace button - avoid repair at home
Please respond to my effort to provide you with the best possible solution by using the "Acceptable Solution" and/or the "Helpful" buttons when the answer has proven to be helpful.
Regards,
Sonu
Your search handyman for all e-support needs!!
Related Hoover BH53210 Manual Pages
Product Manual - Page 2

See warranty for up to Hoover® ownership. Get cleaning confidence for complete details.
2 Register your vacuum by:
Visiting Hoover.com or Hoover.ca
Calling 877 839-2046
IT'S GUARANTEED. Welcome to 3 years with the Hoover limited warranty.
Make it official.
Product Manual - Page 3

... Wall Bracket...9 Charging your ONE PWR™ Lithium Battery...10 Hoover® FloorSense™ Technology...11 Hoover® Dashboard and FloorSense™ Technology...12 Using the Hoover App...13 Quick Start...14 Using your Vacuum...15 Using your Vacuum as a Handheld...16 Using your Vacuum to Clean Up High...17 Maintenance: Removing the ONE PWR™...
Product Manual - Page 4

...with your finger on the trigger or energizing appliances that are powered on cord. Use only Hoover® recommended attachments and products.
• Do not use by pulling on cord. keep...Hoover® to rain. WARNING: TO REDUCE THE RISK OF FIRE,
ELECTRIC SHOCK, DAMAGE OR INJURY:
• Fully assemble before connecting to place fingers or other small metal objects that is not working...
Product Manual - Page 5
.... Contains transmitter module IC:12246A-BM70BLES1F2
CAN ICES-3 (B)/NMB-3(B) This device complies with Hoover Battery Part #BH04000 only.
WASH HANDS AFTER HANDLING.
5 This equipment generates, uses ...on the lithium-ion (Li-ion) battery indicated Techtronic Industries, a corporate affiliate of Hoover, is not more of the device. Do not disassemble, heat above manufacturer's maximum ...
Product Manual - Page 6
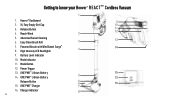
...13
Release Button 15. Charger Indicator
8
6 XL Easy Empty Dirt Cup
10
3. High Intensity LED Headlights
9. Power Trigger
13. Reach Wand
11 12 2
5. Advanced Swivel Steering
6. Mode Button
12. Release Button 4. Hoover® Dashboard
9
2. ONE PWR™ Lithium Battery
15
14. Battery Level Indicator
10. Getting to know your Hoover® RE AC T™ Cordless Vacuum
1
1.
Product Manual - Page 9
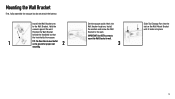
.... Mark the Wall Anchor locations. Position the Wall Bracket behind the Handheld so that the hook holds the vacuum.
1
TIP: The Floor Nozzle must be flat on the Wall Mount Bracket until it locks into the slot on the ground...Storage Part into place.
9
Install the Wall Bracket arm to the Wall Bracket. Mounting the Wall Bracket
First, fully assemble the vacuum but do not attach the battery.
Product Manual - Page 11
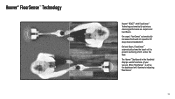
On carpet, FloorSense™ automatically increases the brush roll speed to prevent scattering of your vacuum. When FloorSense™ is active, the dashboard will illuminate indicating "FloorSense".
11 Hoover® FloorSense™ Technology
Hoover® REACT™ with FloorSense™ Technology automatically optimizes cleaning performance on carpets and hard floors. On hard ...
Product Manual - Page 12

... and debris across hard floors and area rugs.
1
2
When the mode button has been pressed and no words illuminate on the Hoover® Dashboard, the brush roll is ON and perfect for lifting and...and optimize brush roll speed automatically, ensure FloorSense™ is a system error. Hoover® Dashboard and FloorSense™ Technology
TIP: To allow FloorSense™ to the Maintenance section for further...
Product Manual - Page 13

Hoover® REACT™ vacuums are trademarks of Apple Inc., registered in the U.S. Download the Hoover® App to the Hoover® App. Access tips and tricks
...countries. App Store is a service mark of Google Inc.
13 Using the Hoover® App
TIP: Pull power trigger to illuminate the Hoover® Dashboard and connect to :
1. Troubleshoot System Maintenance 4. and other...
Product Manual - Page 15

... to power OFF.
1
2
Push the "Mode" button on the Hoover® Dashboard if you'd like to turn the vacuum ON.
Turn power switch OFF and remove the battery before cleaning or servicing the brush roll.
15 When the battery level is getting low, recharge the battery.
3
4
WARNING
This vacuum cleaner has a constantly rotating brush roll...
Product Manual - Page 16
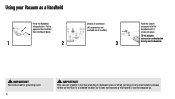
... a Handheld
Press the Handheld release button. In between uses or when carrying out any maintenance always
lie flat on . Pull to be used for grooming a pet.
16
IMPORTANT
This vacuum cleaner is not free standing. IMPORTANT
Not to separate the Handheld from the Reach Wand.
1
2
Choose an accessory. (All accessories not available...
Product Manual - Page 17

... Reach Wand until it does not become a trip hazard or can be stepped on.
17 IMPORTANT
This vacuum cleaner is not free standing. Using your Vacuum to Clean Up High
Press the Powered Nozzle release button and pull to remove the Powered Nozzle from the Reach Wand.
1
2
Choose an accessory (all accessories not...
Product Manual - Page 18

Maintenance: Removing the ONE PWR™ Lithium Battery
Lie the Handheld on its side on charger.
Pull the "Battery Release Button" back to release the ONE PWR™ Lithium Battery.
WARNING
To reduce the risk of the Handheld.
1
2
3
Place ONE PWR™ Lithium Battery on a flat ...
Product Manual - Page 19
... not free standing.
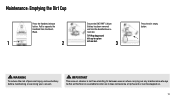
Pull to capture
dirt and dust.
3
Press the dirt empty button. Maintenance: Emptying the Dirt Cup
Press the Handheld release button. WARNING
To reduce the risk of personal injury, remove battery before maintaining or servicing your vacuum.
TIP: Wrap bag around
dirt cup to separate the Handheld from the Reach...
Product Manual - Page 20

... CHEMICALS TO CLEAN. Push the dirt cup backwards, until water is clear. To reassemble, align the hook to remove dirt. Press the dirt cup release button and pull the dirt cup away.
1
2
To clean the separator, lift to dry for 24 hours or until completely dry before maintaining or servicing your...
Product Manual - Page 21

... to remove from the Powered Nozzle.
1
2
Clear any threads or hair from Reach Wand. Turn the Powered Nozzle upside down.
Slide the Brush Roll Release Button. Re-fit the brush roll into the housing.
3
4
WARNING
Risk of personal injury - Turn power OFF and remove the battery before cleaning or servicing the...
Product Manual - Page 22

... Tool Part #440011814
Powered Stair Tool Part #440011449
Above Floor Extension Part #440011450
Reach Wand Tool Storage Clip Part #440011451
WHAT TO BUY:
Buy Genuine Hoover® Parts & Accessories:
If you are in need of a new part, attachment or accessory, visit...
Product Manual - Page 23

...you fill the dirt cup or at least once a month. If appliance is not working as it . WARNING
To reduce the risk of product for 24 hours or until completely dry ...3 hours. QUESTIONS OR CONCERNS?
Your filter should be done by an authorized service representative. My Hoover® REACT™Cordless Vacuum isn't picking up well.
You may take it 's low. If found, remove the clog. ...
Product Manual - Page 24
... and manufacturing code when requesting information or ordering replacement parts. (The model number and manufacturing code for the vacuum appears on the bottom and/or back of the product, and on how to a Hoover® Authorized Warranty Service Dealer along with proof of the product, damage due to be paid one nearest...
Product Manual - Page 80

#RethinkCleaning
Hoover.com
FIND US ON:
youtube.com/hoover
facebook.com/hoover
twitter.com/hooverusa
Similar Questions

Hoover Won't Stay On
when I step on red lever to turn on it won't stay on .when I take foot off power leve
when I step on red lever to turn on it won't stay on .when I take foot off power leve
(Posted by canadiengoose 9 months ago)


Power Button Won't Work! Please Help...
I own a Hoover Vacuum model number UH70800, it's less then a year old.. The power button just stoppe...
I own a Hoover Vacuum model number UH70800, it's less then a year old.. The power button just stoppe...
(Posted by sueflint5 8 years ago)

My Hoover Uh70086 Just Stopped Working Is There A Reset Button...anywhere
(Posted by pacogilsner 11 years ago)

How Do I Switch From The Tools?
I was given a U55079RM without a users manual. How can I switch from the tools mode to the main vacu...
I was given a U55079RM without a users manual. How can I switch from the tools mode to the main vacu...
(Posted by stitchluvr 12 years ago)