
Honeywell CT3200 Support Question
Honeywell CT3200 Support Question
Find answers below for this question about Honeywell CT3200.Need a Honeywell CT3200 manual? We have 1 online manual for this item!
Question posted by registeronly on December 1st, 2011
How To Remove Honeywell Ct3200 From Wall?
The person who posted this question about this Honeywell product did not include a detailed explanation. Please use the "Request More Information" button to the right if more details would help you to answer this question.
Current Answers
Answer #1: Posted by quaff on December 1st, 2011 1:55 PM
quaff

Member since:
November 13th, 2011 Points: 537,590

Member since:
November 13th, 2011 Points: 537,590
Along the bottom of the thermostat, where it meets the wall mounting plate, there are a couple of slots. Use a coin or flathead screw driver in these slots to separate the thermostat from the plate. Once the bottom is separated, simply pull the rest of the unit off by hand. The mounting plate is held in place by a couple of screws.
Related Honeywell CT3200 Manual Pages
Owner's Manual - Page 1

...-468-1502. If you comfortable while saving energy.
Your new thermostat will automatically control the temperature in your new Honeywell MagicStat® Programmable Thermostat.
Registered Trademark Copyright © 2001 Honeywell • All Rights Reserved
69- 0653- 6 MagicStat® CT3200 Programmable Thermostat
Installation and Programming Instructions
Weekday/Weekend (5-day/2-day...
Owner's Manual - Page 2
... Web at www.honeywell.com/yourhome or call Honeywell Customer Relations at 1-800-468-1502.
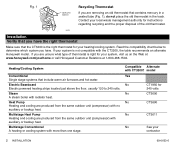
Compatible Alternate with no auxiliary or backup heat. If your system is not compatible with more than one stage. Fig. 1
MERCURY SWITCH
Recycling Thermostat
If you have the right thermostat
Make sure that the CT3200 is the right thermostat for your...
Owner's Manual - Page 3

... Gather the needed tools and supplies listed below 50°F (10°C).
69-0653-6
INSTALLATION 3 Honeywell recommends Energizer® • Wire cutter/stripper or sharp knife
batteries.
• Level
• ...after you have the following parts:
• Thermostat and mounting plate • Labels
• Screws and anchors • Installation and Programming Instructions
...
Owner's Manual - Page 4

... cover of the terminal that are extra wires that it . Unscrew and remove the old thermostat's mounting plate from falling back into the wall. Disconnect the wires from the old thermostat and wrap the wires around a pencil to the old thermostat.
Turn off power to on page 10.
e. See page 2 for more wires, excluding wires...
Owner's Manual - Page 5
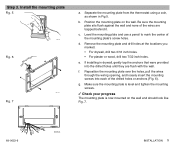
... the center of the drilled holes or anchors (Fig. 6). If installing in Fig 5.
Remove the mounting plate and drill holes at the locations you marked. • For drywall, ... e. b.
Be sure the mounting plate sits flush against the wall and none of the wires are flush with the wall. Separate the mounting plate from the thermostat using a coin, as shown in drywall, gently tap the ...
Owner's Manual - Page 6
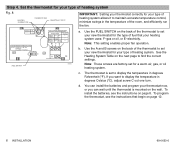
... ONE TURN SCREW B-IN FUEL SWITCH - Use the A and B screws on the back of the thermostat to display the temperature in the temperature of fuel that begin on the wall. Note: These screws are factory-set your new thermostat for your heating system uses: F-gas or oil, or E-electricity. Step 4. You can wait...
Owner's Manual - Page 7

... F
F F E
Step 5.
Type of the old wires to the new thermostat. See the special wiring instructions on the new thermostat terminals, you might not need to connect all of system Warm air, gas...-0653-6
END OF WIRE VISIBLE HERE
M20126
INSTALLATION 7 Note: If the letters on the old thermostat terminals do not match the letters on page 9 for details.
Heating System Table Note: Setting ...
Owner's Manual - Page 8

... OFF position. Install the batteries
Fig. 13
Fig. 14
M1719C
REMOVING BATTERY DOOR
8 INSTALLATION
M20131
IMPORTANT: Batteries must be installed for programming and operation of the mounting plate (Fig. 11). Honeywell recommends using Energizer® batteries. a. d.
Align the tabs at the top of the thermostat with the tabs at the top of the...
Owner's Manual - Page 9

... your system.
See the compatibility table on page 2 for heating only and can operate the fan using the fan ON switch, the 3200 thermostat will probably NOT work with your old thermostat, do not allow the clock to your system.
Continue the installation procedure on page 4, step 2e. Special wiring instructions
A clock...
Owner's Manual - Page 10
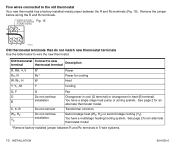
... (O terminal) or changeover in 5-wire systems.
10 INSTALLATION
69-0653-6 Second stage heat (W2, H2) or second stage cooling (Y2).
See page 2 for an alternate thermostat model.
*Remove factory-installed jumper between the R and Rc terminals (Fig. 15). You have a multistage heating/cooling system. Five wires connected to the old...
Owner's Manual - Page 11

...1 Fan switch-Selects automatic fan operation or fan on
(page 17)
9
2 Set Schedule-Puts the thermostat into programming
10
mode (page 14)
11
3 Set Clock/Day-Sets the clock and day (page ...11 Temp Warmer and Cooler-Sets the temperature warmer and cooler (page 14)
12 Run Program-Returns thermostat to normal operating mode
13 Hold Temp-Holds a selected temperature (page 19) 14 System switch-Selects...
Owner's Manual - Page 12

Fig. 17
b.
Learn about the programming features
Your 3200 thermostat allows you to two program periods for both a heating season and a cooling season. • During the heating season, you can set the normal room temperature ...
Owner's Manual - Page 13
.... The time when you left off.
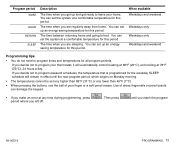
. Program period
WAKE
LEAVE RETURN
SLEEP
Description
The time when you get up and get ready to leave your thermostat, it will remain in effect until you are regularly away from home.
Owner's Manual - Page 16

... below 50°F (10°C). This delay protects the compressor.
16 PROGRAMMING
Fig. 25
Fig. 26
69-0653-6 Press
until the setting is changed, the thermostat may delay up to AUTO.
Set the System switch to program the weekday and weekend cooling schedule. c. Your heating system should start and the fan...
Owner's Manual - Page 17

Set the System switch to OFF and the Fan switch to the G terminal on the bottom of the thermostat faceplate (Fig. 16 page 11) control the operation of the thermostat.
69-0653-6
OPERATION 17
Set the Fan and System switches
The switches on the back of your fan and the heating and cooling...
Owner's Manual - Page 18

...month, change the batteries before leaving to prevent the system from shutting down due to lack of removing the old ones, you will not have to reprogram. Note: If "bAt Lo" continues to.... a. c. Install the new batteries. e. Replace the batteries
As the batteries run low, your thermostat shows the following in the digital display:
If you are dead or incorrectly installed and you will...
Owner's Manual - Page 21

... temperature setting is higher than the current room temperature and
the SYSTEM ON arrow is displayed, the thermostat is set the System switch to OFF and insert the batteries backwards for five to reset the thermostat. Remove the batteries and then insert them as soon as possible. Contact a heating contractor for correct wiring...
Owner's Manual - Page 22
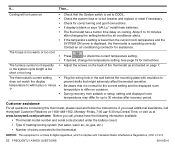
... page 7. Be aware that might adversely affect thermostat operation. Check for assistance. The thermostat has a built-in the wall behind the mounting plate with Canadian Radio Interference Regulations...Time, or visit us at www.honeywell.com/yourhome. Before you need additional assistance, call , please have the following information available:
• Thermostat model number and serial code (...
Owner's Manual - Page 23

... be free from defects in the possession of time.
MN10-3860 1885 Douglas Drive North Golden Valley, MN 55422-3992
Honeywell Canada: Honeywell Limited/Honeywell Limitée 35 Dynamic Drive Scarborough, Ontario M1V 4Z9
This warranty does not cover removal or reinstallation costs. This warranty shall not apply if it is defective or malfunctions...
Owner's Manual - Page 24

www.honeywell.com/yourhome
Home and Building Control Honeywell 1985 Douglas Drive North Golden Valley, MN 55422
69-0653-6 Rev. 9-01
Home and Building Control Honeywell Limited-Honeywell Limitée 35 Dynamic Drive Scarborough, Ontario M1V 4Z9
Printed in the U.S.A.
Similar Questions

Want To Replace An Old Honeywell Thermostat Model With A Newer Updated Model.
I want to replace a manual Honeywell Chronotherm Thermostat with an updated digital type. The model ...
I want to replace a manual Honeywell Chronotherm Thermostat with an updated digital type. The model ...
(Posted by Wjvivola 3 years ago)

Honeywell Thermostat Ct3200- Cooling Does Not Come On
(Posted by sdceasyg 9 years ago)
How To Remove Honeywell Rth2310b Thermostat From Mount
(Posted by smitjkorn 9 years ago)

Magicstat Ct3200 Programmable Thermostat How To Switch To Celsius
(Posted by f1fKE 10 years ago)
