
Homelite UT13126 Support Question
Homelite UT13126 Support Question
Find answers below for this question about Homelite UT13126.Need a Homelite UT13126 manual? We have 1 online manual for this item!
Question posted by Anonymous-168331 on May 14th, 2021
Not The Right Manual.
Not the right manual. This is for the 122. Not the 126. The starting procedure is utilizing parts not available on the UT 13126 model.
Current Answers
Answer #1: Posted by Odin on May 14th, 2021 8:54 AM
Odin

Member since:
April 10th, 2010 Points: 41,236,690

Member since:
April 10th, 2010 Points: 41,236,690
The manual for your UT13126 is at https://www.manualslib.com/manual/591497/Homelite-Ut13122.html#product-UT13126. If you perceive a problem with this manual you may want to consult Homelight: use the contact information at https://www.contacthelp.com/homelight/customer-service.
Hope this is useful. Please don't forget to click the Accept This Answer button if you do accept it. My aim is to provide reliable helpful answers, not just a lot of them. See https://www.helpowl.com/profile/Odin.
Related Homelite UT13126 Manual Pages
User Manual - Page 1
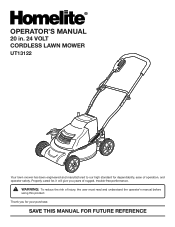
... , it will give you years of rugged, trouble-free performance. SAVE THIS MANUAL FOR FUTURE REFERENCE Properly cared for your purchase. WARNING: To reduce the risk of operation, and operator safety.
OPERATOR'S MANUAL
20 in. 24 VOLT CORDLESS LAWN MOWER
UT13122
Your lawn mower has been engineered and manufactured to our high standard for dependability, ease...
User Manual - Page 2
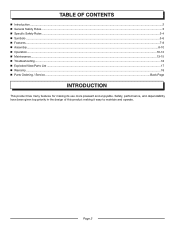
...61550; Symbols ...5-6 Features...7-8 Assembly...8-10 Operation...10-12 Maintenance...13-15 Troubleshooting...16 Exploded View/Parts List ...17 Warranty ...18 Parts Ordering / Service ...Back Page
INTRODUCTION
This product has many features for making it easy to maintain and operate. Safety, performance, and dependability have...
User Manual - Page 3
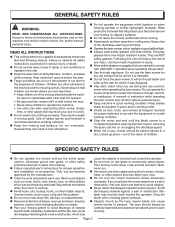
... the right appliance. Poor footing could cause a slip and fall accident. Overreaching can be thrown by the manufacturer.
Clear the work area before cleaning the lawn mower, removing...READ AND UNDERSTAND ALL INSTRUCTIONS. Keep blades sharp and guards in place and in moving parts. READ ALL INSTRUCTIONS
This cutting machine is recommended when working order. ...
User Manual - Page 4
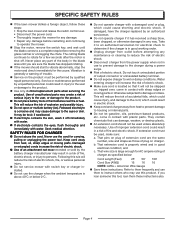
...part of accidental falls, which could cause shorting and electric shock. That extension cord is corrosive and may create a risk of fire and electric shock.
Page 4 SPECIFIC SAFETY RULES
If the lawn mower... weaken, or destroy plastic.
An extension cord should start to persons. Use of unauthorized parts may cause damage to determine if the charger is large enough ...
User Manual - Page 5
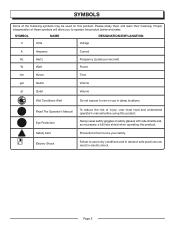
... Protection Safety Alert Electric Shock
To reduce the risk of injury, user must read and understand operator's manual before using this product.
Always wear safety goggles or safety glasses with side shields and, as necessary, a full face shield when operating this product.
Failure ...
User Manual - Page 6
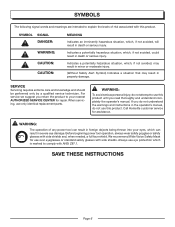
...which, if not avoided, will result in severe eye damage.
Always use only identical replacement parts. For service we suggest you do not attempt to use over eyeglasses or standard safety glasses ... with this product until you read thoroughly and understand completely the operator's manual. WARNING:
The operation of risk associated with ANSI Z87.1. Indicates a potentially hazardous situation, ...
User Manual - Page 8
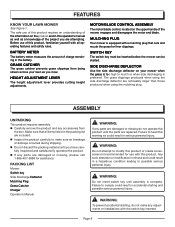
...LAWN MOWER
See Figure 1. SWITCH KEY
The switch key must be inserted before the mower can be started. The grass clippings produced when using the mulching plug. PACKING LIST
Mower Switch key Side Discharge Deflector Mulching Plug Grass Catcher Charger Operator's Manual... Do not discard the packing material until the parts are noticeably larger than those produced when using the side ...
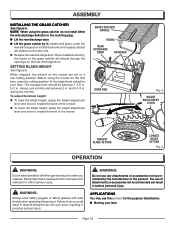
User Manual - Page 9
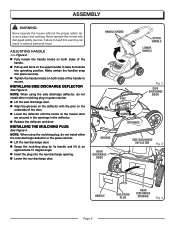
... the side discharge deflector, do not install either mulching plug or grass catcher. Lift the side discharge door. Align the grooves on the mower deck
are secured in the openings in the deflector. Release the deflector and door. HANDLE KNOBS
UPPER HANDLE
LOWER HANDLE
PINS
Fig. 2
SIDE DISCHARGE...
User Manual - Page 10
... the height best suited for the purpose listed below: Mowing your lawn
Page 10 NOTE: When using the mower for the first time, raise the cutting position to do not install either the...61550; Lift the grass catcher by the manufacturer of this product. When shipped, the wheels on the mower are seated on the door rod.
Release the rear discharge door. Before using the grass ...
User Manual - Page 11
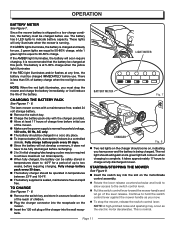
... charge, while 1 green light is shipped in a controlled
climate.
STARTING/STOPPING THE MOWER
See Figure 9.
Insert the switch key into the wall receptacle.
These lights will soon ...When fully charged, the battery can be charged at least 17 hours of the lever release. The lawn mower comes with a maintenance free, sealed 24 volt storage battery. Remove the switch key....
User Manual - Page 12
...manual.
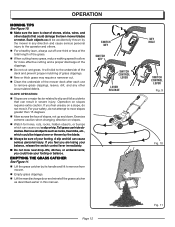
It will stick to the underside of the deck and prevent proper mulching of grass clippings.
New or thick grass may require a narrower cut.
Clean the underside of the mower...lift to allow for holes, ruts, rocks, hidden objects, or bumps which could damage the lawn mower blades or motor.
Such objects could lose your safety, do not mow it. For your ...
User Manual - Page 13
... this warning so could result in this warning could result in serious personal injury. WARNING:
Always protect hands by their use only identical replacement parts.
Since the mower is removed.
NOTE: Only use water. Do not use identical replacement blades. Stop the motor and remove the switch key. See Replacing the...
User Manual - Page 14
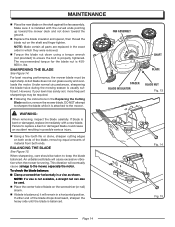
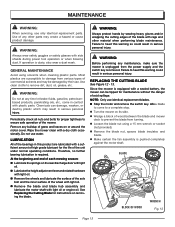
...parts are replaced in the exact order in . SHARPENING THE BLADE
See Figure 14. However, if your lawn has sandy soil, more frequent sharpenings may be taken to keep the blade balanced.
To check the blade balance: Clamp a screwdriver horizontally in the Replacing the Cutting Blade section, remove the mower...cause excessive vibration when the mower is not available, a straight nail can ...
User Manual - Page 15
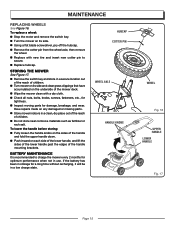
...Stop the motor and remove the switch key. � Turn the mower on any damaged or missing parts. Store mower indoors in use. HUBCAP COTTER PIN
WHEEL AXLE
HANDLE KNOBS
WHEEL
Fig. ... without recharging, it will be in a secure location out
of the reach of children. Turn mower on its side. Using a flat blade screwdriver, pry off the hubcap. Remove the...
User Manual - Page 16
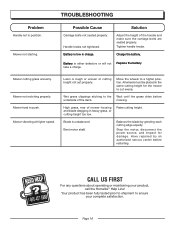
...mower to ensure your product, call the Homelite® Help Line! Page 16 TROUBLESHOOTING
Problem
Handle not in charge. Mower...height not set properly. Mower hard to a higher position.
High grass, rear of mower housing and blade dragging ... operating or maintaining your complete satisfaction. Mower not starting.
Handle knobs not tightened. Mower vibrating at higher speed. All wheels ...
User Manual - Page 17
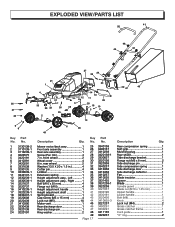
... . No. No.
Mower motor/deck assy 1 25 Front axle assembly 1 26 Rear axle assembly 1 27 Screw (Pan Hd 4 28 7 in 4 32 Cotter pin 4 33 Linkbar 1 34 Extension spring 1 35 Height adjustment assy., Left 1 36 Height adjustment assy., Right ......... 1 37 Bolt ... 18 19
3
7
13
6
38
49
Description
Key Part Qty. EXPLODED VIEW/PARTS LIST
41 26
48
44
42
43
34
36
37
40
9 8
Key...
User Manual - Page 18

...lawn mowers for the conditions, circumstances and parts listed below. Some states do not interfere with questions about operating or maintaining your lawn mower... service part is free from defects in the operator's manual. ...date of products or parts determined not to homelite@...lawn mower company under this warranty any defective product or part from date of purchase.
...
User Manual - Page 20
...
987000-039 11-27-06 (REV:00)
REPAIR PARTS
The model number of the authorized service dealer nearest you call 1-866-457-5888 or visit us online at www.homelite.com. Please record the serial number in . 24 VOLT CORDLESS LAWN MOWER
UT13122
SERVICE
For parts or service, contact your nearest Homelite authorized service dealer...
Similar Questions

I Need A Switch Key For The Homelite Ut13126.
I need a new switch key for a homelite UT13126 cordless lawn mower. Or if there is one that is compa...
I need a new switch key for a homelite UT13126 cordless lawn mower. Or if there is one that is compa...
(Posted by rogueua7771 4 years ago)

Homelite Electric Mower Ut13126 Won't Run When Handle Engaged
No lights on showing battery level, battery checks out at 24 volts, once the screws are removed will...
No lights on showing battery level, battery checks out at 24 volts, once the screws are removed will...
(Posted by qupua311 8 years ago)

Ut 13126 Manual, Is The Ut 13122 The Same ?
Can Not Seem To Get The Ut 13126
Can Not Seem To Get The Ut 13126
(Posted by oklx32 9 years ago)

How To Replace The Battery For Homelite Ut-13126 Lawn Mower
(Posted by dergro 9 years ago)

How Do I Remove Safety Switch On My Lawn Mower?
How do I remove safety switch from bottom of bar near top of handle on my 20 inch, 24 v, cordless la...
How do I remove safety switch from bottom of bar near top of handle on my 20 inch, 24 v, cordless la...
(Posted by janiceaia 11 years ago)