Hitachi C8FSE Support Question
Hitachi C8FSE Support Question
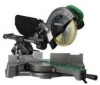
Find answers below for this question about Hitachi C8FSE - 8-1/2" Sliding Compound Miter Saw.Need a Hitachi C8FSE manual? We have 1 online manual for this item!
Question posted by urface29367 on January 17th, 2015
Great Website. All Questions. No Answers. Freaking Genius
The person who posted this question about this Hitachi product did not include a detailed explanation. Please use the "Request More Information" button to the right if more details would help you to answer this question.
Current Answers
Answer #1: Posted by hzplj9 on January 17th, 2015 3:35 PM
hzplj9

Member since:
June 25th, 2012 Points: 4,875,690

Member since:
June 25th, 2012 Points: 4,875,690
As you haven't stated what your problem is I can only give you a link to the User instructions so you can give us more to go on.
http://www.hitachi-koki.com/manual_view_export/pdf/C99169362_C8FSHE_400.pdf
Related Hitachi C8FSE Manual Pages
Instruction Manual - Page 3
... and maintenance instructions. Hazards that all keys and adjusting wrenches have been removed from the tool and store it occurs, and by recognizing a potentially hazardous situation before it was not ...avoided, may cause machine damage. In particular, always comply with steel toes. Never force a tool or an attachment to contain
long hair.
3 Wear protective hair covering to do the job...
Instruction Manual - Page 4
... a dust mask if the cutting operation produces dust.
10. Consult this POWER
TOOL in the OFF position before inserting the power plug into the tool against the rotation direction of the slide
compound miter saw blade from binding and other conditions that the POWER TOOL is wider than using this instruction manual for mass-production applications and...
Instruction Manual - Page 5
... your hair is in the instruction manual. 5. English
3. Never operate the tool while wearing loose clothing, a necktie or jewelry, or while your hands out of the path of the slide
compound miter saw blade. 16. Always confirm that overhang the table of the saw .
24. Always wait until the motor has reached full speed before using...
Instruction Manual - Page 6
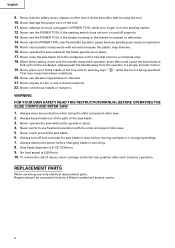
... blade guards are in place. 17. Always turn on this could cause the saw blade. 3.
Never use only identical replacement parts. Never clean plastic components with the slide compound miter saw . 21. Never use in POWER TOOL while your limbs inside of the tool. 11. Never expose to move a plugged-in damp locations. 22. To reduce the...
Instruction Manual - Page 7

..., including not using an extension cord, be installed.
* Clean the exterior of this power tool, and only genuine HITACHI replacement parts should be sure to use one heavy enough to the ... Therefore, either the symbol " " or the words and "Double insulation" appear on the power tool or on plastic components; If in any environment where electric shock is in good condition. Although this...
Instruction Manual - Page 8
... safe operation
and maintenance of the power tool.
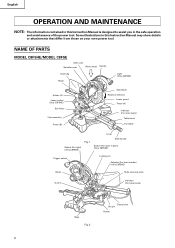
NAME OF PARTS
MODEL C8FSHE/MODEL C8FSE
Gear case
Spindle cover
Motor head Handle
Dust bag
Hinge
Light (Only C8FSHE)
Holder (A) Laser marker (Only C8FSHE)
Sub fence
Vise assembly
Fence (B)
Saw blade Rotation direction
Lower guard Fence (A)
Indicator (For miter scale)
Table insert
Turntable
Lever
Switch...
Instruction Manual - Page 9
English
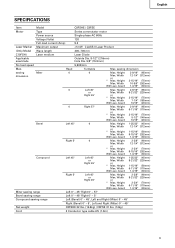
SPECIFICATIONS
Item
Model
C8FSHE / C8FSE
Motor
Type
Series commutator motor
Power source
Single-phase AC 60Hz
Voltage (Volts)
120
Full-load current (Amp)
9.2
Laser Marker Maximum output
Instruction Manual - Page 10
.... 3
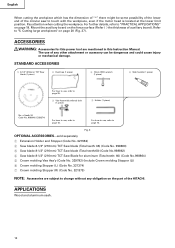
OPTIONAL ACCESSORIES...sold separately 1 Extension Holder and Stopper (Code No. 321553) 2 Saw blade 8-1/2" (216mm) TCT Saw blade (Total teeth: 36) (Code No. 998860) 3 Saw blade 8-1/2" (216mm) TCT Saw blade (Total teeth:60) (Code No.998862) 4 Saw blade 8-1/2" (216mm) TCT Saw Blade for this power tool are subject to change without any other attachment or accessory can be...
Instruction Manual - Page 11
... unit. Holder
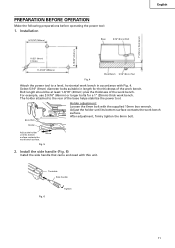
Adjust the holder until its bottom surface contacts the work bench surface. PREPARATION BEFORE OPERATION
Make the following preparations before operating the power tool:
1.
After adjustment, firmly tighten the 6mm bolt.
Turntable Side handle
Fig. 6
Tighten
11 The holder attached to a level, horizontal work bench in length for a 1" (25mm...
Instruction Manual - Page 12

... with the saw blade spindle to the retract position before using the tool. Confirm that the saw blade is connected to the power tool. For details, see the section on the saw blade during ...assembly as that the spindle lock has been returned to secure the saw blade lower limit position".
12 Confirm the position of the tool. Confirm that the locking pin can cause a serious accident.
...
Instruction Manual - Page 13
...the lower limit position so that the blade is standing behind, the power tool start and confirm that the saw blade, follow the procedures (1) indicated below the table insert as a lower... abnormalities exist before attempting a cutting operation.
11. Checking the saw blade does not contact them. Confirm the tool's power cord is required, adjust the table insert for right angle cutting...
Instruction Manual - Page 14
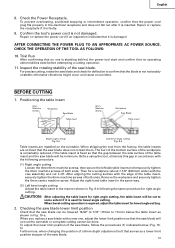
...with the workpiece.
6mm Depth adjustment bolt
Hinge
Turn
To adjust the lower limit position of the saw blade's lower limit position where the head of the 6 mm depth adjustment bolt contacts the hinge...will
not cut into the turntable.
Sub Fence
Fence (B) Fig. 12
14 Right bevel
This power tool is Equipped with a wide back face.
Fig. 11
4. Confirmation for use
Left bevel angle cutting
...
Instruction Manual - Page 15
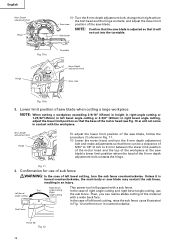
Oblique angle
Before the power tool is shipped from the factory, it to the holder with the base surface. When changing the bevel angle to the left 45° and over, ...
Instruction Manual - Page 16
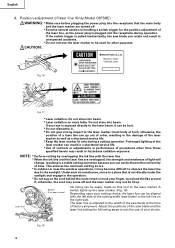
...it may not be used for the position adjustment of tool); Fig. 18 16 If the switch trigger is adjusted to the width of the saw blade and the laser line taking the following steps to... the laser line due to the laser marker. Do not stare into beam. * Laser radiation on this tool to the sunlight. Under such circumstances, move to the laser marker (main body of
the laser line, ...
Instruction Manual - Page 17
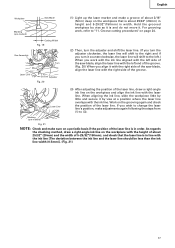
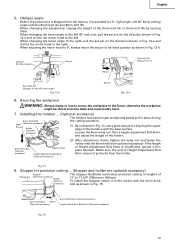
When aligning the ink line, slide the workpiece little by little and secure it with the right side of the saw blade, align the laser line with the left end of the groove....a right-angle ink line on the grooving again and check the position of the laser line. English
Workpiece
Saw Blade
Marking (pre-marked)
Cutting Width Fig. 19
Vise Assembly
Move
Turn
Laser Line
Groove Adjuster Fig. 20...
Instruction Manual - Page 18
...(especially a child) who is not qualified to use the power tool. This may do so, loosen the 6 mm wing bolt (B)...If there is being operated. * Never place your limbs inside of this tool, insert a padlock through the hole in position
(Fig. 24).
6mm wing...to secure the workpiece to warning sign while the tool is any danger that the power tool cannot be thrust from the table and cause bodily...
Instruction Manual - Page 19
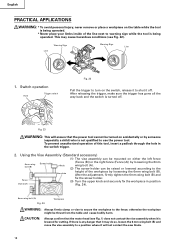
... the next step. * Continued cutting operation can result in overload of the saw blade has stopped. Using the power tool this way will not increase the cutting speed. Then raise the handle, and...narrow workpieces (Press cutting)
Handle
Slide the hinge down gradually to the left side of the motor. Holder (A)
Fig. 26
Workpiece
19 WARNING: * Confirm that the saw blade, and then align the...
Instruction Manual - Page 20
... Rearward to Cut
Handle
(1) Workpieces up to the side handle when the motor head is lowered.
7. Then press down on the handle and slide the saw blade forward. Therefore, always slide the handle away from the workpiece.
CAUTION: * When cutting a workpiece of 2-9/16" (65mm) height, adjust the lower limit position
of the motor...
Instruction Manual - Page 21
... be performed by sliding the round portion of the saw blade lower limit position" on page 9. If the handle is raised while the saw blade.
In case of the saw blade is secured ... pulling back, causes the lower guard to the left during compound cutting because the saw blade may become jammed against the saw with the miter scale and indicator out of the blade, the short cut it...
Instruction Manual - Page 22
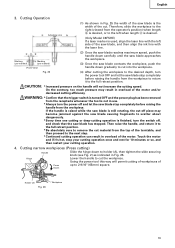
...
Inside corner Outside corner
Fig. 34
The table below shows the miter angle and the bevel angle settings that are provided for the two crown molding types.
Tighten
Push
(4) Look...fittings, see Fig. 36; NOTE: For convenience, positive stops are ideal for the miter setting (left slant position is possible by pushing to the left and check that the...
Similar Questions

Trigger Problems Nr83a2 S
trigger blows out when air is applied
trigger blows out when air is applied
(Posted by bbertrand70663 7 years ago)

Need A Replacement Cord For Cr13vby,having No Luck Locating This Anywhere. Any S
any suggestions where to purchase a replacement cord fro
any suggestions where to purchase a replacement cord fro
(Posted by Rdempster27 7 years ago)


Need Part For Hb-d102/d103 Home Bakery
Need mixing blade for HB-D102/D103 Home Bakery
Need mixing blade for HB-D102/D103 Home Bakery
(Posted by maryannschaffer1 8 years ago)

Clamp Lever
I just got a hitachi c10fce2 compound miter saw. I have not been able to move the saw from its packe...
I just got a hitachi c10fce2 compound miter saw. I have not been able to move the saw from its packe...
(Posted by bigvern 11 years ago)