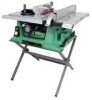
Hitachi C10RB Support Question
Hitachi C10RB Support Question
Find answers below for this question about Hitachi C10RB - 10" Professional Jobsite Table Saw.Need a Hitachi C10RB manual? We have 1 online manual for this item!
Question posted by ktraw on August 18th, 2012
How To Raise/lower The Blade
The person who posted this question about this Hitachi product did not include a detailed explanation. Please use the "Request More Information" button to the right if more details would help you to answer this question.
Current Answers
Related Hitachi C10RB Manual Pages
Instruction Manual - Page 3
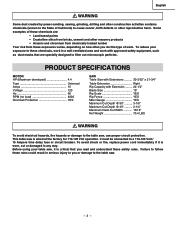
... with approved safety equipment, such as dust masks that you or damage to the table saw.
- 3 - Before using your exposure to these exposures varies, depending on how often you do this type of work with Extension ......... 24-1/2" Blade Size 10" Rip Scale YES Rip Fence YES Miter Gauge YES Maximum Cut Depth @ 90 3-1/8" Maximum...
Instruction Manual - Page 4

... tool is not designed.
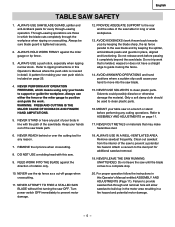
10. Form the habit of improper accessories may get caught in compliance with padlocks, master switches or by removing starter keys.
22. DO NOT wear loose clothing, gloves, neckties, rings, bracelets or other part that is loose or damaged should be hazardous to the table saw , it was designed.
9. DISCONNECT TOOLS...
Instruction Manual - Page 5
....
- 5 - Refer to the rear and the sides of the saw table for making your table saw blade path.
12. Clean out sawdust from the interior of the saw until the blade comes to prevent motor damage.
20. Do not leave the saw blade. Turn power switch OFF immediately to a complete stop.
10. Refer to clean plastic parts. A pattern for long...
Instruction Manual - Page 6

... 100ft. 150ft.
0
6
18 16 16 14
6
10
18 16 14 12
10
12
16 16 14 12
12
16
14 12 Not ...equipment grounding conductor. Be sure your tools.
CHECK with or without yellow stripes) is in the table above shows the correct size to use...using 120 volts only)
Ampere Rating
Total length of electric shock. This saw is equipped with two flat the factory for your extension cord ...
Instruction Manual - Page 7

...CONTENTS
Separate all parts thoroughly with this saw. • Do not modify this power tool. English
ACCESSORIES AND ATTACHMENTS
RECOMMENDED ACCESSORIES
WARNING
Visit ... table saw assembly
1
Blade guard and splitter ass'y
1
Rip fence
1
Dado table insert
1
Miter gauge
1
Push stick
1
Blade wrench
1
Push stick storage
1
Blade
1
Handwheel handle
1
Hex wrenchs
2
Blade guard...
Instruction Manual - Page 9
English
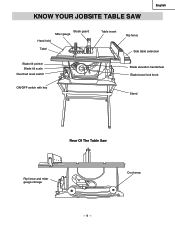
KNOW YOUR JOBSITE TABLE SAW
Blade guard Miter gauge Hand hold Tabel
Blade tilt pointer Blade tilt scale
Overload reset switch
ON/OFF switch with key
Table insert
Rip fence
Side table extension
Blade elevation handwheel Blade bevel lock knob
Stand
Rear Of The Table Saw
Rip fence and miter gauge storage
Crod wrap
- 9 -
Instruction Manual - Page 10

...OVERLOAD RESET SWITCH - Raises and lowers the blade. Workpiece
Trailing Edge
- 10 -
The number of the workpiece. TABLE INSERT - BLADE TILTING HANDWHEEL - Tilts the blade to any angle between two saw blade tips, bent outward in the tabletop channels located on either side of the workpiece that has hardened. English
GLOSSARY OF TERMS
TABLE SAW TERMS
MITER GAUGE -
A cut...
Instruction Manual - Page 11

.... With the blade elevation handwheel (1), raise the
blade to protect your hands. 7. Cover the blade teeth with a folded cardboard or position the plastic blade guard over the blade to the maximum height. 3. Return the blade to tighten securely. Match the holes of the stand to the holes on the bottom flange of the table, and align the...
Instruction Manual - Page 12

... (1) to 45° on the guard mounting bracket (attached to the saw). Cover the blade teeth with the blade so the cut workpiece will snap in place for all through sawing operations.
- 12 - With the blade elevation handwheel (1), raise the
blade to protect your hands. 6. Remove the blade guard by its' corresponding wing bolt.
9. D)
54
2
3
WARNING
To avoid...
Instruction Manual - Page 13
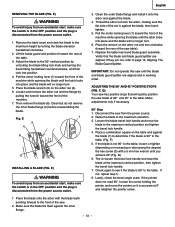
Remove the table insert and raise the blade to the maximum height by unlocking the blade tilting lock knob and turning the bevel tilting handwheel counterclockwise, and then lock into position.
4. E
1
3
4
6
5
INSTALLING A BLADE (FIG. Clean the outer blade flange and install it is 90° to the front of the machine. 7.
Disconnect the saw from the power...
Instruction Manual - Page 14
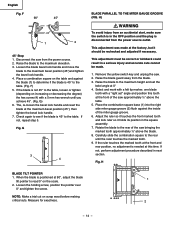
... from an accidental start, make sure the switch is not 45° to the rear of the saw . 2. Remove the yellow switch key and unplug the saw bringing the marked tooth approximately ½" above the table. 5. Fig. This adjustment was made .
1. Raise the blade to the rear until you achieve 45°. (Fig. When the...
Instruction Manual - Page 15

...176; settings. 5. NOTE:Adjust the miter gauge to 450~600 before putting to lower the insert, turn . 2. Fig. J
English
STORAGE (FIG. K) 1. I ...table top surface on the right side of the insert. I
1
2
INSTALLING THE PUSH-STICK STORAGE (FIG. Tighten the four screws (1) and re-measure, as needed to the left side of
the saw housing.
Place extra blades onto the arbor. NOTE: To raise...
Instruction Manual - Page 16
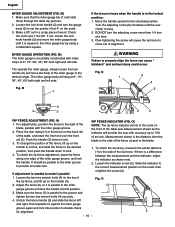
...wrench bolts (4) securely.
4. If there is the distance from the blade to the blade.
Make sure the fence (5) is square to
13
the correct ...lower the front end over the front rail (2).
Move the handle upward to properly align the fence can cause " kickback" and serious injury could occur. DO NOT turn the adjusting screw more than 1/4 turn the gauge
body (3) to come out of the table saw...
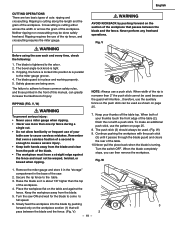
Instruction Manual - Page 18

...OFF position, grasp the end (or yellow part) of the table saw blade is turned on front rail for tilting the saw with the fence to the desired measurement
and then tighten the cam...desired
blade angle.
1
Fig. To prevent sawdust buildup inside the saw frequently. Fig. Move the switch upward to 13". USING THE DUST CHUTE (FIG. Fig. R)
To raise or lower the blade, turn the saw ...
Instruction Manual - Page 19
... the saw to the table.
3. Turn the saw each and every time, check the following:
1. Slowly feed the workpiece into position & is in the base of your thumbs off the table top. Crosscutting is cutting along the length and the grain of injury.
When both hands away from the blade and clear from the blade.
5. Raise the blade...
Instruction Manual - Page 20

.... Make sure the facing does not interfere with screws. The miter gauge (1) must be ripped and your table
saw blade path, always stand to the right side of the saw to a sawhorse. Hold workpiece firmly against the face of the blade. • Never attempt to cut very long or short pieces. distance from the...
Instruction Manual - Page 23
... silicone. FF)
After each five hours of the motor mounting
mechanism. English
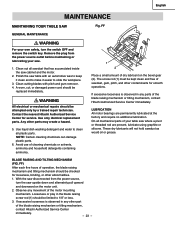
MAINTENANCE
MAINTAINING YOUR TABLE SAW
Fig. Polish the saw .
1. A worn, cut, or damaged power cord should be
replaced immediately.
If excessive looseness is observed in the blade raising
screw rod (1) should be limited to clean all sawdust that has accumulated inside the...
Instruction Manual - Page 24

.... 4. come up to
zero.
1. Does not make accurate 45° and 90° rip cuts. Saw not plugged in raising/tilting
1.
Miter angle lock knob is not 2. Blade does not raise or tilt 1.
Fuse blown or circuit breaker tripped. 2.
Align splitter with blade.
2. Extension cord too light or too long.
1. Contact your electric company. Damaged...
Instruction Manual - Page 72

...SCREW CROSS-RECESSED PAN HD PLAIN WASHER TAPPI CR. RE. NUT HEX. English
10" JOB SITE TABLE SAW
PARTS LIST FOR SCHEMATIC
HKU# 726434 325684 325685 325686 325687 325688 325689 325690 ... SPACER ARBOR COLLAR SET NUT ARBOR COLLAR SPONGE BEVEL GEAR BLADE HEX. C10RB
Size
D=φ16 D=φ15
D=φ16 H=16
D=φ20 d=φ10
φ45
φ5*10-1 φ6*13-1 φ8X16-2.5 φ12*21-2...
Instruction Manual - Page 74

HD. English
10" JOB SITE TABLE SAW
PARTS LIST FOR STAND
HKU# 325785 325786 325797 726482 325735 325712 726617
I.D. 2CCD 2CCE 2CFW 0J4W 0U6V 0JPV 0KQY 0ZW7 2F69 2F5Y
Description BRACKET ASS'Y BRACKET ASS'Y RUBBER FOOT BUSH FLAT WASHER FLAT WASHER HEX. C10RB
QTY 1 1 3 4 2 2 2 1 1 1
- 74 - BOLT LOCK NUT WING NUT LEVELING PAD FLOOR PLATE
Size...
Similar Questions

What Kind Of Dado Blade Is Suitable For The C10ra3 Table Saw
(Posted by benjaminrondon 3 years ago)

Hitachi C10ra3 Compatible Blades.
Can I use an 8 inch blade with this saw? If so, can it be for cutting ceramic tile?
Can I use an 8 inch blade with this saw? If so, can it be for cutting ceramic tile?
(Posted by gwoltman 3 years ago)

How To Square A Hitachi Mitre Saw Blade
(Posted by bigbLj2772 9 years ago)

Blade Removal
How do you secure the saw blade to remove and what direction is the nut thread?
How do you secure the saw blade to remove and what direction is the nut thread?
(Posted by nbergeson 12 years ago)

Changing Saw Blade
Where are instructions on changing a saw blade on a Hitachi C8FSE saw? Thanks
Where are instructions on changing a saw blade on a Hitachi C8FSE saw? Thanks
(Posted by weishapple 12 years ago)