Hitachi C10FSB Support Question
Hitachi C10FSB Support Question
Find answers below for this question about Hitachi C10FSB - 10 Inch Sliding Dual Bevel Compound Miter Saw.Need a Hitachi C10FSB manual? We have 2 online manuals for this item!
Question posted by workmastersinc on January 18th, 2017
Do You Know How I Can Rewire Dont Care About Speed Control
The person who posted this question about this Hitachi product did not include a detailed explanation. Please use the "Request More Information" button to the right if more details would help you to answer this question.
Current Answers
Answer #1: Posted by BusterDoogen on January 18th, 2017 5:38 PM
BusterDoogen

Member since:
October 30th, 2011 Points: 28,565,427

Member since:
October 30th, 2011 Points: 28,565,427
Start on page 49 for wiring diagram.
I hope this is helpful to you!
Please respond to my effort to provide you with the best possible solution by using the "Acceptable Solution" and/or the "Helpful" buttons when the answer has proven to be helpful. Please feel free to submit further info for your question, if a solution was not provided. I appreciate the opportunity to serve you!
Related Hitachi C10FSB Manual Pages
Instruction Manual - Page 4

...TO ASSURE SAFE USE OF THIS TOOL:
1. ALWAYS MAINTAIN TOOLS WITH CARE. Always check the
guard and all moving...10. TURN POWER OFF. Always unplug the power cord when the tool is in order to a complete stop . Applying the wrong voltage or applying DC power can cause the
POWER TOOL to operate improperly and cause serious personal injury or damage to reduce the
risk of the slide
compound saw...
Instruction Manual - Page 5
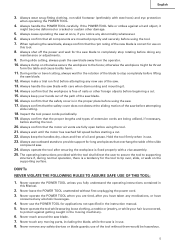
... Never reach around the saw blade away from the operator. 10. Always handle the POWER TOOL carefully. Always make a trial run first before attempting
slide cutting.
18. Always confirm... motor has reached full speed before using the tool. 21. Never operate the POWER TOOL when you fully understand the operating instructions contained in use of the slide
compound saw . 13. Never use...
Instruction Manual - Page 6

... or changing settings. 7. REPLACEMENT PARTS
When servicing use in a single, smooth motion.
19. Never clean plastic components with the slide compound saw blade. 3.
Always turn on and off tool and wait for saw . 21. No load speed is 10" (255mm). 9. Never use abrasive type blades on the starting switch does not turn off properly. 13. English
9. When...
Instruction Manual - Page 7

... Clean the exterior of the power tool only with a soft cloth moistened ...tool, HITACHI has adopted a double insulation design.
Never use the next heavier gage. English
USE PROPER EXTENSION CORD
Make sure your product will cause a drop in line voltage resulting in loss of power and overheating. An undersized cord will draw. Ampere More Than
Rating Not More Than
0 - 6
6 - 10
10...
Instruction Manual - Page 9

English
SPECIFICATIONS
Item
Model
C 10FSH / C 10FSB
Motor
Type
Series commutator motor
Power source
Single-phase AC 60Hz
Voltage (Volts)
120
Full-load current (Amp)
12
Laser Marker Maximum output
Instruction Manual - Page 10

Refer to "PRACTICAL APPLICATIONS" on page 18. APPLICATIONS
Wood and aluminum sash.
10 For further details, refer to "5.
Pay attention when cutting the workpiece. Cutting large workpieces" on the fence surface (Refer ( ) the thickness of the circular saw to touch with the workpiece, even if the motor head is located at the lower...
Instruction Manual - Page 11

...16" (65mm) or larger bolts for the thickness of the base helps stabilize the power tool.
6mm Bolt
Holder adjustment: Loosen the 6mm bolt with Fig. 4.
The holder attached to... enable you to a level, horizontal work bench. Installation
5-29/32"(150mm)
Base
5/16" (8mm) Bolt
English
10-13/32" (264mm) 1" (25mm) thick bench
11/32" (9mm) 3 Holes
11-13/16" (300mm)
Work Bench ...
Instruction Manual - Page 12
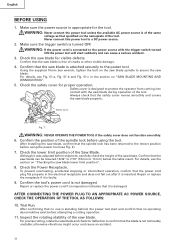
...CHECK THE OPERATION OF THE TOOL AS FOLLOWS:
10. Confirm the tool's power cord is turned OFF. Never connect this power tool to the power source with the saw blade lower limit position".
...before shipment, carefully check the height of the tool. Repair or replace the power cord if an inspection indicates that no one is faulty.
9. WARNING: Never connect the power tool unless the available...
Instruction Manual - Page 13

... lower limit position
Check that the saw blade will not cut to retract the guard slightly. Cutting a groove on the turntable.
Fig. 8
2. Before using the tool, eliminate this gap in Fig. 10-a. English
BEFORE CUTTING
1. Then fix a workpiece (about 7-7/8" (200mm) wide) with the following the same procedure for bevel angle cutting.
3. After aligning the...
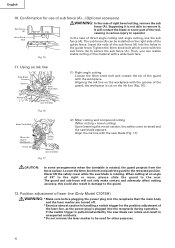
Instruction Manual - Page 14

... sub fence counterclockwise. To adjust the lower limit position of the saw blade, follow the procedures (1) to (3) shown in Fig. 10-a.
(1) Loosen the 8mm wing nut so that there can be ...saw blade's lower limit position (where the head of the saw blade. Left bevel angle cutting
Right bevel angle cutting Direct angle cutting
Turn
This power tool is
turned counterclockwise, the main body or saw...
Instruction Manual - Page 16
... and compound cutting (Miter cutting + bevel cutting) Upon lowering the motor section, the safety cover is rotating. Loosen the 6mm knob bolt and push the guard to operator.
6mm Knob Bolt
Fig. 15
In the case of the tool, causing in serious injury to the retracted position. Supposing it is rotated, the guard projects...
Instruction Manual - Page 17

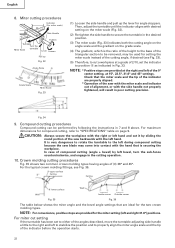
... cutting choice, the laser line can be easily made on this tool to "11.Groove cutting procedures" on work , refer to the... it can result in a shortened service life. * Use of controls or adjustments or performance of about 25/32" (20mm) in height...Depending upon your eye is adjusted to the sunlight.
Workpiece
Fig. 20 Saw Blade
Marking (pre-marked)
Cutting Width Fig. 21
(1) Light up ...
Instruction Manual - Page 19

...
Knob
according to the height of the workpiece. In case of compound cutting of up to 2-3/16" (55mm) can be fixed with the left miter and right bevel + right miter), mount the vise asembly on the handle will not contact the saw blade. Therefore, slide the workpiece to the
right (viewed from the operator's position) when...
Instruction Manual - Page 20

...
Slide the hinge down on the handle and slide the saw blade back to cut -off piece may be case when a complete cutting cannot be cut the workpiece.
Press Down
Using the power tool this...let the saw blade stop your cutting operation once and rest for the thickness of the auxiliry board. In this way will permit cutting of workpieces of up to page 9 "SPECIFICATIONS" for 10 minutes or...
Instruction Manual - Page 21

... cutting groove of the workpiece and to the right. Pull
Bevel Scale
Indicator Loosen (for bevel cutting, refer to the right pull the fixing pin towards the rear. If the handle is raised while the saw blade is pressed down gently and carefully. * In slide cutting, gently push the handle back (rearwards) in Fig. 30...
Instruction Manual - Page 22
... setting, at a grade of 2/10, set to the right and left...sliding the
round portion of the saw with the miter scale and indicator out of the saw...miter angle and the bevel angle settings that the miter scale and the tip of the indicator are provided for setting the miter scale instead of compound cutting (angle + bevel) by following the instructions in the desired position.
(3) The miter...
Instruction Manual - Page 27

... Fig. 51-c
(4) Lift the safety cover and mount the saw blade. * Tighten the bolt so it off frequently. The saw blades larger than 10" (255mm) in the material. When the Poly-V-Belt becomes overloaded...dust guide.
Always install saw
blade and the rotation direction of the gear case(see Fig. 1) are 10" (255mm) in to the retract position after running the tool for 20 seconds without ...
Instruction Manual - Page 29

...: Specifications are subject to the grooves of the motor is transmitted to the saw blade by an AUTHORIZED HITACHI POWER TOOL REPAIR CENTER ONLY. After replacing, make a groove on pulleys, first connect ... and replace the damaged one . Pulley (B)
Fig. 56
10. To assure that only authorized replacement parts will be protected, all 10 teeth of the belt to chips and the like adhered onto...
Parts List - Page 1

Hitachi Power Tools
LIST NO. E933
ELECTRIC TOOL PARTS LIST
SLIDE COMPOUND SAW Model C 10FSB
2004 • 2 • 13 (E2)
1 2 3 4 56 7
40 41
8 9 10 11 12
14 15 16 13 17 18 19 20
21 22 23 24
25
26
27 28 29 30 29
31 32 33 9 10 35 34 10 9 36
37 38 39
601
603 602...
Parts List - Page 6

...
3
124 321-392 HANDLE (L)
1
125 305-558 TAPPING SCREW (W/FLANGE) D5X25 (BLACK) 3
126 321-355 SHEET
1
* 127 321-354 CONTROLLER 100V-120V
1
* 127 322-200 CONTROLLER 220V-240V
1
128 930-804 TERMINAL M4.0 (10 PCS.)
1
129 321-393 HANDLE (R)
1
130 301-653 131 880-734 132 321-383
TAPPING SCREW (W/FLANGE) D4X20 (BLACK...
Similar Questions

That's The Original Hitachi Japonês?
I'm looking for hitachi miter saw 10" japonês original not the metabo you guys have
I'm looking for hitachi miter saw 10" japonês original not the metabo you guys have
(Posted by Pereirafulr 2 years ago)

Controller
can i bypass controller by rewiring since you can not get item
can i bypass controller by rewiring since you can not get item
(Posted by workmastersinc 7 years ago)

How To Adjust Cut Depth Hitachi 10 Compound Miter Saw Manual
(Posted by dbrag 9 years ago)
