Hitachi C10FCE2 Support Question
Hitachi C10FCE2 Support Question
Find answers below for this question about Hitachi C10FCE2 - 10 Inch Compound Miter Saw.Need a Hitachi C10FCE2 manual? We have 2 online manuals for this item!
Question posted by tbartelme on January 25th, 2012
Cutting Out Of Square
I have a hitachi c10fce2 mitre saw that is not cutting perpendicular to the fence, it is actually cutting the plastic on the bed
Current Answers
Related Hitachi C10FCE2 Manual Pages
Operating Instructions - Page 4

... mask if the cutting operation produces dust.
10. ALWAYS USE RECOMMENDED ACCESSORIES ONLY WHEN OPERATING THIS TOOL. Always feed work into the receptacle.
15. This plug will function properly. Consult this POWER
TOOL in the OFF position before changing blades or other conditions that overhang the table of the slide
compound saw blade from binding and...
Operating Instructions - Page 5

... in the moving parts, including the blade, while the saw .
22. otherwise the workpiece might become deformed or cracked or sustain other foreign objects before using the tool. 10. During miter or bevel cutting, always wait for use outboard stands to completely stop completely before starting a cut . 14. Always confirm that the lower guard is a tendency...
Operating Instructions - Page 6

...TOOL if the plastic housing or the handle is cracked or deformed. 14. When slide cutting, never pull the handle toward the operator, since this saw . 2. Always turn on this could cause the saw... the plastic may cause hazardous conditions.
20. English
11. Never reach around the saw . 5. Always wear eye protection when using the compound saw . 21. No load speed is 10" (255mm...
Operating Instructions - Page 7
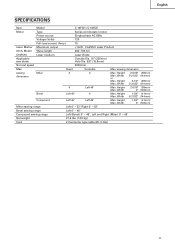
... the nameplate. otherwise the plastic may dissolve. The smaller the gage number, the heavier the cord. Ampere Rating
More
Not More
Than
Than
0 - 6
6 - 10
10 - 12
12 - 16
MINIMUM GAGE FOR CORD SETS
Total Length of this power tool, and only genuine HITACHI replacement parts should disassemble or assemble this power tool, HITACHI has adopted a double insulation...
Operating Instructions - Page 8

... the safe operation
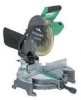
and maintenance of the power tool. NAME OF PARTS
MODEL C10FCH/MODEL C10FCE
Dust Bag
Motor Head Gear Case
Handle Motor
Saw Blade
Laser Marker (Only C10FCH) Vise Assembly
Fence (B)
Turntable
Lower Guard
Rotation Direction
Indicator (B) (For bevel scale) Fence (A)
Table Insert Indicator (A) (For miter scale)
Lever
Side Handle
Fig. 1
Switch (for...
Operating Instructions - Page 9
English
SPECIFICATIONS
Item
Model
C 10FCH / C 10FCE
Motor
Type
Series commutator motor
Power source
Single-phase AC 60Hz
Voltage (Volts)
120
Full-load current (Amp)
15
Laser Marker Maximum output
Operating Instructions - Page 10

...
Base
5/16" (8mm) Bolt
10-3/8" (267mm) 1" (25mm) Thick Bench
11/32" (9mm) 4 Holes
16-11/16" (424mm)
Work Bench 5/16" (8mm) Nut
Fig. 4
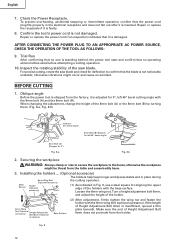
Attach the power tool to a level, horizontal work bench...diameter bolts suitable in accordance with the supplied 10mm box wrench. Fig. 5
CAUTION: Attach the power tool to a work bench with bolts
(6mm), and if the turntable has been swiveled 45° ...
Operating Instructions - Page 11
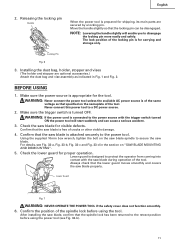
... accessories.) Attach the dust bag and vise assembly as that the lower guard moves smoothly and covers the saw blade for the tool. Check the saw blade properly. Lower Guard
Fig. 7
WARNING: NEVER OPERATE THE POWER TOOL if the safety cover does not function smoothly. 6. NOTE: Lowering the handle slightly will start suddenly and...
Operating Instructions - Page 12
... properly in Fig. 9, use a steel square for 0°)
Fig. 8-a
Fig. 8-b
2. Repair or replace the power cord if an inspection indicates that no one is standing behind, the power tool start and confirm that it is not damaged. For precise cutting, rotate the saw blade. Oblique angle
Before the power tool is shipped from the factory...
Operating Instructions - Page 13
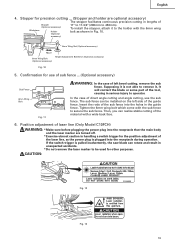
... the saw blade can be used for precision cutting ... (Stopper and holder are turned off. * Exercise utmost caution in handling a switch trigger for use the sub fence. Supposing... Bolt 6mm (Optional accessory)
Fig. 10
5. Confirmation for the position adjustment of the tool, causing in the guide fence. Position adjustment of the guide fence. CAUTION:
Fig. 12
Fig. 13...
Operating Instructions - Page 14

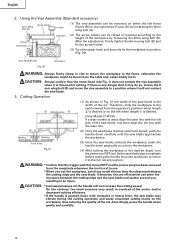
... laser line will shift to suit the use of the groove.
14 A switch lights up the laser marker and make a groove of tool); Workpiece
Fig. 14 Saw Blade
Marking (pre-marked)
Cutting Width Fig. 15
(1) Light up the laser marker. (Fig. 14) Depending upon your finger, wood and the like around it . * Do...
Operating Instructions - Page 16
... saw blade stop completely before raising the handle from the receptacle whenever the tool is not in an injury.
CAUTION: * Increased pressure on the workpiece, thus reducing the quality of the motor and/or decreased cutting efficiency. * If the handle is used, align the laser line with the left fence
Knob
{Fence (B)} or the right fence {Fence...
Operating Instructions - Page 17

...alignment, or with the right hand side for compound cutting.
Bevel cutting procedures
(1) Loosen the clamp lever and bevel the saw blade is secured on the miter scale (Fig. 22).
(2) Re-tighten the...of the tool without pulling back, causes the safety cover to the right for bevel scale)
Clamp Lever Tighten Loosen
Fig. 23
WARNING: When the workpiece is still rotating, the cut -off
...
Operating Instructions - Page 18

..., positive stops are provided for the two crown molding types. For miter cut crown moldings at positions 1 and 4 in Fig. 36.
Miter Angle Setting
Bevel Angle Setting
left 35.3° ( mark)
left 30...contacts the fence as in Fig. 36. For the typical crown molding fittings, see Fig. 27;
For bevel cut crown moldings at positions 2 and 3 in Fig. 28.
(2) Setting to cut setting
Move...
Operating Instructions - Page 19

... the table and cause bodily harm.
Do not bevel cutting. Then turn the upper knob, as shown in position. ...saw blade. Head Bevel Angle Scale 4
1 Fence
Miter Angle Scale Turntable Fig. 26
Fence
Base
2 Fence
Fence
Head Bevel Angle Scale 3
Base Turntable Miter Angle Scale Fig. 27
English
Table on Base
Table on either the left fence (Fence (B)) or the right fence
6mm Knob Bolt
(Fence...
Operating Instructions - Page 20

... the receptacle before removing or installing a saw blade (Fig. 33-a, Fig. 33-b, Fig. 33-c and Fig. 33-d)
(1) Rotate the lower guard (plastic) to the top position.
(2) Use ... During bevel and compound cutting, attach the dust bag at a right angle to ensure stability in the lateral direction, and clamp it using tools other than normal during bevel cutting.
SAW BLADE MOUNTING AND ...
Operating Instructions - Page 21

...wrench) as indicated in Fig. 33-c. CAUTION: Never use a dull saw blade immediately upon the first sign of this tool.
1. WARNING: When mounting the saw blade. * Tighten the bolt so it does not come loose during ... 33-a
Fig. 33-b
(5) Lift the lower guard and mount the saw blades larger than 10" (255mm) in the spindle lock and tighten the bolt by turning it unsafe to operate the ...
Operating Instructions - Page 22

... lower guard (see Fig. 36) with the steel square. Inspecting the screws
Regularly inspect each use , keep the carbon brushes clean so that it stored in a secure place. When the tool is said to be removed after removal of the fence and saw blade and fence to wash oil or water. Inspecting the lever
If...
Parts List - Page 1

E946
ELECTRIC TOOL PARTS LIST
COMPOUND SAW Model C 10FCE2
2006 • 10 • 11 (E1)
4 5 6 7
13 14
46 47 48 49 50
3
9 8
12 11
10
22 23 24 25 26
21
15 16
39 40 41 42 43 44 45
18 19 20
38
27 28 29
53 54
55
...
46 47 48 65
629 615 619 626 627
619 620
613 609
612 611 610
621
622
623 67
626
624
627 66
625 Hitachi Power Tools
LIST NO.
Parts List - Page 7
...
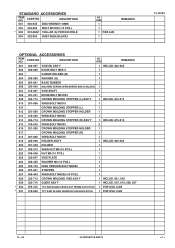
629 322-710 GUIDE ASS'Y
1 INCLUD. 615, 619, 626, 627
* 630 976-472 TCT SAW BLADE CROSS-CUT 255MM-D15.9 HOLE 1 FOR USA, CAN
* 631 319-658 TCT SAW BLADE 255MM-D15.88 HOLE-NT100 1 FOR USA, CAN
C 10FCE2
10 -- 06
* ALTERNATIVE PARTS
--- 7 ---
DESCRIPTION
501 940-543 BOX WRENCH 10MM
502 949-695 BOLT...
Similar Questions

C10fs Compound Miter Saw Bearing Replacement
how do I remove the bearing from the armature
how do I remove the bearing from the armature
(Posted by Bobster8820 3 years ago)

How To Square The Head On An Hitachi Miter Saw
(Posted by afajab 9 years ago)

How To Adjust Cut Depth Hitachi 10 Compound Miter Saw Manual
(Posted by dbrag 9 years ago)

How To Square A Hitachi Miter Saw
(Posted by prisibr 10 years ago)

Where Can I Get A Free Manual On The Hitachi C12rsh 12' Slide Compound Miter Saw
(Posted by kathy86883 14 years ago)