HP 8100 Support Question
HP 8100 Support Question
Find answers below for this question about HP 8100 - Elite Convertible Minitower PC.Need a HP 8100 manual? We have 9 online manuals for this item!
Question posted by eellis on June 23rd, 2011
Display Says To Close Left Or Top Door.
Both doors are closed, where are switches/ sensors located?
Current Answers
Related HP 8100 Manual Pages
Safety and Regulatory Information Desktops, Thin Clients, and Personal Workstations - Page 19
...-Packard Company P.O. To identify the location of exceeding the FCC radio frequency exposure limits, human proximity to be co-located or operating in devices displaying the A-tick. ENWW
Electromagnetic Compatibility... antennae should be less than 20 cm (8 inches), including when the computer display is closed, if integrated into the unit. These radar stations can cause interference with ...
Illustrated Parts & Service Map: HP Compaq 8100 and 8180 Elite Convertible Minitower Business PC - Page 1

...Type RAM Type Maximum RAM Supported Expansion Slots
Chipset Graphics Adapter Bays
I /O assembly, power switch 3 eSATA port assembly 4 SATA cable, hard drive 5 SATA cable, optical drive *... 605651-002. 2nd Edition March 2010. Illustrated Parts & Service Map
HP Compaq 8100 and 8180 Elite Convertible Minitower Business PC
© 2009, 2010 Hewlett-Packard Development Company, L.P. HP shall not be ...
Maintenance and Service Guide: HP Compaq 8100 and 8180 Elite Business PC - Page 5
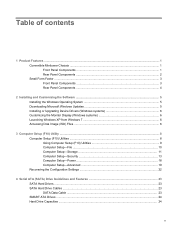
... ...1 Convertible Minitower Chassis ...1 Front Panel Components ...1 Rear Panel Components ...2 Small Form Factor ...3 Front Panel Components ...3 Rear Panel Components ...4
2 Installing and Customizing the Software ...5 Installing the Windows Operating System 5 Downloading Microsoft Windows Updates 5 Installing or Upgrading Device Drivers (Windows systems 6 Customizing the Monitor Display...
Maintenance and Service Guide: HP Compaq 8100 and 8180 Elite Business PC - Page 6

..., Routine Care, and Disassembly Preparation 25 Chassis Designations ...25 Convertible Minitower (CMT 25 8100 Models ...25 8180 Models ...26 Small Form Factor (SFF...32 Hard Drives ...32 Lithium Coin Cell Battery 32
6 Removal and Replacement Procedures Convertible Minitower (CMT) Chassis 34 Serial Number Location ...34 Preparation for Disassembly ...35 Unlocking the Smart Cover Lock ...36 Smart ...
Maintenance and Service Guide: HP Compaq 8100 and 8180 Elite Business PC - Page 11
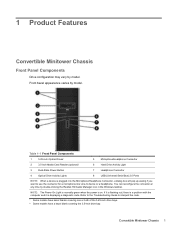
... Power Button
7
Headphone Connector
4
Optical Drive Activity Lights
8
USB (Universal Serial Bus) 2.0 Ports
NOTE: When a device is displaying a diagnostic code.
NOTE: The Power On Light is normally green when the power is on.
Convertible Minitower Chassis 1 Front bezel appearance varies by double-clicking the Realtek HD Audio Manager icon in the Windows taskbar...
Maintenance and Service Guide: HP Compaq 8100 and 8180 Elite Business PC - Page 35
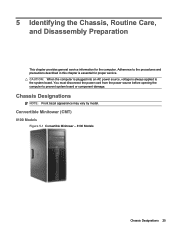
5 Identifying the Chassis, Routine Care, and Disassembly Preparation
This chapter provides general service information for proper service.
Convertible Minitower (CMT)
8100 Models
Figure 5-1 Convertible Minitower - 8100 Models
Chassis Designations 25 You must disconnect the power cord from the power source before opening the computer to the system board. Adherence to the ...
Maintenance and Service Guide: HP Compaq 8100 and 8180 Elite Business PC - Page 36
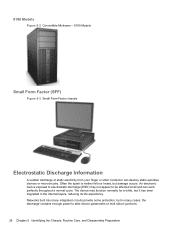
8180 Models
Figure 5-2 Convertible Minitower - 8180 Models
Small Form Factor (SFF)
Figure 5-3 Small Form Factor chassis
Electrostatic Discharge Information
A sudden discharge of static electricity from your finger or other conductor ...
Maintenance and Service Guide: HP Compaq 8100 and 8180 Elite Business PC - Page 44
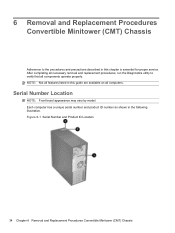
... serial number and product ID number as shown in this chapter is essential for proper service. Figure 6-1 Serial Number and Product ID Location
34 Chapter 6 Removal and Replacement Procedures Convertible Minitower (CMT) Chassis After completing all necessary removal and replacement procedures, run the Diagnostics utility to the procedures and precautions described in this...
Maintenance and Service Guide: HP Compaq 8100 and 8180 Elite Business PC - Page 46

...; Power outage ● Startup failure ● PC component (for the wrench- This lock prevents unauthorized access to the Desktop Management Guide. To obtain a FailSafe Key: ● Contact an authorized HP reseller or service provider. CAUTION: Regardless of the computer.
36 Chapter 6 Removal and Replacement Procedures Convertible Minitower (CMT) Chassis
For more information about...
Maintenance and Service Guide: HP Compaq 8100 and 8180 Elite Business PC - Page 48
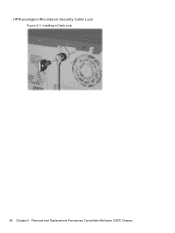
HP/Kensington MicroSaver Security Cable Lock
Figure 6-3 Installing a Cable Lock
38 Chapter 6 Removal and Replacement Procedures Convertible Minitower (CMT) Chassis
Maintenance and Service Guide: HP Compaq 8100 and 8180 Elite Business PC - Page 50
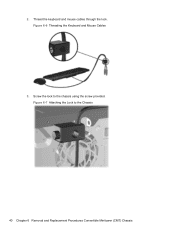
Screw the lock to the Chassis
40 Chapter 6 Removal and Replacement Procedures Convertible Minitower (CMT) Chassis 2. Thread the keyboard and mouse cables through the lock. Figure 6-6 Threading the Keyboard and Mouse Cables
3. Figure 6-7 Attaching the Lock to the chassis using the screw provided.
Maintenance and Service Guide: HP Compaq 8100 and 8180 Elite Business PC - Page 52
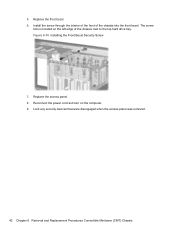
... Chapter 6 Removal and Replacement Procedures Convertible Minitower (CMT) Chassis Install the screw through the interior of the front of the chassis next to the top hard drive bay. Replace the access panel. 8. 5. The screw
hole is located on the computer. 9. Reconnect the power cord and turn on the left edge of the chassis into...
Maintenance and Service Guide: HP Compaq 8100 and 8180 Elite Business PC - Page 54
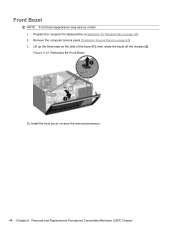
... may vary by model. 1. Figure 6-12 Removing the Front Bezel
To install the front bezel, reverse the removal procedure.
44 Chapter 6 Removal and Replacement Procedures Convertible Minitower (CMT) Chassis Prepare the computer for disassembly (Preparation for Disassembly on the side of the bezel (1), then rotate the bezel off the chassis (2). Remove the...
Maintenance and Service Guide: HP Compaq 8100 and 8180 Elite Business PC - Page 56
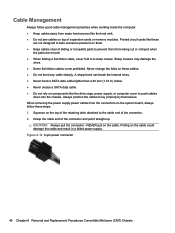
... like the drive cage, power supply, or computer cover to lay properly by themselves. Figure 6-14 6-pin power connector
46 Chapter 6 Removal and Replacement Procedures Convertible Minitower (CMT) Chassis Always position the cables to push cables
down into the chassis. Never change the folds on the system board, always follow good cable...
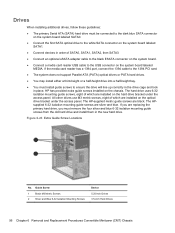
Maintenance and Service Guide: HP Compaq 8100 and 8180 Elite Business PC - Page 58
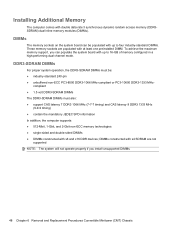
... of memory configured in a high-performing dual channel mode. To achieve the maximum memory support, you install unsupported DIMMs.
48 Chapter 6 Removal and Replacement Procedures Convertible Minitower (CMT) Chassis
DIMMs constructed with x4 SDRAM are populated with x8 and x16 DDR devices;
Maintenance and Service Guide: HP Compaq 8100 and 8180 Elite Business PC - Page 60
... must disconnect the power cord before touching.
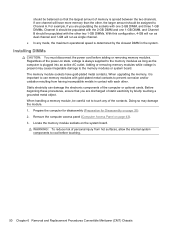
50 Chapter 6 Removal and Replacement Procedures Convertible Minitower (CMT) Chassis Regardless of the power-on page 43). 3. Static electricity can damage the electronic components of memory is plugged into an active AC outlet. Locate the memory module sockets on page 35). 2.
WARNING!
When upgrading the memory...
Maintenance and Service Guide: HP Compaq 8100 and 8180 Elite Business PC - Page 62
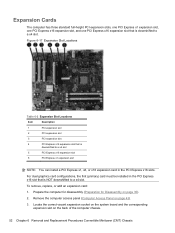
... the computer for disassembly (Preparation for Disassembly on the back of the computer chassis.
52 Chapter 6 Removal and Replacement Procedures Convertible Minitower (CMT) Chassis
Figure 6-17 Expansion Slot Locations
Table 6-2 Expansion Slot Locations
Item
Description
1
PCI expansion slot
2
PCI expansion slot
3
PCI expansion slot
4
PCI Express x16 expansion slot that is NOT...
Maintenance and Service Guide: HP Compaq 8100 and 8180 Elite Business PC - Page 64
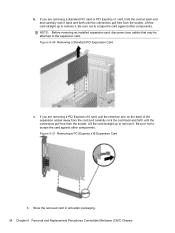
... the card straight up to scrape the card against other components. Store the removed card in anti-static packaging. 54 Chapter 6 Removal and Replacement Procedures Convertible Minitower (CMT) Chassis Lift the card straight up to the expansion card. NOTE: Before removing an installed expansion card, disconnect any cables that may be attached...
Maintenance and Service Guide: HP Compaq 8100 and 8180 Elite Business PC - Page 66
... Screws
Device 5.25-inch Drives 3.5-inch Hard Drives
56 Chapter 6 Removal and Replacement Procedures Convertible Minitower (CMT) Chassis
The HP-supplied metric guide screws are replacing the primary hard drive, you are black. Figure 6-23 Extra Guide Screw Locations
No. All other drives use M3 metric screws, eight of which are installed on...
Maintenance and Service Guide: HP Compaq 8100 and 8180 Elite Business PC - Page 90

... at: http://h18000.www1.hp.com/support/files.
80 Chapter 6 Removal and Replacement Procedures Convertible Minitower (CMT) Chassis NOTE: After installing a new processor onto the system board, always update ... processor (1) must be aligned with the provided alcohol pad and place it in its socket and close the retainer. If reusing the existing heat sink, go to evenly seat the heat sink on ...
Similar Questions

Hp Compaq Dc7600 Convertible Minitower Pc Can Change Motherboard?
(Posted by NANAPkboudh 9 years ago)

How To Run Hardware Test On Hp Compaq 8000 Elite Convertible Minitower
(Posted by bradearrin 9 years ago)
I Want To Know The Manufacturing Date Of Hp 500b Minitower Pc. Hu. Shaikh
I want to know the manufacturing date of hp 500b minitower pc. hu.shaikh
I want to know the manufacturing date of hp 500b minitower pc. hu.shaikh
(Posted by staticlifcpc 9 years ago)

How To Flash Hp Compaq Dc7800p Convertible Minitower Pc Bios Rom
(Posted by AJPCka 10 years ago)

Still One More Question On The Hp Compaq Dc7800 Convertible Minitower.
Iam so very greatful for the answer.still there is one problem left.when i try to insert a flash dri...
Iam so very greatful for the answer.still there is one problem left.when i try to insert a flash dri...
(Posted by rashidkamau 12 years ago)